This article is a continuation of the series of tutorials on the LPC2148 Microcontroller (ARM7). The aim of this series is to provide easy and practical examples that anyone can understand. In the previous tutorial, we have interfaced the LCD to print the custom character with LPC2148 (ARM7) using 8-bit mode. But here we will see LCD 4-bit interfacing with the LPC2148 Microcontroller.
Table of Contents
Prerequisites
Before we will start I would suggest you to read these topics. Then only you can understand this strongly. If you already know, please go ahead.
LCD 4-bit interfacing with LPC2148
Introduction
8-bit mode – Using 8 data lines in LCD (totally 8 data lines are there)
4-bit mode – Using only 4 data lines in the LCD module
8-bit mode is already working and that looks awesome. Then why we are going to 4-bit mode? This is the question that comes to every mind whenever I said 4-bit mode. Yeah, that 8-bit mode is nice. But but but… Just assume. I’m doing one project which requires more hardware (sensors or etc). So we need to reduce the GPIO as possible. In that time we can use this 4-bit mode and reduce the pin required for the LCD module. Am I right? Great. That’s why 4-bit mode also important. Already we know the LED’s operation. If we want to enable 4-bit mode we have to do small modifications in the normal method. Let’s see that.
In initializing time we have to give 0x28 command. That’s all.
LCD Initializing
void lcd_init()
{
    cmd(0x02);
    cmd(0x28);
    cmd(0x0c);
    cmd(0x06);
    cmd(0x80);
}
Sending command
Here everything is the same except the way of data writing. Here we have only 4 bits. So we need to send nibble by nibble. So first we need to send first nibble then followed by the second. See that code. I’m writing into the Port 0 ’s 4 – 7 bits. Because those 4 bits are connected to LCD.
void cmd(unsigned char a)
{
    IO0PIN&=0xffffff03;
    IO0PIN|=(a & 0xf0) << 0;
    IO0CLR|=bit(2);              //rs=0
    IO0CLR|=bit(1);             //rw=0
    IO0SET|=bit(3);             //en=1
    lcd_delay();
    IO0CLR|=bit(3);             //en=0

    IO0PIN&=0xffffff03;
    IO0PIN|=((a << 4)  & 0xf0) << 0;
    IO0CLR|=bit(2);             //rs=0
    IO0CLR|=bit(1);             //rw=0
    IO0SET|=bit(3);             //en=1
    lcd_delay();
    IO0CLR|=bit(3);             //en=0
}
Sending Data
Same as sending the command.
void dat(unsigned char b)
{
    IO0PIN&=0xffffff03;
    IO0PIN|=(b & 0xf0) << 0;
    IO0SET|=bit(2);         //rs=1
    IO0CLR|=bit(1);         //rw=0
    IO0SET|=bit(3);         //en=1
    lcd_delay();
    IO0CLR|=bit(3);         //en=0

    IO0PIN&=0xffffff03;
    IO0PIN|=((b << 4)  & 0xf0) << 0;
    IO0SET|=bit(2);         //rs=1
    IO0CLR|=bit(1);         //rw=0
    IO0SET|=bit(3);         //en=1
    lcd_delay();
    IO0CLR|=bit(3);         //en=0
}
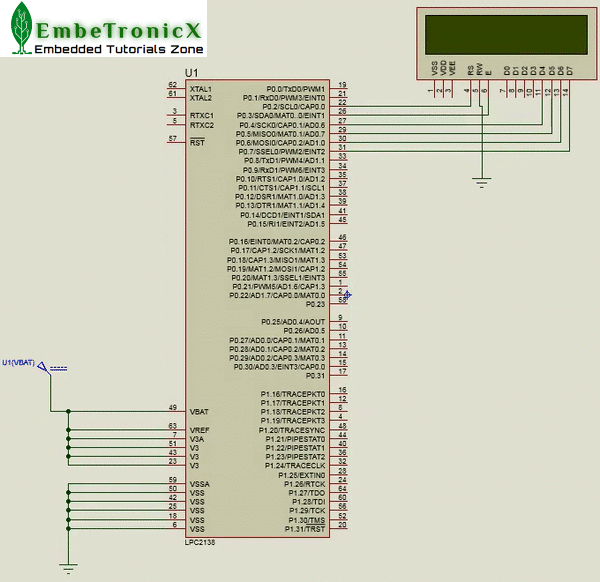
Circuit Diagram

Code
#include<lpc214x.h>

#define bit(x) (1<<x)

void lcd_init();
void cmd(unsigned char a);
void dat(unsigned char b);
void show(unsigned char *s);
void lcd_delay();

#define delay for(i=0;i<55000;i++)

unsigned int range=0,i;

int main()
{
    VPBDIV=0x01;                 // PCLK = 60MHz
    IO0DIR=0x0FC;
    lcd_init();
    cmd(0x89);
    show("www.embetronicx.com");

    while(1) {
        cmd(0x18);
        delay;
    }
}

void lcd_init()
{
        cmd(0x02);
    cmd(0x28);
    cmd(0x0c);
    cmd(0x06);
    cmd(0x80);
}

void cmd(unsigned char a)
{
    IO0PIN&=0xffffff03;
    IO0PIN|=(a & 0xf0) << 0;
    IO0CLR|=bit(2);                //rs=0
    IO0CLR|=bit(1);                //rw=0
    IO0SET|=bit(3);                 //en=1
    lcd_delay();
    IO0CLR|=bit(3);                 //en=0

    IO0PIN&=0xffffff03;
    IO0PIN|=((a << 4)  & 0xf0) << 0;
    IO0CLR|=bit(2);                //rs=0
    IO0CLR|=bit(1);                //rw=0
    IO0SET|=bit(3);                 //en=1
    lcd_delay();
    IO0CLR|=bit(3);                 //en=0
}

void dat(unsigned char b)
{
    IO0PIN&=0xffffff03;
    IO0PIN|=(b & 0xf0) << 0;
    IO0SET|=bit(2);                //rs=1
    IO0CLR|=bit(1);                //rw=0
    IO0SET|=bit(3);            //en=1
    lcd_delay();
    IO0CLR|=bit(3);            //en=0

    IO0PIN&=0xffffff03;
    IO0PIN|=((b << 4)  & 0xf0) << 0;
    IO0SET|=bit(2);                //rs=1
    IO0CLR|=bit(1);                //rw=0
    IO0SET|=bit(3);            //en=1
    lcd_delay();
    IO0CLR|=bit(3);            //en=0
}

void show(unsigned char *s)
{
    while(*s) {
        dat(*s++);
    }
}

void lcd_delay()
    {
    unsigned int i;
    for(i=0;i<=1000;i++);
}
Output
 [ Please find the output image Here ]
In our next tutorial, we will see how to interface the DC motor with LPC2148 (ARM7). If you want to use FreeRTOS on LPC2148, then please refer FreeRTOS series.
You can also read the below tutorials.
Embedded Software | Firmware | Linux Devic Deriver | RTOS
Hi, I am a tech blogger and an Embedded Engineer. I am always eager to learn and explore tech-related concepts. And also, I wanted to share my knowledge with everyone in a more straightforward way with easy practical examples. I strongly believe that learning by doing is more powerful than just learning by reading. I love to do experiments. If you want to help or support me on my journey, consider sharing my articles, or Buy me a Coffee! Thank you for reading my blog! Happy learning!
