
This article is a continuation of the series on Unit testing in C and carries the discussion on Unit Testing and its implementation. The aim of this series is to provide easy and practical examples that anyone can understand. This is the Mock using CMock in Embedded – Unit testing in C tutorial Part 5.
You can also read the unit testing introduction, ceedling installation, Unity, Code coverage, compilation steps in c, pointers in c, and macro vs inline.
Table of Contents
Mock using CMock in Embedded
Prerequisites
Before starting CMock Mocking, I would recommend you explore the relevant topics by using the below link.
Introduction
In our last tutorial, we have used only one module. In that module, we have not called any other module. So we have just used unity to test that. Let’s discuss one scenario.
I have one function called
do_bit_man(same from last tutorial). In that functiondo_bit_man, I am accessing hardware or another module. If you access hardware it won’t work. Because we are going to run this unit test without hardware. And also our intention is to test only that function (do_bit_man), not the hardware. So, How will we test that function (do_bit_man) now?
In this case, mocking will come into the picture. When your code depends on hardware or another module, you need to mock those hardware or other module functions.
What is Mocking?
In simple English, Mocking is making a replica or imitation of something. Like that, in coding mocking is a method, that simulates the behavior of a real method/object in controlled ways. In other words, Mocking is a way to replace some functions with alternate implementations (“mocks”).
An object that you want to test may have dependencies on other modules. To isolate the behavior of the code or function you want to test, you need to replace the other dependencies with mocks. That will create some fake functions in controlled ways. Using those fake functions, we can eliminate the dependencies and test the code that we want to test.
So, Mocks are used to break module dependencies so that they can be tested in isolation. There are many frameworks available to do so. But ceedling has an inbuilt tool for doing that mocking. That is CMock. So we don’t need to install anything.
CMock
CMock is a framework for generating mocks based on a header API. All you have to do to use CMock is add a mock header file to the test suite file. You can generate the mock functions using #include "mock_example.h". Here, example.h is your file to create a mock.
You can use these mocks to simulate different return values and to verify that your code calls functions in a particular order and with specific arguments.
You will understand very clearly if you go through the example below.
What happens if we don’t use Mock?
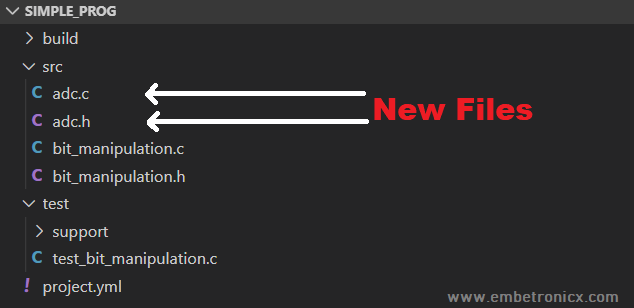
I have just used the last tutorial‘s code. On top of that, I have made the below changes.
- I have created new source files (
adc.candadc.hfiles) where theadc_readfunction is present. - In
do_bit_manfunction, We need to print whether the temperature is high or low. - I have not made any changes in
test_bit_manipulation.c. I have just added#include "adc.h".
So, now the file structure will be, like the below image.
Note: These adc.c and adc.h files are just for explaining the concept. So there, we aren’t actually accessing the hardware. So don’t look for any logical mistakes like movies. Hehe 😆
I have attached the source code for your reference.
Code:
adc.h
/* This source is just for understanding purpose.
** There is no logic here. We are not going to use
** this code. This will be used for understand the
** Unit test.
*/

#ifndef ADC_H
#define ADC_H

/* Read ADC value */
int adc_read( void );

#endif // ADC_H
adc.c
/* This source is just for understanding purpose.
** There is no logic here. We are not going to use
** this code outside. This will be used for understand the
** Unit test mock.
*/

#include "adc.h"

//We will assume that, ADC value will be updated in this value.
volatile int adc_value = 0;


int adc_read( void )
{
    /* We will assume that some other function outside is updating this
    ** adc_value variable. This variable will have updated adc's value.
    ** So, Simply return that variable for explain mock test.
    */
    return adc_value;
}
bit_manipulation.c
#include "bit_manipulation.h"
#include "adc.h"

uint8_t Jill = 0x00;
uint8_t Jung = 0xFF;
uint8_t Jukk = 0x00;


int8_t do_bit_man(int8_t position)
{
    if( ( position < 0 ) || ( position > 7 ) )
    {
        //positon should be 0 to 7. Because we are going to modify 8 bit value.
        return -1;
    }

    //set particular bit
    Jill |= ( 1 << position );

    //clear particular bit
    Jung &= ~( 1 << position );

    //toggle particular bit
    Jukk ^= ( 1 << position );

    int result = adc_read();

    if( result >= 30 )
    {
        printf("Temperature is High\n");
    }
    else
    {
        printf("Temperature is Low\n");
    }

    return 0;
}
bit_manipulation.h
#ifndef BIT_MANIPULATION_H
#define BIT_MANIPULATION_H

#include <stdio.h>
#include <stdint.h>

int8_t do_bit_man(int8_t position);

#endif // BIT_MANIPULATION_H
test_bit_manipulation.c
#include "unity.h"

#include "bit_manipulation.h"
#include "adc.h"

extern uint8_t Jill;
extern uint8_t Jung;
extern uint8_t Jukk;

void setUp(void)
{
    Jill = 0x00;
    Jung = 0xFF;
    Jukk = 0x00;
}

void tearDown(void)
{
}

//Test Case 0
void test_do_bit_man_0(void)
{
    int8_t result;

    result = do_bit_man( 15 );

    TEST_ASSERT_EQUAL_INT8( -1, result );

    TEST_ASSERT_EQUAL_INT8( 0x00, Jill );
    TEST_ASSERT_EQUAL_INT8( 0xFF, Jung );
    TEST_ASSERT_EQUAL_INT8( 0x00, Jukk );
}

//Test Case 1
void test_do_bit_man_1(void)
{
    int8_t result;

    result = do_bit_man( -1 );

    TEST_ASSERT_EQUAL_INT8( -1, result );

    TEST_ASSERT_EQUAL_INT8( 0x00, Jill );
    TEST_ASSERT_EQUAL_INT8( 0xFF, Jung );
    TEST_ASSERT_EQUAL_INT8( 0x00, Jukk );
}

//Test Case 2
void test_do_bit_man_2(void)
{
    int8_t result;
    int8_t position = 5;
    result = do_bit_man( position );

    TEST_ASSERT_EQUAL_INT8( 0, result );

    TEST_ASSERT_BIT_HIGH( position, Jill );
    TEST_ASSERT_BIT_LOW( position, Jung );
    TEST_ASSERT_BIT_HIGH( position, Jukk );
}
That’s all. Let’s run the unit test using ceedling test:all.
simple_prog>ceedling test:all


Test 'test_bit_manipulation.c'
------------------------------
Generating runner for test_bit_manipulation.c...
Compiling test_bit_manipulation_runner.c...
Compiling test_bit_manipulation.c...
Compiling unity.c...
Compiling bit_manipulation.c...
Compiling adc.c...
Compiling cmock.c...
Linking test_bit_manipulation.out...
Running test_bit_manipulation.out...

-----------
TEST OUTPUT
-----------
[test_bit_manipulation.c]
  - "Temperature is Low"

--------------------
OVERALL TEST SUMMARY
--------------------
TESTED:  3
PASSED:  3
FAILED:  0
IGNORED: 0
Wahoo!!! All the test cases were passed. Then why do we need to mock here? Okay, let’s check the code coverage.
Generate the report using the below commands.
ceedling gcov:allceedling utils:gcov
This is the result. Your result will be stored in simple_prog\build\artifacts\gcov.

Here, adc.c is 100% but bit_manipulation.c is 90.9%. adc.c is out of scope for us. Because we are testing do_bit_man not adc_read. Why did this 9.1% get reduced in bit_manipulation.c? Let’s see the complete report of bit_manipulation.c.
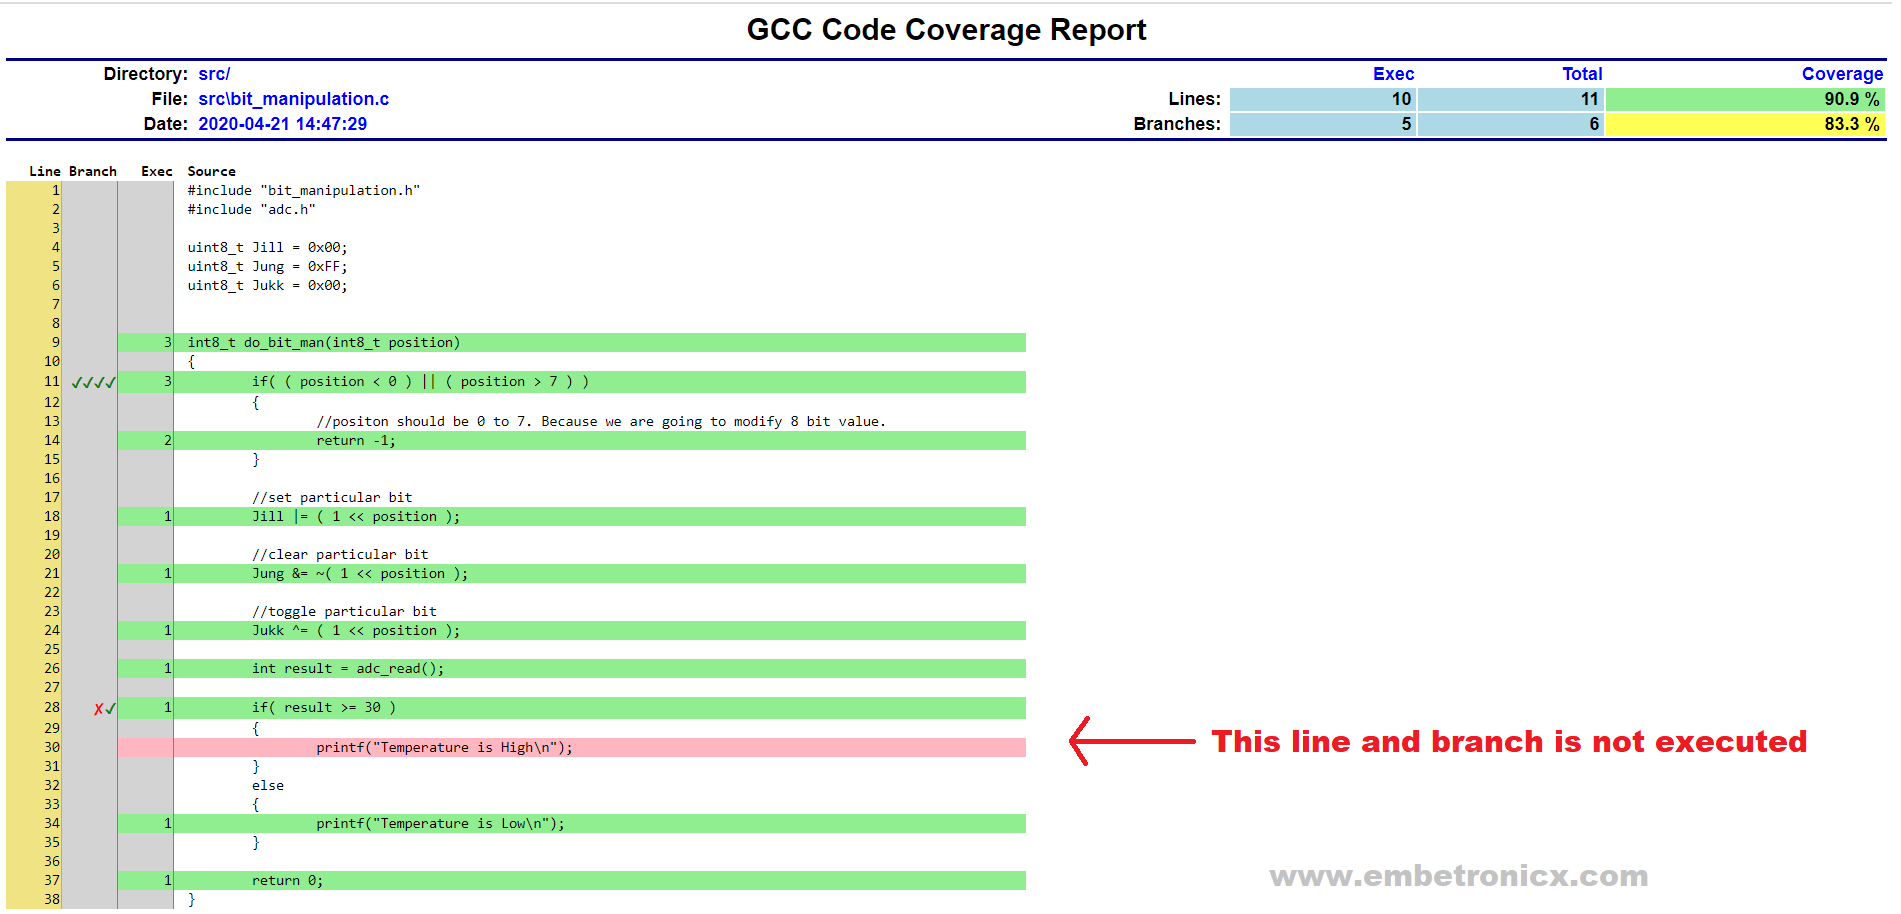
Here We have missed one line and one branch. This branch (if) is not been covered by our unit testing code. What do we have to do in order to cover that branch? whenever you call adc_read, always it will return 0. Because the hardware is not connected and it is not running in hardware. So, how will adc_read return more than 30?
Even If you add a new test case, you cannot control the hardware and adc.c file. Because it is not part of the module which you are testing. In order to control the functions of another module (dependencies), you need to use mock. Now we will see how mock is working.
Generating Mock using CMock
To generate a mock for the header file, all we need to do is include the mock header file name in one of our unit test files. The mock header file name is the original header name prepended with mock_.
For example, to create mocks for the functions in adc.h, we just include mock_adc.h in our test_bit_manipulation.c instead.
#include "mock_adc.h"
Ceedling automatically creates this mock_adc.h file and a corresponding implementation in mock_adc.c by using CMock. Let’s test this using ceedling test:all.
simple_prog>ceedling test:all


Test 'test_bit_manipulation.c'
------------------------------
Generating include list for adc.h...
Creating mock for adc...
Generating runner for test_bit_manipulation.c...
Compiling test_bit_manipulation_runner.c...
Compiling test_bit_manipulation.c...
Compiling mock_adc.c...
Compiling unity.c...
Compiling bit_manipulation.c...
Compiling cmock.c...
Linking test_bit_manipulation.out...
Running test_bit_manipulation.out...

-------------------
FAILED TEST SUMMARY
-------------------
[test_bit_manipulation.c]
  Test: test_do_bit_man_2
  At line (50): "Function adc_read.  Called more times than expected."

--------------------
OVERALL TEST SUMMARY
--------------------
TESTED:  3
PASSED:  2
FAILED:  1
IGNORED: 0

---------------------
BUILD FAILURE SUMMARY
---------------------
Unit test failures.
Now you have forgotten about the errors. We will discuss that later. Just look into line number 7 of the above output. You can see that it is creating mock functions for adc. Then see line number 11. It has generated a mock file called mock_adc.c and compiled it. So this is how it is generating mock files.
For each function present in adc.h, It generates a bunch of new functions that you use to control the mock function. These new functions are based on the name and parameters of the original function. The below functions will be generated for adc_read() function.
adc_read_ExpectAndReturn(int return_value)adc_read_IgnoreAndReturn(int return_value)adc_read_StubWithCallback(callback)
The functions generated may vary based on the header file (mock_filename.h) and config file(project.yml). This means it may generate more functions or fewer functions based on your configurations and header file.
If you want to see all the mock control functions that CMock has generated for a particular module, you can find them in the .h files in build/test/mocks.
By using this Mocked version, you can then verify that it receives the data you want as an argument, return whatever data you desire, make it throw errors when you want, and more…
We will see all the possible generated functions below.
Mock Variants
There are multiple variants of mock functions that will be generated. We will see some of the most used variants below.
Expect
The expect functions are always generated.
| Original Function | Generated Mock Function | Details |
| void func(void) | void func_Expect(void) | By calling this, you are telling CMock that you expect that function to be called during your test. This won’t expect any arguments and won’t return anything. |
| void func(params) | void func_Expect(expected_params) | By calling this, you are telling CMock that you expect that function to be called during your test with the given expected_params. It won’t return anything. |
| retval func(void) | void func_ExpectAndReturn(retval_to_return) | By calling this, you are telling CMock that you expect that function to be called during your test. It won’t expect any argument and It will return the retval_to_return. |
| retval func(params) | void func_ExpectAndReturn(expected_params, retval_to_return) | By calling this, you are telling CMock that you expect that function to be called during your test with the given expected_params. It will return the retval_to_return. |
Example:
Let’s assume I am going to test this function.
int gpio_num = 10;

void Test_gpio( void )
{
  int result = 0;

  result = gpio_read(gpio_num);
}
Here, gpio_read() takes one argument which is gpio number. If we want to mock this gpio_read function, We have to use gpio_read_ExpectAndReturn(expected_params, retval_to_return). Because it has an argument and returns value. The test case will be as below.
/*
** This test case will pass. Because we have already told that
** We are expecting argument as 10 and it should return 1.
** In our Test_gpio function we are passing 10 as arg.
** So this test will pass.
*/
void test_test_gpio_0(void)
{
  gpio_read_ExpectAndReturn(10, 1);

  Test_gpio();
}

/*
** This test case will fail. Because we have already told that
** We are expecting argument as 12 and it should return 1.
** In our Test_gpio function we are passing 10 as arg.
** So this test will fail.
*/
void test_test_gpio_1(void)
{
  gpio_read_ExpectAndReturn(12, 1);

  Test_gpio();
}
So based on your arguments and return value, you can use the respective variant of the Expect mock functions.
Ignore Arguments
If you don’t want to check the argument that is passed and you want to use a similar kind of Expect variants then you can use this method. This will just ignore the argument. This feature is not enabled by default. You have to add ignore_arg under plugin in the project.yml file. Please refer below.
| Before change (project.yml) | After change (project.yml) |
  :plugins:
    - :ignore
    - :callback
|
  :plugins:
    - :ignore
    - :callback
    - :ignore_arg
|
This is particularly useful when that argument is a pointer to a value that is supposed to be filled in by the function. This will just ignore the argument that you are making. The rest of the other arguments will be checked.
| Original Function | Generated Mock Function | Details |
| void func(void) | nothing | Mock function won’t be generated since it doesn’t have any arguments. |
| void func(paramName) | void func_IgnoreArg_paramName(void) | By calling this, you are telling CMock to ignore the argument (paramName). It should be used along with expect variants. See the example below. |
Example:
Let’s assume I am going to test this function.
int gpio_num = 10;

void Test_gpio( void )
{
  int result = 0;

  result = gpio_read(gpio_num);
}
Here, gpio_read() takes one argument which is gpio_num. We are going to ignore that gpio_num and return 1. The test case will be as below.
/*
** We have told that we are expecting argument as 15
** and it should return 1 using _ExpectAndReturn.
** But in the next line we told to ignore the argument gpio_num.
** So this won't check the gapio_num argument. It won't give
** error even values are not matching. So this test will pass.
*/
void test_test_gpio_0(void)
{
  gpio_read_ExpectAndReturn(15, 1);
  gpio_read_IgnoreArg_gpio_num();

  Test_gpio();
}
Note: When you use this ignore function, it will ignore the particular argument until this current test case. You may call multiple instances of this to ignore multiple arguments after each expectation if desired.
So based on your arguments and return value, you can use the respected variant of the IgnoreArg mock functions.
Array
When you have an array argument, then you may need to use this feature. This feature is not enabled by default. You have to add array under plugin in the project.yml file. Please refer below.
| Before change (project.yml) | After change (project.yml) |
  :plugins:
    - :ignore
    - :callback
|
  :plugins:
    - :ignore
    - :callback
    - :array
|
Now, CMock provides an ExpectWithArray function your each mocked function that contains pointer arguments. For each pointer argument, the ExpectWithArray function takes an additional argument that specifies the number of array elements to compare.
| Original Function | Generated Mock Function | Details |
| void func(void) | nothing | It won’t generate any mocked functions. Because an additional function is only generated if the params list contains pointers |
| void func(ptr * param, other_params) | void func_ExpectWithArray(ptr* param, int param_depth, other_params) | It will add one more argument after the pointer parameter which tells the depth of the array. |
| void func(Other_params, ptr * param) | void func_ExpectWithArray(other_params, ptr* param, int param_depth) | It will add one more argument after the pointer parameter which tells the depth of the array. |
| retval func(Other_params, ptr * param) | void func_ExpectWithArrayAndReturn(other_params, ptr* param, int param_depth, retval_to_return) | It will add one more argument after the pointer parameter which tells the depth of the array. And it returns the retval_to_return. |
Example:
Let’s assume I am going to test this function.
int gpio_num[5] = {1, 2, 3, 4, 5};

void Test_gpio( void )
{
  int result = 0;

  result = gpio_read(gpio_num);
}
Here, gpio_read() takes one argument which is gpio_num (int array). The test case will be as below.
/*
** We have told that we are expecting array argument ({1, 2, 3, 4, 5}) it has 5 elements
** and it should return 1 using _ExpectWithArrayAndReturn.
** In our code we are passing the same value. So this test will pass.
*/
void test_test_gpio_0(void)
{
  int expected_data[] = {1, 2, 3, 4, 5};
  gpio_read_ExpectWithArrayAndReturn(expected_data, 5, 1);

  Test_gpio();
}

/*
** We have told that we are expecting array argument ({10, 20, 30, 40, 50}) it has 5 elements
** and it should return 1 using _ExpectWithArrayAndReturn.
** But in our code we are passing {1, 2, 3, 4, 5}. It is not matching with this expected value.
** In our code we are passing the same value. So this test will fail.
*/
void test_test_gpio_1(void)
{
  int expected_data[] = {10, 20, 30, 40, 50};
  gpio_read_ExpectWithArrayAndReturn(expected_data, 5, 1);

  Test_gpio();
}
So based on your arguments and return value, you can use the respective variant of the Array mock functions.
Ignore
If you don’t want to care about any functions then you can use this feature. This feature is enabled by default.
| Original Function | Generated Mock Function | Details |
| void func(void) | void func_Ignore(void) | By calling this, you are telling CMock to ignore any of this call. |
| void func(params) | void func_Ignore(void) | By calling this, you are telling CMock to ignore any of this call. |
| retval func(void) | void func_IgnoreAndReturn(retval_to_return) | By calling this, you are telling CMock to ignore any of this call and return this retval_to_return. |
| retval func(params) | void func_IgnoreAndReturn(retval_to_return) | By calling this, you are telling CMock to ignore any of this call and return this retval_to_return. |
Note: These Ignore only needs to be called once per test. It will then ignore any further calls to that particular mock.
Example:
Let’s assume I am going to test this function.
int gpio_num = 10;

void Test_gpio( void )
{
  int result = 0;

  result = gpio_read(gpio_num);
  result = gpio_read(gpio_num);
  result = gpio_read(gpio_num);
  result = gpio_read(gpio_num);
}
Here, gpio_read() takes one argument which is gpio_num. We are going to ignore these calls and return 1. The test case will be as below.
/*
** We have told that just ignore the function and return 1.
** So this test will pass.
*/
void test_test_gpio_0(void)
{
  //Only using one time is enough even you have called multiple time in code
  gpio_read_IgnoreAndReturn(1);

  Test_gpio();
}
So based on your arguments and return value, you can use the respective variant of the Ignore mock functions.
ReturnThruPtr
In embedded, sometimes you may need to pass a pointer to another module and get data from that pointer. In such a case, you can use this feature. This feature is not enabled by default. You have to add return_thru_ptr under plugin in the project.yml file. Please refer below.
| Before change (project.yml) | After change (project.yml) |
  :plugins:
    - :ignore
    - :callback
|
  :plugins:
    - :ignore
    - :callback
    - :return_thru_ptr
|
Now, CMock provides an ReturnThruPtr function your each mocked function that contains pointer arguments.
| Original Function | Generated Mock Function | Details |
| void func(param) | void func_ReturnThruPtr_paramName(val_to_return) | This will be widely used for writing the data into int, struct etc. |
| void func(param) | void func_ReturnArrayThruPtr_paramName(cal_to_return, len) | This will be used for arrays |
| void func(param) | void func_ReturnMemThruPtr_paramName(val_to_return, size) | This will be used for memory and struct. |
Example:
Let’s assume I am going to test this function.
int gpio_num[3] = {0};

void Test_gpio( void )
{
  int result = 0;

  //This will write 3 elements in the gpio_num pointer
  gpio_read(gpio_num);

  if( (gpio_num[0] == 0x01) && (gpio_num[1] == 0x02) && (gpio_num[2] == 0x03) )
  {
    result = 0;
  }
  else
  {
     result = 1;
  }
}
Here, gpio_read() takes one argument which is gpio_num (pointer). In this case, we should not care about the argument. Because it is taking pointers. We don’t know which address it is passing.
So we have to ignore that. But we need to write 3 elements in that pointer. Then only we can check that if else part. So we are going to use this feature and write data through the pointer. The test case will be as below.
/*
** We have told that ignore the arg and write the value.
** and it should return 1 using _ExpectWithArrayAndReturn.
** In our code we are passing the same value. So this test will pass.
*/
void test_test_gpio_0(void)
{
  int expected_data[] = {1, 2, 3};
  gpio_read_Expect(0);                                      //This will tell cmock to expect the function with 0 arg.
  gpio_read_IgnoreArg_gpio_num();                           //This will tell cmock to ignore the arg
  gpio_read_ReturnArrayThruPtr_gpio_num(expected_data, 3);  //This will write the 3 elements data to that pointer when this func called..

  Test_gpio();
}
So based on your arguments and return value, you can use the respective variant of the ReturnThruPtr mock functions.
Callback
If you want to mock something complicated, then you can use this feature. This feature is enabled by default. This will create a mock function called _StubWithCallback.
| Original Function | Generated Mock Function | Details |
| void func(void) | void func_StubWithCallback(Callback) | You have to pass your own callback function’s pointer as an argument. That callback will be called when that original function has been called. This callback function should match the original function. |
So if you have a function that looks like this:
bool org_function (uint8_t a_value);
Your callback function needs to look like this:
bool callback_function_mock (uint8_t a_value, int call_count);
You need to provide one more extra argument like the above. That will be used to track how many times the callback is called.
Note: The name of the callback function can be anything. But it should not match with original name.Whatever you return from your callback is what is provided to the calling function during your test — just like the custom callback was called instead of the mock function.
You will understand that better way If you see the example below.
Example:
Let’s assume I am going to test this function.
int gpio_num = 10;

void Test_gpio( void )
{
  int result = 0;

  result = gpio_read(gpio_num);
}
Here, gpio_read() takes one argument which is gpio number. To test this case we are going to create the custom callback and register that using gpio_read_StubWithCallback.
So this callback function will be called when you call the gpio_read function in the code. That custom callback function should match with the original function of arg and return type.
The test case will be as below.
/* Custom callback.
** This fucntion will be called when Test_gpio calls gpio_read funciton
*/
int custom_callback_gpio_read(int gpio_num, int num_of_call)
{
  if( gpio_num == 1 )
  {
     return gpio_num;
  }
  else
  {
    return 0;
  }
}

void test_test_gpio_0(void)
{
  /* Registering custom callback */
  gpio_read_StubWithCallback(mock_adc_get_sample);

  Test_gpio();
}
So according to the above example, custom_callback_gpio_read will be getting called when Test_gpio calls the custom_callback_gpio_read returns 0 if gpio_num is not 1. Otherwise, it will return 1.
I think now you will have a better idea about Mock using CMock in Embedded. So now we will come to the original example. I expect you to achieve the code coverage to 100% by using mock functions by yourself. If you have any doubt you can refer to the below answer.
The solution of the original code
You can find the original code here. Now we are going to modify the test_bit_manipulation.c in order to achieve 100% code coverage. In the code, we have two branches which are if and else. So we are going to update our old test_bit_manipulation.c with cmock.
Please find the below code.
test_bit_manipulation.c
#include "unity.h"

#include "bit_manipulation.h"
#include "mock_adc.h"

extern uint8_t Jill;
extern uint8_t Jung;
extern uint8_t Jukk;

void setUp(void)
{
    Jill = 0x00;
    Jung = 0xFF;
    Jukk = 0x00;
}

void tearDown(void)
{
}

//Test Case 0
void test_do_bit_man_0(void)
{
    int8_t result;

    result = do_bit_man( 15 );

    TEST_ASSERT_EQUAL_INT8( -1, result );

    TEST_ASSERT_EQUAL_INT8( 0x00, Jill );
    TEST_ASSERT_EQUAL_INT8( 0xFF, Jung );
    TEST_ASSERT_EQUAL_INT8( 0x00, Jukk );
}

//Test Case 1
void test_do_bit_man_1(void)
{
    int8_t result;

    result = do_bit_man( -1 );

    TEST_ASSERT_EQUAL_INT8( -1, result );

    TEST_ASSERT_EQUAL_INT8( 0x00, Jill );
    TEST_ASSERT_EQUAL_INT8( 0xFF, Jung );
    TEST_ASSERT_EQUAL_INT8( 0x00, Jukk );
}

//Test Case 2
void test_do_bit_man_2(void)
{
    int8_t result;
    int8_t position = 5;

    //This will return 35, which prints Temperature is High
    adc_read_ExpectAndReturn(35);

    result = do_bit_man( position );

    TEST_ASSERT_EQUAL_INT8( 0, result );

    TEST_ASSERT_BIT_HIGH( position, Jill );
    TEST_ASSERT_BIT_LOW( position, Jung );
    TEST_ASSERT_BIT_HIGH( position, Jukk );
}

//Test Case 3
void test_do_bit_man_3(void)
{
    int8_t result;
    int8_t position = 5;

    //This will return 10, which prints Temperature is Low
    adc_read_ExpectAndReturn(10);

    result = do_bit_man( position );

    TEST_ASSERT_EQUAL_INT8( 0, result );

    TEST_ASSERT_BIT_HIGH( position, Jill );
    TEST_ASSERT_BIT_LOW( position, Jung );
    TEST_ASSERT_BIT_HIGH( position, Jukk );
}
I have added CMock functions to Test cases 3 and 4. Let’s see the code coverage by using the below commands.
ceedling gcov:allceedling utils:gcov
ceedling gcov:all


Test 'test_bit_manipulation.c'
------------------------------
Compiling test_bit_manipulation_runner.c...
Compiling test_bit_manipulation.c...
Compiling mock_adc.c...
Compiling unity.c...
Compiling bit_manipulation.c with coverage...
Compiling cmock.c...
Linking test_bit_manipulation.out...
Running test_bit_manipulation.out...

-----------------
GCOV: TEST OUTPUT
-----------------
[test_bit_manipulation.c]
  - "Temperature is High"
  - "Temperature is Low"

--------------------------
GCOV: OVERALL TEST SUMMARY
--------------------------
TESTED:  4
PASSED:  4
FAILED:  0
IGNORED: 0


---------------------------
GCOV: CODE COVERAGE SUMMARY
---------------------------
bit_manipulation.c Lines executed:100.00% of 11
bit_manipulation.c Branches executed:100.00% of 6
bit_manipulation.c Taken at least once:100.00% of 6
bit_manipulation.c Calls executed:100.00% of 3

Could not find coverage results for src/adc.c
We have achieved 100%. Let’s see the detailed report. Your result will be stored in simple_prog\build\artifacts\gcov.
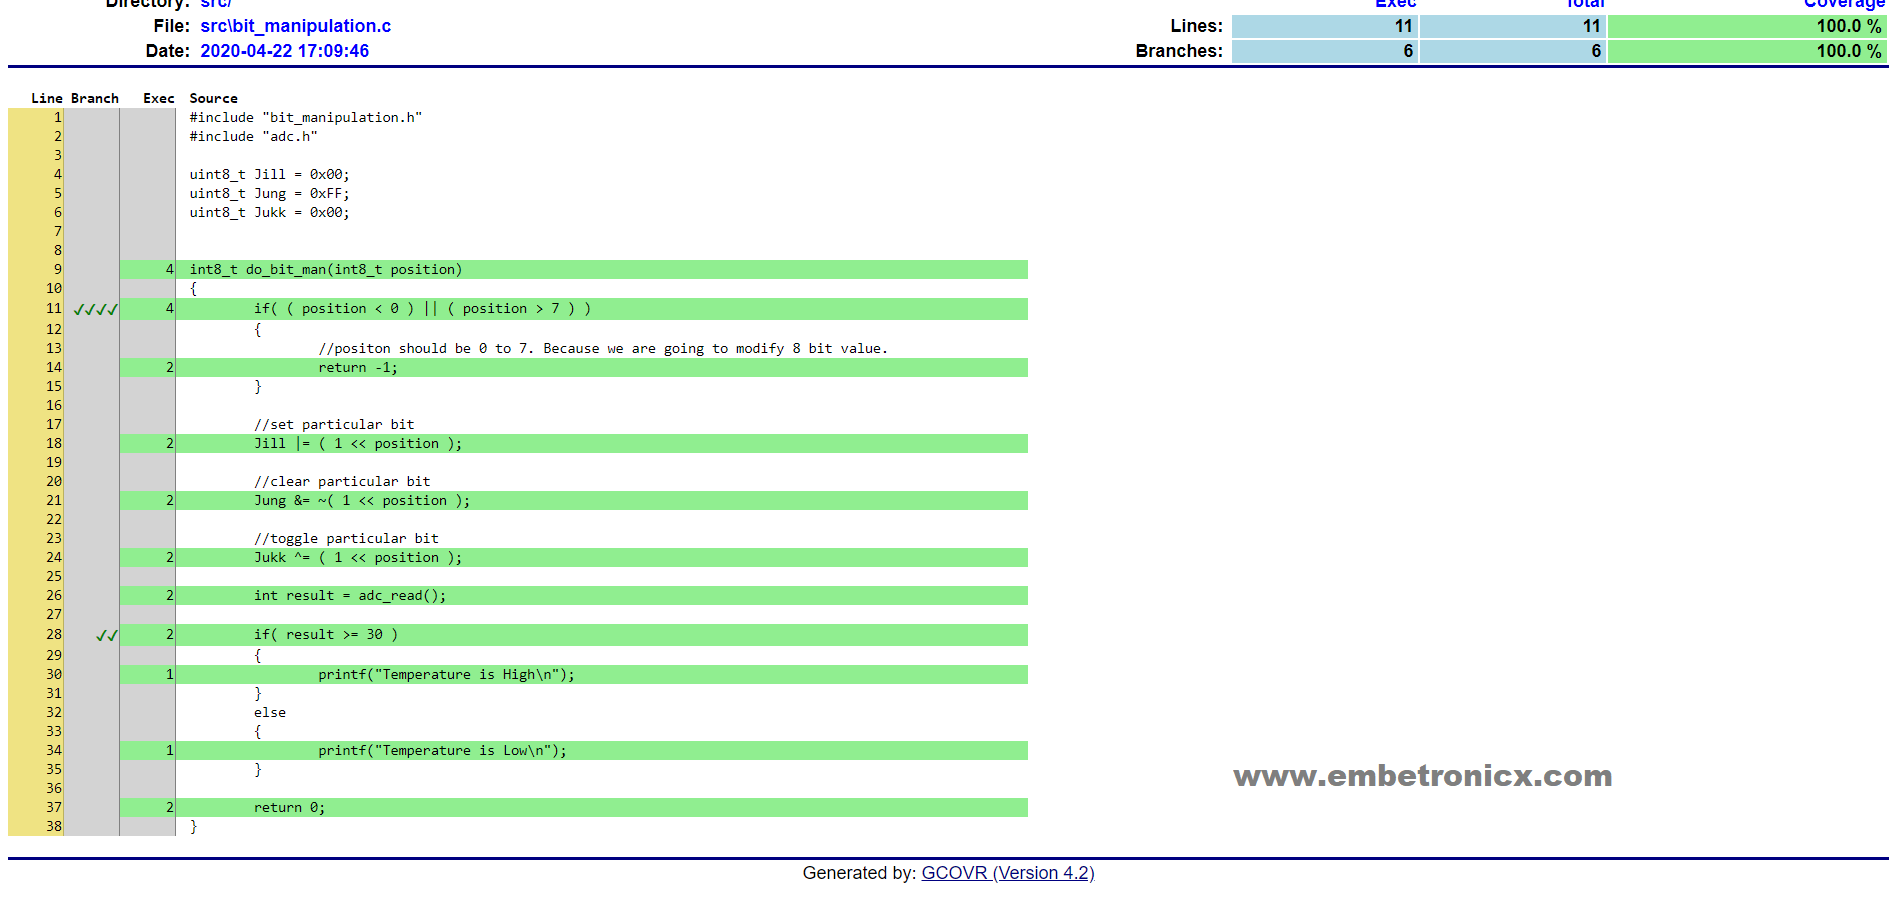 Now you can see that we have covered all the branches and lines. You can try from your side and confirm the same.
What if I have created Mock and not using it in our test file?
Your test case will fail like this.
simple_prog>ceedling test:all


Test 'test_bit_manipulation.c'
------------------------------
Generating include list for adc.h...
Creating mock for adc...
Generating runner for test_bit_manipulation.c...
Compiling test_bit_manipulation_runner.c...
Compiling test_bit_manipulation.c...
Compiling mock_adc.c...
Compiling unity.c...
Compiling bit_manipulation.c...
Compiling cmock.c...
Linking test_bit_manipulation.out...
Running test_bit_manipulation.out...

-------------------
FAILED TEST SUMMARY
-------------------
[test_bit_manipulation.c]
  Test: test_do_bit_man_2
  At line (50): "Function adc_read.  Called more times than expected."

--------------------
OVERALL TEST SUMMARY
--------------------
TESTED:  3
PASSED:  2
FAILED:  1
IGNORED: 0

---------------------
BUILD FAILURE SUMMARY
---------------------
Unit test failures.
What if I want to mock more functions in one unit test?
Let’s take the below example.
int gpio_num = 10;

void Test_gpio( void )
{
  int result = 0;

  //read gpio
  result = gpio_read(gpio_num);

  //write gpio
  result = gpio_write(gpio_num, 0);

  //toggle gpio
  result = gpio_toggle(gpio_num);
}
In the above example, We need to mock the three functions (gpio_read, gpio_write, gpio_toggle).
So you have to use the mocking function in the correct order like how they have called in the source code. Please refer to the example below.
void test_test_gpio_0(void)
{
  gpio_read_ExpectAndReturn(10, 1);
  gpio_write_ExpectAndReturn(10, 0, 1);
  gpio_toggle_ExpectAndReturn(10, 1);

  Test_gpio();
}
If you change the order then your test case will fail and you will get an error. If you don’t want to follow the order then you have to change the settings of the project.yml file. We will see how to do that in our next tutorial.
That’s all about Mock using CMock in Embedded.
You can also read the below tutorials.
Embedded Software | Firmware | Linux Devic Deriver | RTOS
Hi, I am a tech blogger and an Embedded Engineer. I am always eager to learn and explore tech-related concepts. And also, I wanted to share my knowledge with everyone in a more straightforward way with easy practical examples. I strongly believe that learning by doing is more powerful than just learning by reading. I love to do experiments. If you want to help or support me on my journey, consider sharing my articles, or Buy me a Coffee! Thank you for reading my blog! Happy learning!
