
This article is a continuation of the series on Unit testing in C and carries the discussion on Unit Testing and its implementation. The aim of this series is to provide easy and practical examples that anyone can understand. This is the Unit testing in Embedded C using Unity – Unit testing in C tutorial Part 4.
You can also read the unit testing introduction, ceedling installation, Code coverage, Cmock, stringizing, token pasting in C, and macro vs inline, compilation steps in c.
Table of Contents
Unit testing in Embedded C using Unity
Prerequisites
I would recommend you to explore the relevant topics by using the below link.
Introduction
In this tutorial, we are going to discuss –
Before doing anything, we have to know about unity and its APIs.
Unity
Unity is simply a rich collection of assertions you can use to establish whether your source code behaves the way you think it does. Unity provides a framework to easily organize and execute those assertions in test code separate from your source code. There are many TEST_ASSERT functions are available in the Unity framework, which is used to validate the values. We will see each one by one.
TEST_ASSERT_XXX Functions
Validating Boolean
These are the functions used to validate the boolean condition.
| Function | Note |
| TEST_ASSERT_TRUE (condition) | If the condition is true, then this evaluates to pass otherwise fail. |
| TEST_ASSERT (condition) | This function is another way of TEST_ASSERT_TRUE |
| TEST_ASSERT_FALSE (condition) | If the condition is false, then this evaluates to pass otherwise fail. |
| TEST_ASSERT_UNLESS (condition) | This function is another way of TEST_ASSERT_FALSE |
| TEST_ASSERT_NULL (pointer) | If the pointer is NULL, then this evaluates to pass otherwise fail. |
| TEST_ASSERT_NOT_NULL (pointer) | If the pointer is not a NULL, then this evaluates to pass otherwise fail. |
Example
int a = 10;

//This evaluates to pass
TEST_ASSERT( (a > 0) )
TEST_ASSERT_TRUE( (a > 0) )
TEST_ASSERT_UNLESS( (a == 0) )
TEST_ASSERT_FALSE( (a == 0) )

//This evaluates to fail
TEST_ASSERT( (a == 0) )
TEST_ASSERT_TRUE( (a == 0) )
TEST_ASSERT_UNLESS( (a >> 0) )
TEST_ASSERT_FALSE( (a >> 0) )
Validating Integers
A separate set of functions are available for signed, unsigned integers that too for all sizes. Please have a look at the below functions.
| Functions | Note |
| TEST_ASSERT_EQUAL_INT (exp, act) | Compare two signed integers for equality and display errors |
| TEST_ASSERT_EQUAL_INT8 (exp, act) | Compare two 8bit signed integers for equality and display errors |
| TEST_ASSERT_EQUAL_INT16 (exp, act) | Compare two 16bit signed integers for equality and display errors |
| TEST_ASSERT_EQUAL_INT32 (exp, act) | Compare two 32bit signed integers for equality and display errors |
| TEST_ASSERT_EQUAL_INT64 (exp, act) | Compare two 64bit signed integers for equality and display errors |
| TEST_ASSERT_EQUAL (exp, act) | This is another way of calling TEST_ASSERT_EQUAL_INT |
| TEST_ASSERT_NOT_EQUAL (exp, act) | Compare two signed integers for a not equality and display errors |
| TEST_ASSERT_EQUAL_UINT (exp, act) | Compare two unsigned integers for equality and display errors |
| TEST_ASSERT_EQUAL_UINT8 (exp, act) | Compare two 8bit unsigned integers for equality and display errors |
| TEST_ASSERT_EQUAL_UINT16 (exp, act) | Compare two 16bit unsigned integers for equality and display errors |
| TEST_ASSERT_EQUAL_UINT32 (exp, act) | Compare two 32bit unsigned integers for equality and display errors |
| TEST_ASSERT_EQUAL_UINT64 (exp, act) | Compare two 64bit unsigned integers for equality and display errors |
| TEST_ASSERT_INT_WITHIN(delta, expected, actual) |
This evaluates to pass if the actual signed value is within plus or minus delta of the expected value. This also comes in size specific variants like 8bits, 16bits, 32bits, and 64bits. |
| TEST_ASSERT_UINT_WITHIN(delta, expected, actual) |
This evaluates to pass if the actual unsigned value is within plus or minus delta of the expected value. This also comes in size specific variants like 8bits, 16bits, 32bits, and 64bits. |
| TEST_ASSERT_GREATER_THAN(threshold, actual) | This evaluates to pass if the actual value is greater than the threshold. This also comes in size specific variants. |
| TEST_ASSERT_LESS_THAN(threshold, actual) | This evaluates to pass if the actual value is lesser than the threshold. This also comes in size specific variants. |
Example
int a=10;

//This will evaluates to pass
TEST_ASSERT_EQUAL_INT(10, a);

//This will evaluates to fail
TEST_ASSERT_EQUAL_INT(5, a);
Validating hex values
These are the functions used to validate the unsigned hex values.
| Functions | Note |
| TEST_ASSERT_EQUAL_HEX (exp, act) | Compare two unsigned hex values for equality and display errors |
| TEST_ASSERT_EQUAL_HEX8 (exp, act) | Compare two 8 bit unsigned hex values for equality and display errors |
| TEST_ASSERT_EQUAL_HEX16 (exp, act) | Compare two 16 bit unsigned hex values for equality and display errors |
| TEST_ASSERT_EQUAL_HEX32 (exp, act) | Compare two 32 bit unsigned hex values for equality and display errors |
| TEST_ASSERT_EQUAL_HEX64 (exp, act) | Compare two 64 bit unsigned hex values for equality and display errors |
Validating bits
These are the functions used to validate the bits in the value.
| Functions | Note |
| TEST_ASSERT_BITS (mask, exp, act) | Apply the integer mask to specify which bits should be compared between two other integers. In mask, if any bit is 0 means it will ignore and if any bit is 1 means it will compare that bit between exp and act. |
| TEST_ASSERT_BITS_HIGH (mask, act) | This call used to check whether bits are set to high or not using the mask. In mask, if any bit is 0 means it will ignore and if any bit is 1 means it will check the bit is high or not with act value. |
| TEST_ASSERT_BITS_LOW (mask, act) | This is the opposite of TEST_ASSERT_BITS_HIGH.This will check whether the masked bit is low or not. |
| TEST_ASSERT_BIT_HIGH (bit, act) | This is used to test a single bit and verify that it is high. The bit is specified 0-31 for a 32-bit integer. |
| TEST_ASSERT_BIT_LOW (bit, act) | This is used to test a single bit and verify that it is low. The bit is specified 0-31 for a 32-bit integer. |
Example
int act = 0x12FF;

/* Here Mask is 0xF. That means it will compare first 4bits.
** So after masked, exp value also 0xF and act also 0xF.
** Both value's first four bits are matching.
** This evaluate to pass the test case.
*/
TEST_ASSERT_BITS(0xF, 0xFFFFFFFF, act);


/* Here Mask is 0xF00. That means it will compare bits from 8 to 11.
** So after masked, exp value also 0xF00 and act also 0x200.
** Both value's masked bits are not matching.
** This evaluate to fail the test case.
*/
TEST_ASSERT_BITS(0xF00, 0xFFFFFFFF, act);


/* Here Mask is 0xF. That means it will check the first 4bits are high or not.
** So after masked, act value is 0xF.
** That means those 4bits are high.
** This evaluate to pass the test case.
*/
TEST_ASSERT_BITS_HIGH(0xF, act);

/* Here Mask is 0xF00. That means it will check bits8 to 11 are high or not.
** So after masked, act value is 0x200.
** That means those 4bits are not high.
** This evaluate to fail the test case.
*/
TEST_ASSERT_BITS_LOW(0xF00, act);


/* Here first argument is 0. That means it will check bit 0 is high or not.
** So here bit 0 is high.
** This evaluate to pass the test case.
*/
TEST_ASSERT_BIT_HIGH(0, act);

/* Here first argument is 8. That means it will check bit 8 is high or not.
** So here bit 8 is not high.
** This evaluate to pass the test case.
*/
TEST_ASSERT_BIT_LOW(8, act);
Validating Strings and pointers values
These are the functions used to validate the strings and pointers values.
| Functions | Note |
| TEST_ASSERT_EQUAL_PTR (exp, act) | Checks the both exp pointer and act pointer is the same or not. |
| TEST_ASSERT_EQUAL_STRING (exp, act) | This checks the two NULL terminated strings. It will fail if any character is different. |
| TEST_ASSERT_EQUAL_STRING_LEN(expected, actual, len) |
This checks the two strings till it reaches the given len. It will fail if any character is different. |
Example
char a[] = "EMBETRONICX";
char *b = a;
char c[] = "embetronicx";

//This will pass
TEST_ASSERT_EQUAL_PTR(a, b);

//This will pass
TEST_ASSERT_EQUAL_STRING(a, b);

//This will pass
TEST_ASSERT_EQUAL_STRING_LEN(a, b, 3);

//This will fail
TEST_ASSERT_EQUAL_STRING(a, c);
Validating Structures and memory
We cannot validate the structure through its members. But we can validate the structure using memory comparison. This function is used to compare the memory and structure as well.
Note: You have to know the structure padding. I will always fail if the structure is padded by 0.
| Functions | Note |
| TEST_ASSERT_EQUAL_MEMORY (exp, act, len) | Compare the memory of len bytes from exp and act. Fails if it is not matching. |
Example
typedef struct{
    int a;
    int b;
} temp;

temp a_struct = {10, 20};
temp b_struct = {10, 20};
temp c_struct = {5, 20};

char a[] = "Embetroncix";
char *b = a;
char c[] = "embetronicx";


//This will pass
TEST_ASSERT_EQUAL_MEMORY(a, b, 5);

//This will pass
TEST_ASSERT_EQUAL_MEMORY(&a_struct, &b_struct, sizeof(temp));

//This will fail
TEST_ASSERT_EQUAL_MEMORY(&a_struct, &c_struct, sizeof(temp));

//This will fail
TEST_ASSERT_EQUAL_MEMORY(a, c, 5);
Validating Arrays
We have functions to validate the arrays also like above. These are the functions to be used to check the arrays.
| Functions | Note |
| TEST_ASSERT_EQUAL_INT_ARRAY (exp, act, elem) | This will compare the two signed integer arrays exp and act of elem elements |
| TEST_ASSERT_EQUAL_INT8_ARRAY (exp, act, elem) | This will compare the two 8bit signed integer arrays exp and act of elem elements |
| TEST_ASSERT_EQUAL_INT16_ARRAY (exp, act, elem) | This will compare the two 16bit signed integer arrays exp and act of elem elements |
| TEST_ASSERT_EQUAL_INT32_ARRAY (exp, act, elem) | This will compare the two 32bit signed integer arrays exp and act of elem elements |
| TEST_ASSERT_EQUAL_INT64_ARRAY (exp, act, elem) | This will compare the two 64bit signed integer arrays exp and act of elem elements |
| TEST_ASSERT_EQUAL_UINT_ARRAY (exp, act, elem) | This will compare the two unsigned integer arrays exp and act of elem elements |
| TEST_ASSERT_EQUAL_UINT8_ARRAY (exp, act, elem) | This will compare the two 8bit unsigned integer arrays exp and act of elem elements |
| TEST_ASSERT_EQUAL_UINT16_ARRAY (exp, act, elem) | This will compare the two 16bit unsigned integer arrays exp and act of elem elements |
| TEST_ASSERT_EQUAL_UINT32_ARRAY (exp, act, elem) | This will compare the two 32bit unsigned integer arrays exp and act of elem elements |
| TEST_ASSERT_EQUAL_UINT64_ARRAY (exp, act, elem) | This will compare the two 61bit unsigned integer arrays exp and act of elem elements |
| TEST_ASSERT_EQUAL_HEX_ARRAY (exp, act, elem) | This will compare the two hex value arrays exp and act of elem elements |
| TEST_ASSERT_EQUAL_HEX8_ARRAY (exp, act, elem) | This will compare the two 8bit hex value arrays exp and act of elem elements |
| TEST_ASSERT_EQUAL_HEX16_ARRAY (exp, act, elem) | This will compare the two 16bit hex value arrays exp and act of elem elements |
| TEST_ASSERT_EQUAL_HEX32_ARRAY (exp, act, elem) | This will compare the two 32bit hex value arrays exp and act of elem elements |
| TEST_ASSERT_EQUAL_HEX64_ARRAY (exp, act, elem) | This will compare the two 64bit hex value arrays exp and act of elem elements |
| TEST_ASSERT_EQUAL_PTR_ARRAY (exp, act, elem) | This will compare the two pointer arrays exp and act of elem elements |
| TEST_ASSERT_EQUAL_STRING_ARRAY (exp, act, elem) | This will compare the two string arrays exp and act of elem elements |
Example
unsigned int a0[] = {1, 8, 567, 120};
unsigned int a1[] = {1, 8, 567, 120};
unsigned int a2[] = {1, 8, 567, 10};

//These below cases will pass
TEST_ASSERT_EQUAL_INT_ARRAY(a0, a1, 4);
TEST_ASSERT_EQUAL_INT_ARRAY(a0, a2, 3);
TEST_ASSERT_EQUAL_UINT_ARRAY(a0, a1, 4);
TEST_ASSERT_EQUAL_HEX32_ARRAY(a0, a1, 4);

//These below cases will fail
TEST_ASSERT_EQUAL_INT_ARRAY(a0, a2, 4);
TEST_ASSERT_EQUAL_INT_ARRAY(a0, a2, 4);
TEST_ASSERT_EQUAL_UINT_ARRAY(a0, a2, 4);
TEST_ASSERT_EQUAL_HEX32_ARRAY(a0, a2, 4);
_MESSAGE variant
If you add _MESSAGE to the names of any assertion listed above for the message variant (and include your own string as the final parameter in the assertion). The message variant of TEST_ASSERT_EQUAL_INT is given below. That message will be printed when it is failing.
TEST_ASSERT_EQUAL_INT_MESSAGE(exp, act, message)
Example:
int a=10;

//This will evaluates to fail and print the message
TEST_ASSERT_EQUAL_INT_MESSAGE(13, a, "Test Failed: \"a\" should be 13");
You should see the print like this.
"Expected 13 Was 10. Test Failed: "a" should be 13"
Like this, you can add the _MESSAGE to any functions.
Ignoring the test case
If you want to ignore the test case then you have to use this function.
TEST_IGNORE()
This will not run the respected test case and ignore it.
Failing the test case
If you want to fail the test case you can use the below function.
TEST_FAIL()
Note:
Functions are available for float and double also. Out of this, I think, I’ve covered most of the functions which we use widely. If I’ve missed anything please find that in ThrowTheSwitch.
Now we will move to the example project.
Creating a new project
Now I am going to create a new project which has no source code initially. In this project, ceedling will be linked automatically since we are creating the project using ceedling.
Create the project using ceedling new proj_name using the command terminal (command prompt) in your desired directory (folder).
Example:
C:\Users\ceedling-proj>ceedling new simple_prog
After this, you can able to see the prints like below.
Welcome to Ceedling!
      create  simple_prog/project.yml

Project 'simple_prog' created!
 - Execute 'ceedling help' to view available test & build tasks
Cool. Now you have created the new project using ceedling.
Now you could able to see the new folder (directory) is created by ceedling called proj_name. In our case the folder (directory) name is simple_prog. Inside that folder, you can see src and test directories along with that one project.yml file. We will discuss about project.yml later. In those two directories, no files will be there. We have to create those files.
Requirement for the development
First, we will get a requirement. We need to develop the code, that reflects the functionality below.
- I’ve to have three 8-bit global variables called
Jill,JungandJukk. - Need to create the function and pass the position to that function. (Example :
do_bit_man(int8_t position)) - We have to set the bit of the
Jillvariable based on theposition(argument ofdo_bit_man()). - We have to clear the bit of the
Jungvariable based on theposition(argument ofdo_bit_man()) - We have to toggle the bit of the
Jukkvariable based on theposition(argument ofdo_bit_man())
Got your requirement? Ok, let’s write the code now. Oops, wait a minute. This is TDD. Before writing the code, we need to have a test plan and test code. Let’s plan how to write the test case.
Testing Plan
Let’s create a test plan and test cases based on the requirement above.
- As these variables (
Jill,Jung,Jukk) are 8-bit values, what will happen if I pass the value that is more than 7? So, the code should not allow doing the bit operations when the position value is more than 7. So, this test case tests the negative scenario. - What will happen if I pass a negative number to the position argument? This is also a negative scenario.
- What will happen if I pass the proper position argument? This is a positive scenario.
So, we have to test these possible scenarios.
We will go step by step. First, we will see the basics of test cases.
Testing those functions with Unity
To create source code and test cases, we need .c and .h files. Using ceedling also we can create the source template. We can create a module using ceedling module:create[module_name].
First, go into the project directory where project.yml file resides. Then enter the command to create the module.
>cd simple_prog
>ceedling module:create[bit_manipulation]
After this, you can see the prints like below.
File src/bit_manipulation.c created
File src/bit_manipulation.h created
File test/test_bit_manipulation.c created
Generate Complete
Three files have been created automatically while creating the module. Now we can use those files to add our source code.
NOTE: In this tutorial, we are not going to compile the program or test the output of the program. Our intention is to write the unit test for our source code.
So, we have created the .c and .h files.
We will write the unit test code first. Open the test_bit_manipulation.c under the test directory. In that test_bit_manipulation.c, there might be some default code available already like below.
#include "unity.h"

#include "bit_manipulation.h"

void setUp(void)
{
}

void tearDown(void)
{
}

void test_bit_manipulation_NeedToImplement(void)
{
    TEST_IGNORE_MESSAGE("Need to Implement bit_manipulation");
}
There, one test case is already present that is test_bit_manipulation_NeedToImplement. We can remove this default test case and write our own test case.
What is the setUp function?
This is a kinda start function (like Constructor function) that is used to initialize some variables and allocate memory if we want to. This setUp function will be executed before each test function. If you have three test functions in your test file, setUp gets called three times. As per our example, I am going to initialize the gloable variables in this function. So that, we will properly initialize the values before calling the test case.
Example:
void setUp(void)
{
 Jill = 0x00;
 Jung = 0xFF;
 Jukk = 0x00;
}
What is the tearDown function?
This is a kinda end function (like destructor function) that is used to free the memory. This tearDown function will be executed after each test function. If you have three test functions in your test file, tearDown gets called three times. In this example we don’t do anything in this function.
Note: You have to include the unity.h file in every test file. And include your required header files also.
Test Case 0
Let’s write our first test case to test the function do_bit_man(uint8_t position). So, I am going to create a test function called test_do_bit_man_0(void). This function name can be anything (should be unique) but make sure you are adding test_ in front of that function name. This test case is a negative test. When I pass more than 7, it should return -1 and it should not modify any values of those global variables. Please find the below function.
#ifdef TEST

#include "unity.h"

#include "bit_manipulation.h"

extern uint8_t Jill;
extern uint8_t Jung;
extern uint8_t Jukk;

void setUp(void)
{
  Jill = 0x00;
  Jung = 0xFF;
  Jukk = 0x00;
}

void tearDown(void)
{
}

//Test Case 0
void test_do_bit_man_0(void)
{
  int8_t result;
  result = do_bit_man( 15 );

  TEST_ASSERT_EQUAL_INT8( -1, result );
  TEST_ASSERT_EQUAL_INT8( 0x00, Jill );
  TEST_ASSERT_EQUAL_INT8( 0xFF, Jung );
  TEST_ASSERT_EQUAL_INT8( 0x00, Jukk );
}

#endif // TEST
Now our test case 0 is ready. Lets write the source code.
Writing a Sample source code in C
Let’s write our simple program.
bit_manipulation.c
#include "bit_manipulation.h"

uint8_t Jill = 0x00;
uint8_t Jung = 0xFF;
uint8_t Jukk = 0x00;


int8_t do_bit_man(int8_t position)
{
    if( ( position < 0 ) || ( position > 7 ) )
    {
        //position should be 0 to 7. Because we are going to modify 8 bit value.
        return -1;
    }

    return 0;
}
bit_manipulation.h
#ifndef BIT_MANIPULATION_H
#define BIT_MANIPULATION_H

#include <stdio.h>
#include <stdint.h>

int8_t do_bit_man(int8_t position);

#endif // BIT_MANIPULATION_H
If you look at the above program, we are just returning -1 if the argument is not valid. We will verify this code by using our test case 0.
To verify this, you can run ceedling test:all. Make sure that you are running the command terminal on the directory where the project.yml file is present. When you run this, you will get prints like below.
simple_prog>ceedling test:all


Test 'test_bit_manipulation.c'
------------------------------
Generating runner for test_bit_manipulation.c...
Compiling test_bit_manipulation_runner.c...
Compiling test_bit_manipulation.c...
Linking test_bit_manipulation.out...
Running test_bit_manipulation.out...

--------------------
OVERALL TEST SUMMARY
--------------------
TESTED:  1
PASSED:  1
FAILED:  0
IGNORED: 0
Our test case has been passed. It is not modifying any of the variables and returns -1.
Using the above code itself, we can write our second test case too.
Test Case 1
Another negative test case we have to write. When I pass a negative value (less than 0), that time also it should behave as test case 0. Write our second test case.
test_bit_manipulation.c
#ifdef TEST

#include "unity.h"

#include "bit_manipulation.h"

extern uint8_t Jill;
extern uint8_t Jung;
extern uint8_t Jukk;

void setUp(void)
{
  Jill = 0x00;
  Jung = 0xFF;
  Jukk = 0x00;
}

void tearDown(void)
{
}

//Test Case 0
void test_do_bit_man_0(void)
{
  int8_t result;
  result = do_bit_man( 15 );

  TEST_ASSERT_EQUAL_INT8( -1, result );
  TEST_ASSERT_EQUAL_INT8( 0x00, Jill );
  TEST_ASSERT_EQUAL_INT8( 0xFF, Jung );
  TEST_ASSERT_EQUAL_INT8( 0x00, Jukk );
}

//Test Case 1
void test_do_bit_man_1(void)
{
  int8_t result;

  result = do_bit_man( -5 );

  TEST_ASSERT_EQUAL_INT8( -1, result );
  TEST_ASSERT_EQUAL_INT8( 0x00, Jill );
  TEST_ASSERT_EQUAL_INT8( 0xFF, Jung );
  TEST_ASSERT_EQUAL_INT8( 0x00, Jukk );
}

#endif // TEST
Just see the Test Case 1 (test_do_bit_man_1). In that test case, we are passing the value -5 to the do_bit_man function. So, it should return -1. lets check that.
You will get prints like below.
simple_prog>ceedling test:all


Test 'test_bit_manipulation.c'
------------------------------
Generating runner for test_bit_manipulation.c...
Compiling test_bit_manipulation_runner.c...
Compiling test_bit_manipulation.c...
Compiling bit_manipulation.c...
Linking test_bit_manipulation.out...
Running test_bit_manipulation.out...

--------------------
OVERALL TEST SUMMARY
--------------------
TESTED:  2
PASSED:  2
FAILED:  0
IGNORED: 0
Our two negative test cases also passed. Let’s write our positive test case.
Test Case 2
If we pass the valid argument ( 0 to 7), then it should set, clear, and toggle the respective variables in the position based on the argument and it should return 0.
test_bit_manipulation.c
#ifdef TEST

#include "unity.h"

#include "bit_manipulation.h"

extern uint8_t Jill;
extern uint8_t Jung;
extern uint8_t Jukk;

void setUp(void)
{
  Jill = 0x00;
  Jung = 0xFF;
  Jukk = 0x00;
}

void tearDown(void)
{
}

//Test Case 0
void test_do_bit_man_0(void)
{
  int8_t result;
  result = do_bit_man( 15 );

  TEST_ASSERT_EQUAL_INT8( -1, result );
  TEST_ASSERT_EQUAL_INT8( 0x00, Jill );
  TEST_ASSERT_EQUAL_INT8( 0xFF, Jung );
  TEST_ASSERT_EQUAL_INT8( 0x00, Jukk );
}

//Test Case 1
void test_do_bit_man_1(void)
{
  int8_t result;

  result = do_bit_man( -5 );

  TEST_ASSERT_EQUAL_INT8( -1, result );
  TEST_ASSERT_EQUAL_INT8( 0x00, Jill );
  TEST_ASSERT_EQUAL_INT8( 0xFF, Jung );
  TEST_ASSERT_EQUAL_INT8( 0x00, Jukk );
}

//Test Case 2
void test_do_bit_man_2(void)
{
  int8_t result;
  int8_t position = 5;

  result = do_bit_man( position );

  TEST_ASSERT_EQUAL_INT8( 0, result );
  TEST_ASSERT_BIT_HIGH( position, Jill );
  TEST_ASSERT_BIT_LOW( position, Jung );
  TEST_ASSERT_BIT_HIGH( position, Jukk );
}

#endif // TEST
Look at the Test Case 2 (test_do_bit_man_2). There we are passing position as 5 to the function do_bit_man. So, the do_bit_man function has to set, clear, toggle the Jill, Jung, and Jukk respectively.
Let’s write the original code.
bit_manipulation.c
#include "bit_manipulation.h"

uint8_t Jill = 0x00;
uint8_t Jung = 0xFF;
uint8_t Jukk = 0x00;

int8_t do_bit_man(int8_t position)
{
  if( ( position < 0 ) || ( position > 7 ) )
  {
    //position should be 0 to 7. Because we are going to modify 8 bit value.
    return -1;
  }

  //set particular bit
  Jill |= ( 1 << position );

  //clear particular bit
  Jung &= ~( 1 << position );

  //toggle particular bit
  Jukk ^= ( 1 << position );

  return 0;
}
We have written our code. Let’s check whether our function works correctly or not with the Test Case 2.
ceedling test:all
You should get a print like below.
simple_prog>ceedling test:all


Test 'test_bit_manipulation.c'
------------------------------
Generating runner for test_bit_manipulation.c...
Compiling test_bit_manipulation_runner.c...
Compiling test_bit_manipulation.c...
Linking test_bit_manipulation.out...
Running test_bit_manipulation.out...

--------------------
OVERALL TEST SUMMARY
--------------------
TESTED:  3
PASSED:  3
FAILED:  0
IGNORED: 0
All good? I have written one function called do_bit_man. So, we have implemented our requirement and tested that implementation using the ceedling unit test. I hope you are clear now. Comment below if you have any doubts.
You can download the all codes from GitHub.
Code coverage
If you want to see the code coverage, please follow the below steps.
Install the gcovr using pip.
pip install gcovr
You can see the prints like below if you have installed them correctly.
simple_prog>pip install gcovr
Collecting gcovr
  Downloading gcovr-4.2-py2.py3-none-any.whl (45 kB)
     |████████████████████████████████| 45 kB 166 kB/s
Collecting jinja2
  Downloading Jinja2-2.11.1-py2.py3-none-any.whl (126 kB)
     |████████████████████████████████| 126 kB 1.7 MB/s
Collecting lxml
  Downloading lxml-4.5.0-cp37-cp37m-win_amd64.whl (3.7 MB)
     |████████████████████████████████| 3.7 MB 5.5 kB/s
Collecting MarkupSafe>=0.23
  Downloading MarkupSafe-1.1.1-cp37-cp37m-win_amd64.whl (16 kB)
Installing collected packages: MarkupSafe, jinja2, lxml, gcovr
Successfully installed MarkupSafe-1.1.1 gcovr-4.2 jinja2-2.11.1 lxml-4.5.0
Then have to add gcov plugin using project.yml. Open the project.yml and add - gove after plugin like below.
:plugins:
  :load_paths:
    - "#{Ceedling.load_path}"
  :enabled:
    - stdout_pretty_tests_report
    - module_generator
    - gcov
That’s it. Now you can see the report by using ceedling gcov:all. You will get details like below.
simple_prog>ceedling gcov:all


Test 'test_bit_manipulation.c'
------------------------------
Running test_bit_manipulation.out...

--------------------------
GCOV: OVERALL TEST SUMMARY
--------------------------
TESTED:  3
PASSED:  3
FAILED:  0
IGNORED: 0


---------------------------
GCOV: CODE COVERAGE SUMMARY
---------------------------
bit_manipulation.c Lines executed:100.00% of 7
bit_manipulation.c Branches executed:100.00% of 4
bit_manipulation.c Taken at least once:100.00% of 4
bit_manipulation.c No calls
If you want to generate a detailed HTML review, then please use the below command after ceedling gcov:all.
ceedling utils:gcov
You will get prints like this.
simple_prog>ceedling utils:gcov
Creating a detailed html report of gcov results in build/artifacts/gcov/GcovCoverageResults.html...
Done.
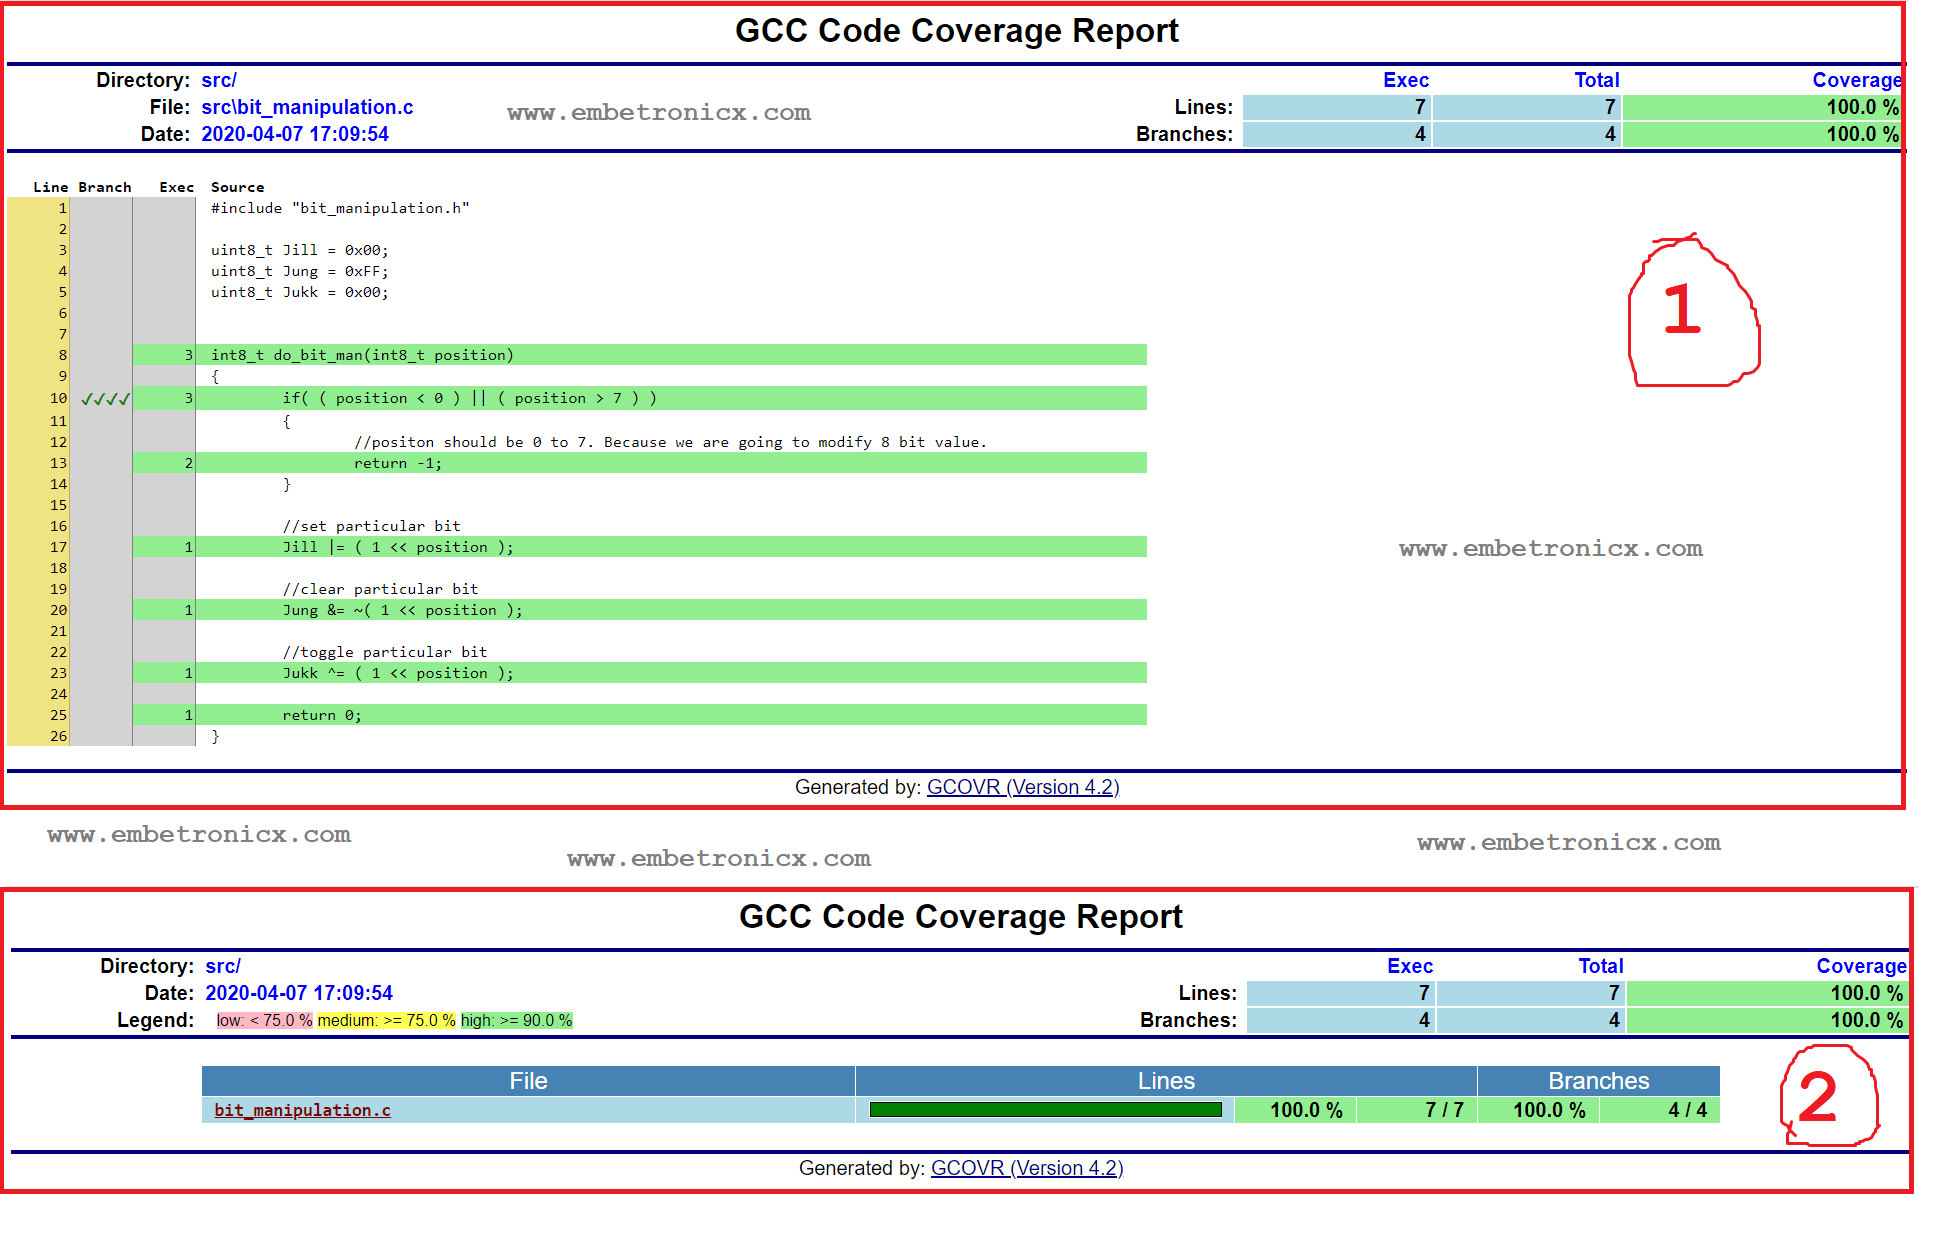
Once it is generated, then you can see the HTML file in simple_prog\build\artifacts\gcov. Open those two files which are generated and analyze. Right now it is 100%. That means we have covered all the lines and branches. You will get a report like this.
 I want you guys to experiment on those by removing any of the test cases and regenerate the report. Now you may see some percentage drop. Like this, you can learn about code coverage.
Whenever you regenerate the report please clean it and regenerate or follow the steps below to get the updated report.
ceedling clean– This will clean the generated files.ceedling test:all– build and test the test caseceedling gcov:all– generate coverage resultceedling utils:gcov– Generate the HTML detailed report
By this experiment, you can see how many branches we have and how many lines we have covered, etc. You may get a report like below if you remove test case 2.
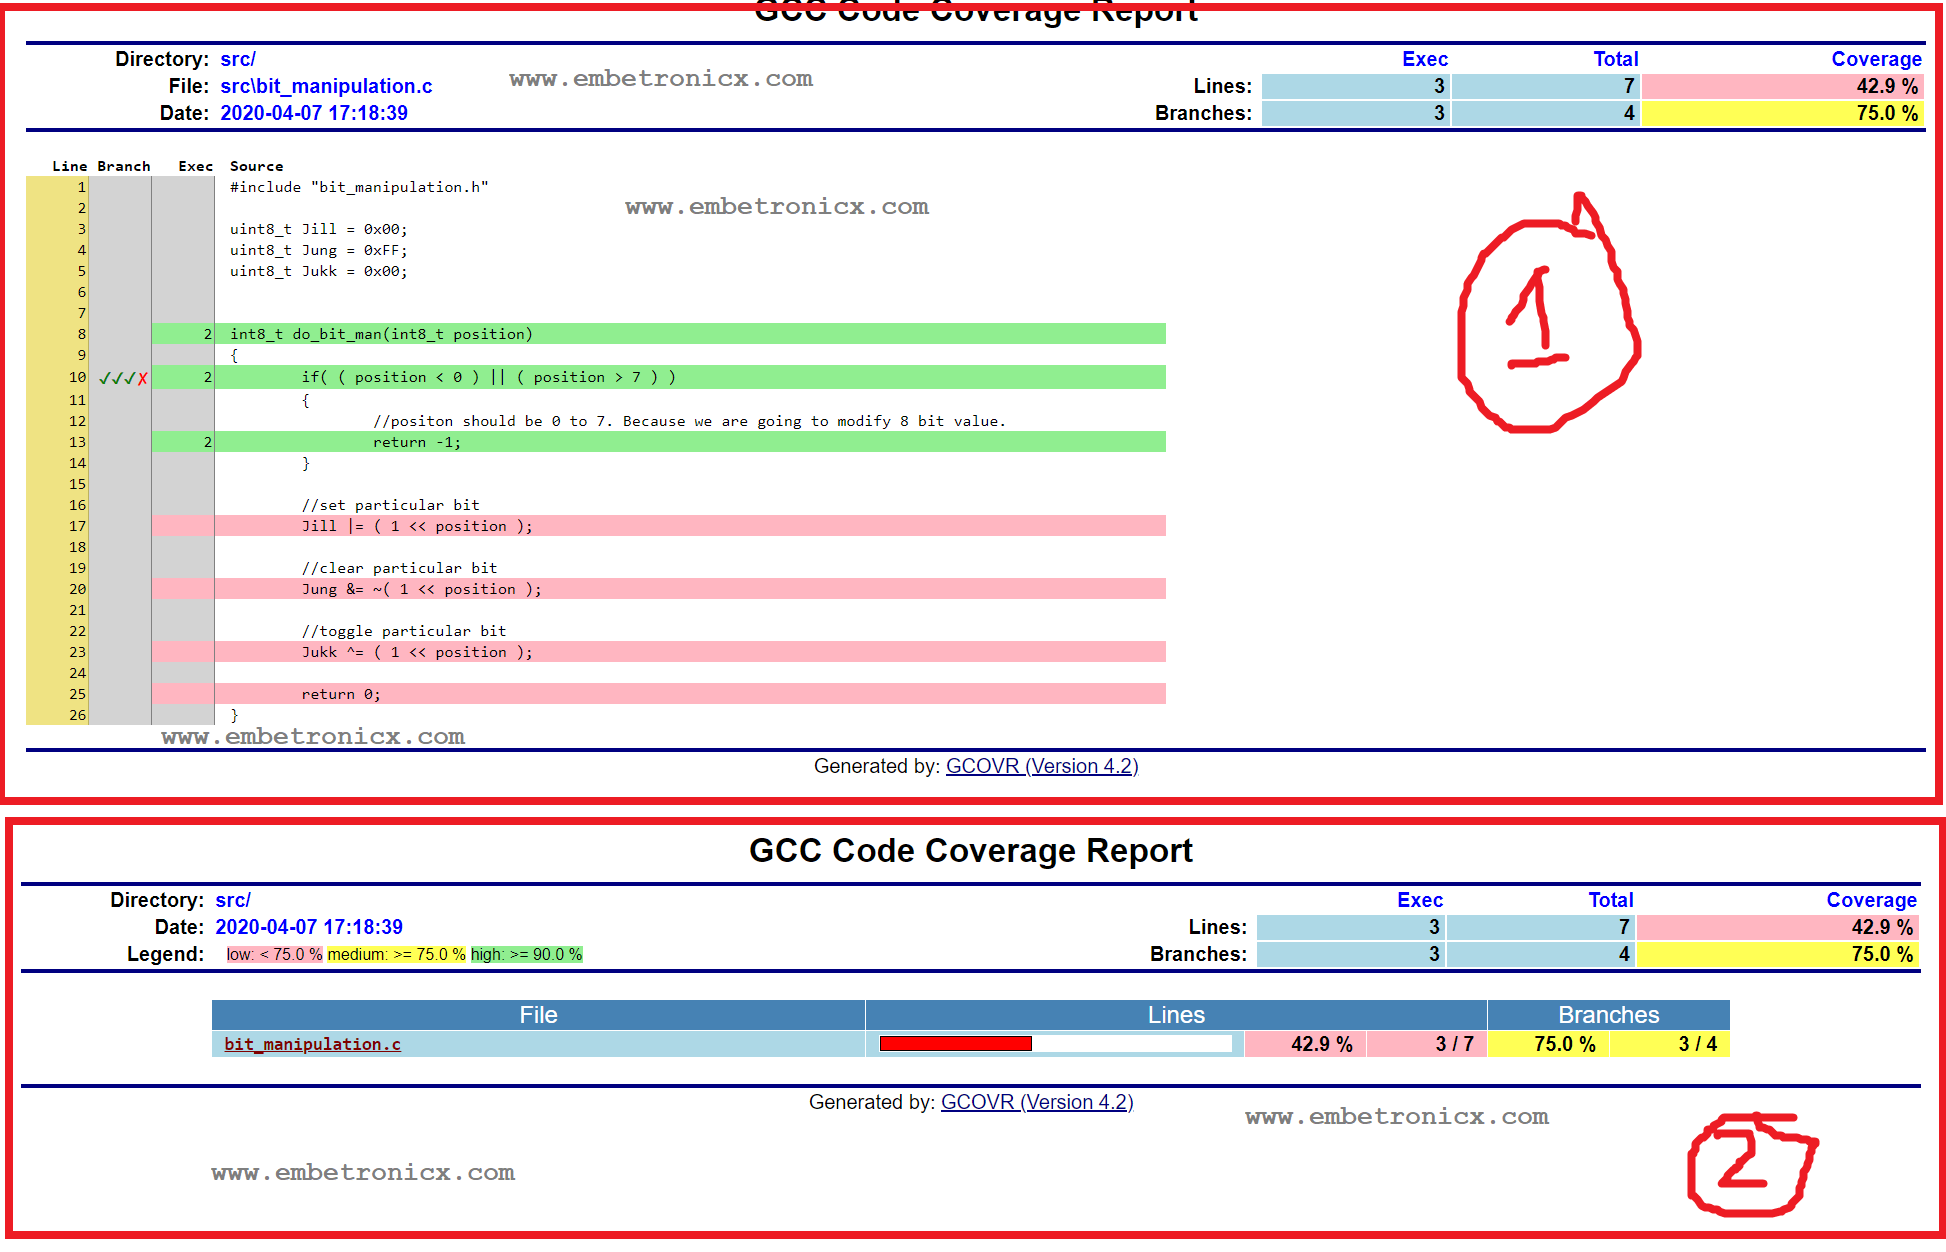
If we remove, one test case (test case 2), then we are missing one branch and 4 lines. If you don’t understand the code coverage, please go back here and read about the code coverage.
Note: Let’s say you have one test case where you have three TEST_ASSERT_X functions. If anyone fails, it will stop there and won’t run the next line in that test case. It will run the next test case. So all TEST_ASSERT_X should pass in order to make the test case to pass.
In our next tutorial, we will learn what is cmock and mock functions.
You can also read the below tutorials.
Embedded Software | Firmware | Linux Devic Deriver | RTOS
Hi, I am a tech blogger and an Embedded Engineer. I am always eager to learn and explore tech-related concepts. And also, I wanted to share my knowledge with everyone in a more straightforward way with easy practical examples. I strongly believe that learning by doing is more powerful than just learning by reading. I love to do experiments. If you want to help or support me on my journey, consider sharing my articles, or Buy me a Coffee! Thank you for reading my blog! Happy learning!
