
Ethernet cables offer you a faster way to connect to the internet. If your work relies on a fast internet connection and if you have access to an Ethernet cable, you can always benefit from it. But, that said, wireless connectivity offers both convenience and speed and you don’t have to worry about being tethered to a cable all the time.
However, have you ever encountered a situation where your laptop or PC could only connect to the internet with the help of an ethernet cable and not Wi-Fi? Worry not! You are not alone. Here are some steps you can take if there is no Wi-Fi option on your computer and the only option you have is to use an ethernet cable.
Table of Contents
How To Fix The Issue of Only Ethernet and No Wi-Fi on Windows 11/10 PC?
Solution No.1 – Check if The Wi-Fi Switch Is ON or OFF
Much before you proceed with any advanced steps, you can first check if you have enabled Wi-Fi on your PC. To do that follow the steps mentioned below –
- Step 1 – Open Settings by pressing Windows + I.
- Step 2 – From the left-hand side, click on Network & internet.
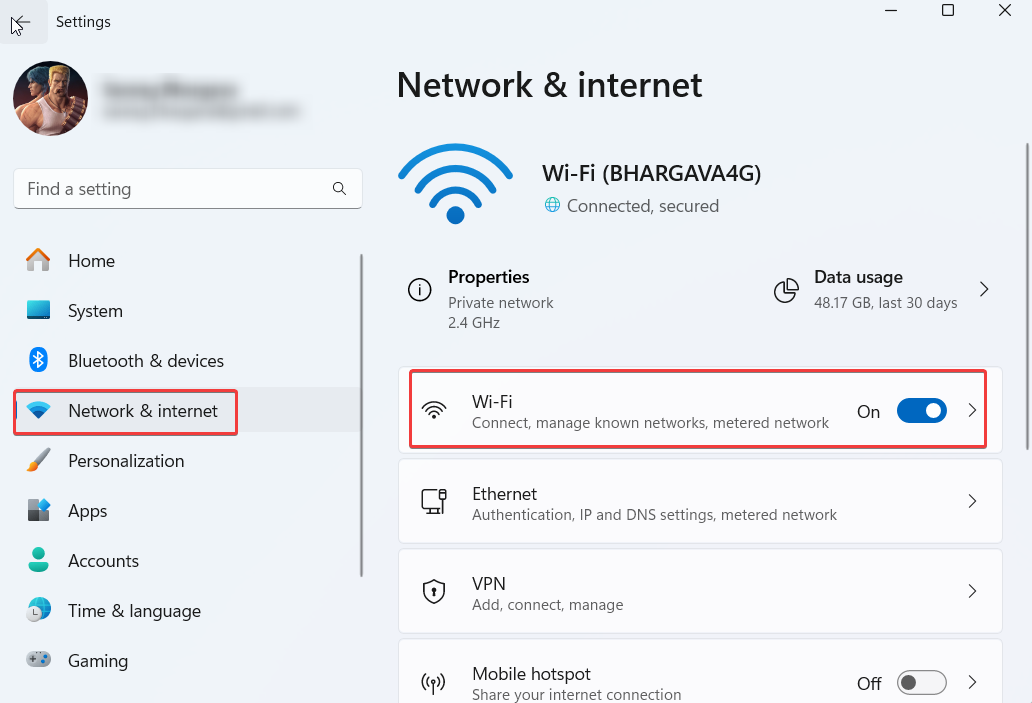
- Step 3 – On the right, check if you have toggled on the switch next to Wi-Fi.
Solution No.2 – Check if Airplane Mode is Turned Off
While on Network & internet, you may also want to check if the Airplane mode is disabled. Since, if it is enabled, you may not be able to see the Wi-Fi option.
Solution No.3 – Run Network Troubleshooter
Windows has an inbuilt mechanism called the Network Troubleshooter. It helps fix any issues related to the internet. So, if you are unable to see the Wi-Fi icon or can only use ethernet as a way to connect to the internet, follow these steps to use the Network Troubleshooter –
- Step 1 – Open Settings by pressing the Windows + I button.
- Step 2 – From the left-hand side, click on System.

- Step 3 – From the right-hand side, click on Troubleshoot, and then on Other troubleshooters.

- Step 4 – Under Most frequent, locate Network and internet, and click on the Run button next to it.

Alternatively, if you are using Windows 10, follow the steps mentioned below to run the Network Troubleshooter –
- Step 1 – Open Settings by right-clicking on the Start button and clicking on Settings.
- Step 2 – Click on Network & Internet > Status.
- Step 3 – Under Change your network settings, select Network troubleshooter.
- Step 4 – Follow the on-screen instructions.
Solution No.4 – Reset Network Settings
Up until this point, if you still aren’t able to see the Wi-Fi option and are only relying on the ethernet cable, you can try resetting Network settings. To do that –
- Step 1 – Open Settings and go to Network & internet as shown above.
- Step 2 – From the right, scroll down and click on Advanced network settings.

- Step 3 – Scroll down and under More settings, click on Network reset.

- Step 4 – Restart your PC.
Solution No.5 – Update Network Adapter
It is likely that since you had just upgraded your Windows, a glitch has caught your Network Adapters. The best bet? Update your Network Adapters.
There are two ways to update Network Adapters. One way is to update them manually. To manually update drivers, follow these steps –
- Step 1 – Open the Run dialog box by pressing Windows + R and pressing Enter.
- Step 2 – When the dialog box opens, type devmgmt.msc and press Enter.
- Step 3 – Click on the dropdown next to Network adapters, right-click on your network adapter, and select Update driver.

- Step 4 – Follow the on-screen instructions.
There are times when finding Network Adapters manually might not be a fruitful step. Hence, an easier option is to use a driver updater tool such as Advanced Driver Updater, Driver Booster, Driver Easy, and others as shown in this post.
Solution No.6 – Configure Network Adapter Power Management Settings
Sometimes, in order to save power your computer may enter sleep mode. While not a very common occurrence, this may cause Wi-Fi connectivity issues. To fix this, first open your Device Manager and locate your Network Adapter as shown in the steps above. Next –
- Step 1 – Right-click on your Network Adapter and click on Properties.

- Step 2 – Click on the Power Management tab.

- Step 3 – Uncheck the option that says Allow the computer to turn off this device to save power.

- Step 4 – Click OK and restart your computer.
Solution No.7 – Flush DNS
Whether you are unable to see the Wi-Fi icon on your PC or are facing some other connectivity issues, you can try flushing the DNS. This step helps clear incorrect and outdated DNS records and hence, fixes internet-related issues. To flush the DNS –
- Step 1 – In the Windows search bar, type cmd and click on the Run as administrator. This will open the administrative Command Prompt.

- Step 2 – When the Command Prompt window opens, type the following commands. Press the Enter key after each of the commands –
ipconfig /release
ipconfig /renew
ipconfig /flushdns
Now, try and connect to the Wi-Fi again.
Wrapping Up
We hope that you can now enjoy the internet in its entirety; you can now enjoy Wi-Fi without only having to depend on the ethernet cable for accessing the internet. If you have been able to fix the issue, do let us know in the comments section which of the above solutions worked out for you.
You can also read the below tutorials.

Embedded Software | Firmware | Linux Devic Driver | RTOS
Hi, I am a tech blogger and an Embedded Engineer. I am always eager to learn and explore tech-related concepts. And also, I wanted to share my knowledge with everyone in a more straightforward way with easy practical examples. I strongly believe that learning by doing is more powerful than just learning by reading. I love to do experiments. If you want to help or support me on my journey, consider sharing my articles, or Buy me a Coffee! Thank you for reading my blog! Happy learning!
Share this:

Discover more from EmbeTronicX
Subscribe to get the latest posts sent to your email.