
This article is a continuation of the Series on Linux Device Drivers and carries the discussion on character drivers and their implementation. The aim of this series is to provide easy and practical examples that anyone can understand. This is the First Linux Device Driver – Linux Device Driver Tutorial Part 2.
Table of Contents
Prerequisites
To continue with this tutorial, you must have set up the Ubuntu or Raspberry Pi, or Beaglebone. If you aren’t set up anything yet, we suggest you to set up the boards that you have using the below-given tutorials.
Let’s make our hands dirty.
You can find a video explanation of this tutorial here. You can also find all the Linux device driver’s video playlists here.
First Linux Device Driver
Module Information
- License
- Author
- Module Description
- Module Version
These pieces of information are present in the Linux/module.h as macros.
|
|
|
License
GPL, or the GNU General Public License, is an open-source license meant for software. If your software is licensed under the terms of the GPL, it is free. However, “free” here does not essentially mean freeware—it can also be paid software. Instead, “free” as per the GPL means freedom. As proponents of GPL proudly proclaim, free as in freedom, not free beer.
The following license idents are currently accepted as indicating free software modules.
"GPL" [GNU Public License v2 or later]
"GPL v2" [GNU Public License v2]
"GPL and additional rights" [GNU Public License v2 rights and more]
|
|
|
"Dual BSD/GPL" [GNU Public License v2 or BSD license choice]
"Dual MIT/GPL" [GNU Public License v2 or MIT license choice]
"Dual MPL/GPL" [GNU Public License v2 or Mozilla license choice]
The following other idents are available
"Proprietary" [Non free products]
|
|
|
There are dual-licensed components, but when running with Linux it is the GPL that is relevant so this is a non-issue. Similarly, LGPL linked with GPL is a GPL combined work.
This exists for several reasons,
modinfocan show license info for users wanting to vet their setup is free- The community can ignore bug reports including proprietary modules
- Vendors can do likewise based on their own policies
We can give the License for our Linux device driver (module) like below. For this, you need to include the Linux/module.h header file.
MODULE_LICENSE("GPL");
MODULE_LICENSE("GPL v2");
MODULE_LICENSE("Dual BSD/GPL");
Note: It is not strictly necessary, but your module really should specify which license applies to its code.
Author
Using this Macro we can mention who is writing this Linux device driver or module. So modinfo can show the author’s name for users wanting to know. We can give the Author’s name for our driver (module) like below. For this, you need to include the Linux/module.h header file.
|
|
|
MODULE_AUTHOR("Author");
Note: Use “Name <email>” or just “Name”, for multiple authors use multiple MODULE_AUTHOR() statements/lines.
Module Description
Using this Macro we can give a description of the module or Linux device driver. So modinfo can show a module description for users wanting to know. We can give the description for our driver (module) like below. For this, you need to include the Linux/module.h header file.
MODULE_DESCRIPTION("A sample driver");
Module Version
Using this Macro we can give the version of the module or driver. So, modinfo can show the module version for users wanting to know.
Version of form [<epoch>:]<version>[-<extra-version>].
<epoch>: A (small) unsigned integer which allows you to start versions anew. If not mentioned, it’s zero. eg. “2:1.0” is after “1:2.0”.
|
|
|
<version>: The <version> may contain only alphanumerics and the character `.’. Ordered by numeric sort for numeric parts, ASCII sort for ASCII parts (as per RPM or DEB algorithm).
<extraversion>: Like <version>, but inserted for local customizations, eg “rh3” or “rusty1”.
Example
MODULE_VERSION("2:1.0");
Simple Kernel Module Programming
So as of now, we know the very basic things that are needed for writing the Linux device drivers. Now we will move into programming. In every programming language, how we will start to write the code? Any ideas? Well, in all programming there would be a starting point and ending point. If you take C Language, the starting point would be the main function, Isn’t it? It will start from the start of the main function and run through the functions which are calling from the main function. Finally, it exits at the main function closing point. But Here two separate functions are used for the starting and ending.
- Init function
- Exit function
Kernel modules require a different set of header files than user programs require. And keep in mind, Module code should not invoke user space Libraries or API or System calls.
|
|
|
Init function
This is the function that will execute first when the Linux device driver is loaded into the kernel. For example, when we load the driver using insmod, this function will execute. Please see below to know the syntax of this function.
static int __init hello_world_init(void) /* Constructor */
{
    return 0;
}
module_init(hello_world_init);
This function should register itself by using module_init() macro.
Exit function
This is the function that will execute last when the Linux device driver is unloaded from the kernel. For example, when we unload the driver using rmmod, this function will execute. Please see below to know the syntax of this function.
void __exit hello_world_exit(void)
{

}
module_exit(hello_world_exit);
This function should register itself by using module_exit() macro.
Printk()
In C programming how we will print the values or whatever? Correct. Using printf() function. printf() is a user-space function. So we cant use this here. So, they have created another function for the kernel which is printk().
|
|
|
One of the differences is that printk lets you classify messages according to their severity by associating different log levels, or priorities, with the messages. You usually indicate the log level with a macro. I will explain about the macros now. There are several macros used for printk.
KERN_EMERG:
Used for emergency messages, usually those that precede a crash.
KERN_ALERT:
A situation requiring immediate action.
|
|
|
KERN_CRIT:
Critical conditions are often related to serious hardware or software failures.
KERN_ERR:
Used to report error conditions; device drivers often use KERN_ERR to report hardware difficulties.
KERN_WARNING:
|
|
|
Warnings about problematic situations that do not, in themselves, create serious problems with the system.
KERN_NOTICE:
Situations that are normal, but still worthy of note. A number of security-related conditions are reported at this level.
KERN_INFO:
Informational messages. Many drivers print information about the hardware they find at startup time at this level.
|
|
|
KERN_DEBUG:
Used for debugging messages.
Example
printk(KERN_INFO "Welcome To EmbeTronicX");
The difference between printf and printk
Printk()is a kernel-level function, which has the ability to print out to different log levels as defined in. We can see the prints usingdmesgcommand.printf()will always print to a file descriptor – STD_OUT. We can see the prints in the STD_OUT console.
Note: In the newer Linux kernels, you can use the APIs below instead of this printk.
pr_info– Print an info-level message. (ex.pr_info("test info message\n")).pr_cont– Continues a previous log message in the same line.pr_debug– Print a debug-level message conditionally.pr_err– Print an error-level message. (ex. pr_err(“test error message\n”)).pr_warn– Print a warning-level message.
First Linux Device Driver – Simple Linux Device Driver
This is the complete code for our simple device driver (hello_world_module.c). You can download the Project By clicking the below link.
|
|
|
[Get the code from Github]
/***************************************************************************//**
*  \file       driver.c
*
*  \details    Simple hello world driver
*
*  \author     EmbeTronicX
*
* *******************************************************************************/
#include<linux/kernel.h>
#include<linux/init.h>
#include<linux/module.h>

/*
** Module Init function
*/
static int __init hello_world_init(void)
{
    printk(KERN_INFO "Welcome to EmbeTronicX\n");
    printk(KERN_INFO "This is the Simple Module\n");
    printk(KERN_INFO "Kernel Module Inserted Successfully...\n");
    return 0;
}

/*
** Module Exit function
*/
static void __exit hello_world_exit(void)
{
    printk(KERN_INFO "Kernel Module Removed Successfully...\n");
}

module_init(hello_world_init);
module_exit(hello_world_exit);

MODULE_LICENSE("GPL");
MODULE_AUTHOR("EmbeTronicX <[email protected]>");
MODULE_DESCRIPTION("A simple hello world driver");
MODULE_VERSION("2:1.0");
Compiling our driver
Once we have the C code, it is time to compile it and create the module file hello_world_module.ko. creating a Makefile for your module is straightforward.
obj-m += hello_world.o

ifdef ARCH
  #You can update your Beaglebone path here.
  KDIR = /home/embetronicx/BBG/tmp/lib/modules/5.10.65/build
else
  KDIR = /lib/modules/$(shell uname -r)/build
endif

all:
  make -C $(KDIR)  M=$(shell pwd) modules

clean:
  make -C $(KDIR)  M=$(shell pwd) clean
The C code (hello_world_module.c) and Makefile are ready, all we need to do is invoke make to build our first driver (hello_world_module .ko).
Demo in Beaglebone
If you are using the Beaglebone board, please follow the below video. If you are using Ubuntu or Raspberry Pi, then please skip this video and go ahead with the next part.
You can cross-compile the Linux device driver using the below command.
|
|
|
sudo make ARCH=arm CROSS_COMPILE=arm-linux-gnueabi-
Then copy the driver to the Beaglebone using the below command.
sudo rsync -avz *.ko [email protected]:/home/debian
You can refer to the below video.
Demo in Ubuntu and Raspberry Pi
In Terminal you need to enter sudo make like the below image.
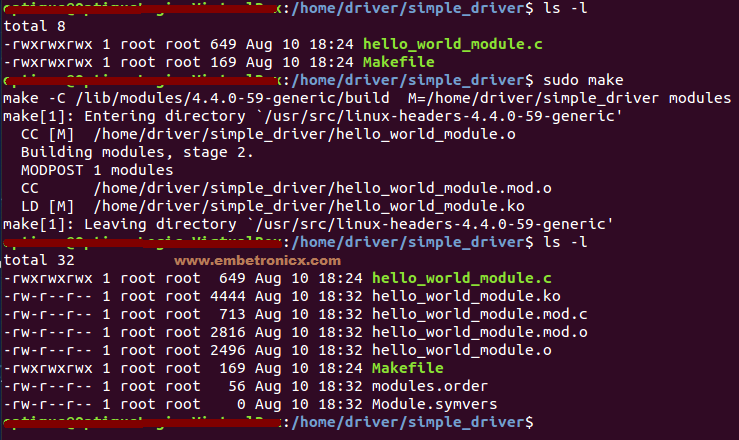 Now we got
 hello_world_module .ko. This is the kernel object which is loading into the kernel.
|
|
|
Loading and Unloading the Linux Device driver
A Kernel Module is a small file that may be loaded into the running Kernel and unloaded.
Loading
To load a Kernel Module, use the insmod command with root privileges.
For example, our module file name is hello_world_module.ko
sudo insmod hello_world_module.ko

|
|
|
lsmod used to see the modules were inserted. In the below image, I’ve shown the prints in the init function. Use dmesg to see the kernel prints.

So, when I load the module, it executes the init function.
Listing the Modules
In order to see the list of currently loaded modules, use the lsmod command. In the above image, you can see that I have used lsmod command.
Unloading
To un-load, a Kernel module, use the rmmod command with root privileges.
|
|
|
In our case,
sudo rmmod hello_world_module.ko or sudo rmmod hello_world_module

So, when I unload the module, it executes the exit function.
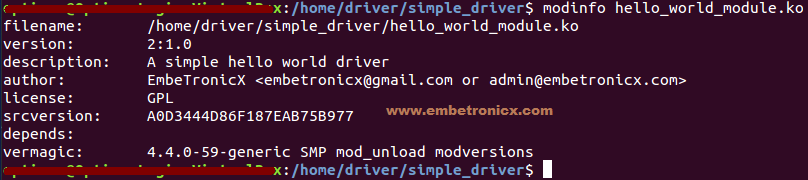
Getting Module Details
In order to get information about a Module (author, supported options), we may use the modinfo command.
|
|
|
For example
modinfo hello_world_module.ko
So, now we know where to start with the Linux device driver. Thank you for reading. In our next tutorial, we will see how to pass the arguments to the Linux device driver. Find out the other Linux device driver tutorials here.
Video Explanation
Please check our video explanation below.
|
|
|
You can also read the below tutorials.
Embedded Software | Firmware | Linux Devic Deriver | RTOS
Hi, I am a tech blogger and an Embedded Engineer. I am always eager to learn and explore tech-related concepts. And also, I wanted to share my knowledge with everyone in a more straightforward way with easy practical examples. I strongly believe that learning by doing is more powerful than just learning by reading. I love to do experiments. If you want to help or support me on my journey, consider sharing my articles, or Buy me a Coffee! Thank you for reading my blog! Happy learning!
