When you use your Raspberry Pi as your mini PC, then I am sure you would have found some difficulties to get the current correct time if you don’t connect your Raspberry Pi to the network using Ethernet, WiFi, etc.
In this Adding a Real Time Clock to your Raspberry Pi post, we will see how to get rid of this problem.
In this demonstration, we have used the DS3231 RTC module.
Table of Contents
Adding a Real Time Clock to your Raspberry Pi
Hardware Required
- Raspberry Pi
- DS3231 RTC module
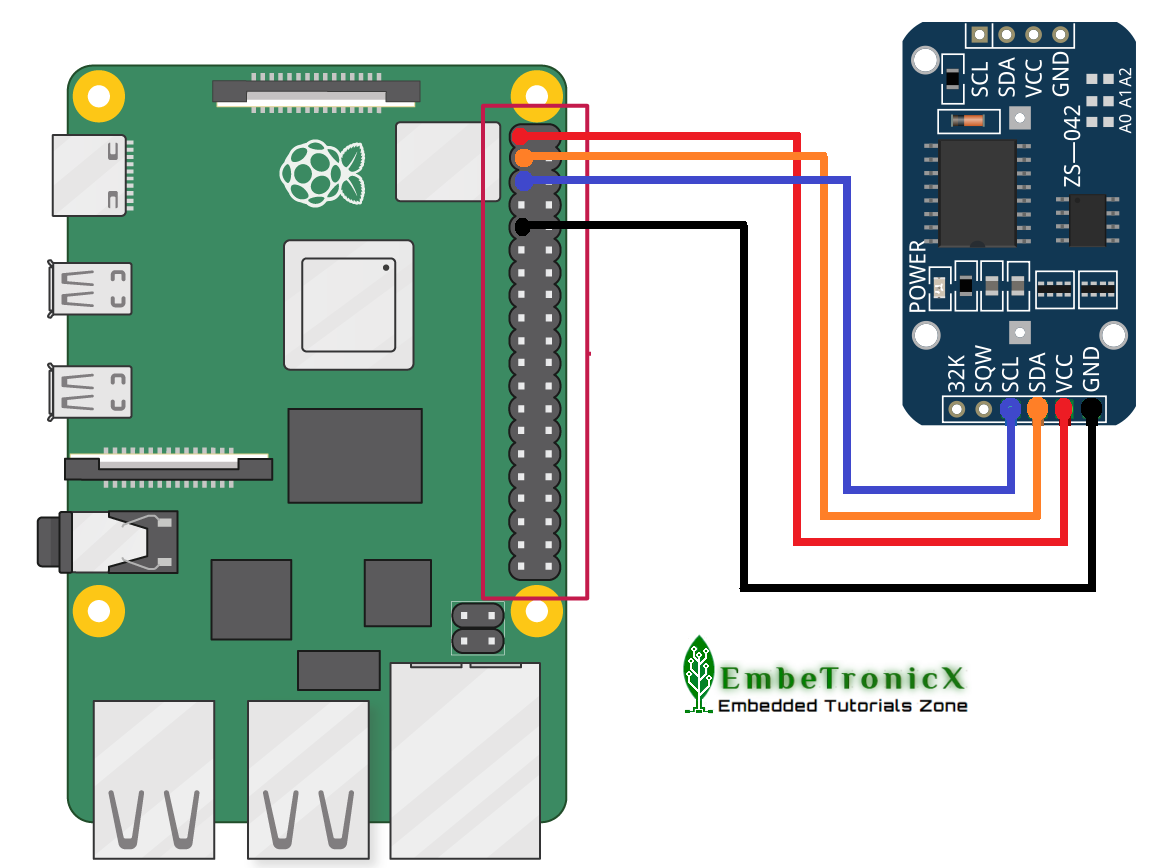
Connection Diagram
- VCC – 3.3V
- GND – GND
- SDA – GPIO 2 (Pin 3)
- SCL – GPIO 3 (Pin 5)
Steps
Enable I2C
- Open the /boot/config.txt using the below command.
sudo vi /boot/config.txt
- The above command opens the config.tx file. If you are not familiar with the vi editor you can use whatever you want. Please refer this vi commands.
- Then add the below two lines.
dtparam=i2c_arm=on
dtoverlay=i2c-rtc,ds3231
- Save the /boot/config.txt file and exit.
- Reboot your Raspberry Pi.
Install I2C Tools
- Then install i2c-tools using the below command.
sudo apt-get install i2c-tools
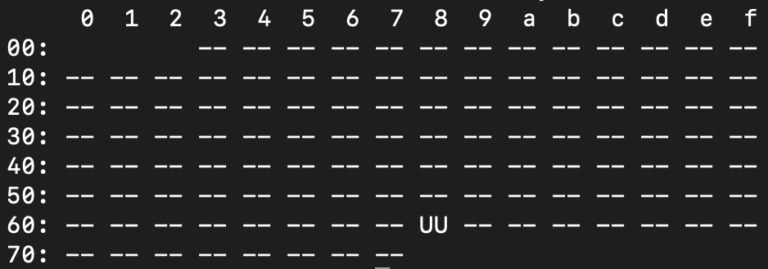
- Then check whether the DS3231 is detected or not using the installed i2c-tools.
sudo i2cdetect -y 1
- You should get an output like the below image.
|
|
|
The 0x68 is a popular address for real-time clocks, especially for the DS3231. Having a #68 on the address means that a driver wasn’t using the address. If the address result is “UU”, it is currently being used by a driver.
Use the DS3231 as the main clock
- Run
sudo vi /lib/udev/hwclock-setand comment out these three lines:
Before change:
if [ -e /run/systemd/system ] ; then
exit 0
fi
After change:
#if [ -e /run/systemd/system ] ; then
# exit 0
#fi
- Comment the below lines if any.
/sbin/hwclock --rtc=$dev --systz --badyear
/sbin/hwclock --rtc=$dev –systz
- Run the following commands to insert the drivers.
modprobe i2c-dev
modprobe i2c-bmc2708
modprobe i2c-ds1307
Note: Select your modprobe i2c-bmc2708 command based on your Raspberry Pi model.
- Then enter as admin and write data to the I2C device. Refer to the below commands.
sudo su
echo ds1307 0x68 > /sys/class/i2c-adapter/i2c-1/new_device
- Read the time from the hardware module using the below command.
sudo hwclock -r
Now you should be able to get the time. If this is the very first time, then you may get the wrong time. Don’t worry.
|
|
|
- Configure the RTC time with the system time using the below command. Before that, please connect your Pi with WiFi or Ethernet. So, Pi will be having updated time.
sudo hwclock -w
- Now read back the RTC time using
sudo hwclock -r. - You should get the proper time.
Till now, we are good to use the RTC module. But when you reboot your Raspberry Pi, it won’t use the RTC module’s time. To achieve that, please follow the mentioned steps.
- Edit the /etc/modules.
sudo vi /etc/modules
- Then add rtc-ds1307 to the /etc/modules.
- Add the following to /etc/rc.local just above the exit 0 line.
echo ds1307 0x68 > /sys/class/i2c-adapter/i2c-1/new_device
sudo hwclock -s
If you don’t have the /etc/rc.local file, then follow the below steps.
- Create that file.
sudo vi /etc/rc.local
- Then add the below lines to that file.
#!/bin/sh -e
#
# rc.local
#
# This script is executed at the end of each multiuser runlevel.
# Make sure that the script will "exit 0" on success or any other
# value on error.
#
# In order to enable or disable this script just change the execution
# bits.
#
# By default this script does nothing.


echo ds1307 0x68 > /sys/class/i2c-adapter/i2c-1/new_device
sudo hwclock -s
exit 0
- Create another file called /etc/systemd/system/rc-local.service using the below command.
sudo vi /etc/systemd/system/rc-local.service
- Add the below lines to that file.
[Unit]
Description=/etc/rc.local Compatibility
ConditionPathExists=/etc/rc.local

[Service]
Type=forking
ExecStart=/etc/rc.local start
TimeoutSec=0
StandardOutput=tty
RemainAfterExit=yes
SysVStartPriority=99

[Install]
WantedBy=multi-user.target
- Then Enable the rc-local service.
sudo systemctl enable rc-local
- Remember to set the executable bit on the rc.local
sudo chmod +x /etc/rc.local
All good. Now you can reboot the Raspberry Pi. Now, it should be picking the RTC. To verify that, run the sudo hwclock -r. If you get any error, then the device is not loaded properly. Do the below steps.
- Create a new script using the below command.
sudo vi /etc/init.d/rtc.sh
- Add the below lines to that file.
#!/bin/sh
echo ds1307 0x68 > /sys/class/i2c-adapter/i2c-1/new_device
- Then run the below commands.
chmod ugo+x /etc/init.d/rtc.sh
update-rc.d rtc.sh defaults
That’s all, you try a reboot and check it again.
Change the timezone:
|
|
|
By default, you will be in the UTC timezone. we can use the timedatectl command to display and set the current system’s time and timezone.
Example:
$timedatectl

                      Local time: Wed 2021-10-23 22:45:47 UTC
                  Universal time: Wed 2021-10-23 22:45:47 UTC
                        RTC time: Wed 2021-10-23 22:45:48
                       Time zone: Etc/UTC (UTC, +0000)
       System clock synchronized: yes
systemd-timesyncd.service active: yes
                 RTC in local TZ: no
- You can run the command
cat /etc/timezoneto get the timezone that is activated. - Then run the
timedatectl list-timezonescommand to list the available timezones. - Then it will list all the time zones. So note the timezone which you want to set and run the below command with your desired timezone.
sudo timedatectl set-timezone your_time_zone
Example:
sudo timedatectl set-timezone Europe/Rome
Now, your timezone should be updated, and run the sudo hwclock -w.
That’s all. You have configured the RTC DS3231 with Raspberry Pi.
|
|
|
You can also read the below tutorials.
Embedded Software | Firmware | Linux Devic Deriver | RTOS
Hi, I am a tech blogger and an Embedded Engineer. I am always eager to learn and explore tech-related concepts. And also, I wanted to share my knowledge with everyone in a more straightforward way with easy practical examples. I strongly believe that learning by doing is more powerful than just learning by reading. I love to do experiments. If you want to help or support me on my journey, consider sharing my articles, or Buy me a Coffee! Thank you for reading my blog! Happy learning!
