This article is a continuation of the Series on Linux Device Drivers and carries the discussion on Linux device drivers and their implementation. The aim of this series is to provide easy and practical examples that anyone can understand. This is the Threaded IRQ in Linux Device Driver using Raspberry PI – Linux Device Driver Tutorial Part 46.
You can also read GPIO driver, Spinlock, Sysfs, Procfs, Workqueue, Completion, Softirq, and threaded IRQ in the Linux device driver.
We are using the Raspberry PI 4 Model B for this demonstration.
Table of Contents
Prerequisites
In this tutorial, we will be using the concepts which have been explained already in the below-given tutorials. So I would request you to go through those tutorials first if you are not familiar with those topics.
- Interrupts in Linux Kernel
- Interrupts example in Linux kernel
- Workqueue Example – Static Method
- Workqueue Example – Dynamic Method
- Workqueue Example – Own Workqueue
- Tasklet – Dynamic Method
- Tasklet – Static Method
- Softirq
As we are using interrupts, we came across the word called bottom half.
|
|
|
Bottom Half
When Interrupt triggers, the Interrupt handler should be executed very quickly and it should not run for more time (it should not perform time-consuming tasks). If we have the interrupt handler who is doing more tasks then we need to divide it into two halves.
- Top Half
- Bottom Half
The top Half is nothing but our interrupt handler. If we want to do less work, then the top half is more than enough. No need for the bottom half in that situation. But if we have more work when interrupt hits, then we need the bottom half. The bottom half runs in the future, at a more convenient time, with all interrupts enabled. So, The job of the bottom halves is to perform any interrupt-related work not performed by the interrupt handler.
There are 4 bottom half mechanisms are available in Linux:
- Workqueue – Executed in a process context.
- Threaded IRQs
- Softirqs – Executed in an atomic context.
- Tasklets – Executed in an atomic context.
In this tutorial, we will discuss threaded IRQ in Linux Kernel.
Threaded IRQ in Linux Kernel
If you see in our previous tutorials where we discussed bottom halves (Workqueue, softirq, Tasklets), we have to register those bottom half and ask the kernel to call those bottom half handler functions. To simplify the process more, Linux has introduced the threaded IRQ. Using this feature, Linux is like, you just give me the handler functions (both top half and bottom half), and I will call those functions at a right time. So, with this threaded IRQ, registering the interrupt handler is a bit simplified and we need not even have to schedule the bottom half ourselves. The core does this for us.
|
|
|
The main aim of the threaded IRQ is to reduce the time spent with interrupts being disabled and that will increase the chances of handling other interrupts. How we are achieving this? If we want to know this, we have to know what we are doing in the interrupt handler normally. Once the interrupt hits, we will disable the all interrupts and process our data or do something. Once we process that, then re-enable the interrupts. In this case, if we take more time to process in the ISR, then we might miss the other interrupts as we have disabled the interrupts in the ISR.
To eliminate this, we just do a very important process in the ISR (which takes less than 100us) and deferred other stuff to the thread function. In this case, interrupts have not been disabled for more time. So, we will respond to other interrupts too.
Threaded IRQ API
We have to use the request_threaded_irq instead of request_irq and pass two handlers to that API.
|
Where,
Interrupt line or IRQ number to allocate.
This is the primary handler for threaded interrupts. This function will be invoked whenever the operating system receives the interrupt. The data type of return is
A function called from the irq handler. If NULL, no IRQ thread is created. This represents the bottom half. When the
can be either zero or a bitmask of one or more of the flags defined in
Used to identify the device name using this IRQ, for example,
IRQ shared by many devices. When an interrupt handler is freed, the dev provides a unique cookie to enable the removal of only the desired interrupt handler from the interrupt line. Without this parameter, it would be impossible for the kernel to know which handler to remove on a given interrupt line. You can pass NULL here if the line is not shared, but you must pass a unique cookie if your interrupt line is shared. This pointer is also passed into the interrupt handler on each invocation. A common practice is to pass the driver’s device structure. This pointer is unique and might be useful to have within the handlers. Return |
What if a threaded IRQ handler takes more time?
Okay, I can hear you guys. Some will ask, what if threaded IRQ handler (thread_fn) takes more time when ISR handler takes less time? In that case, we don’t miss the interrupts. But we miss the threaded IRQ function (thread_fn). Confusion? Let’s see this by using an example.
I have two interrupts (UART, and GPIO) being enabled. I have used threaded IRQ for UART interrupt. So, we will be having one UART ISR handler and a UART thread handler(thread_fn). Once we receive some data from the UART, UART ISR will be triggered. Then kernel calls the UART thread handler(thread_fn). If we take more time to process the data in the UART thread handler(thread_fn) (basically when (thread_fn) takes more time), Core can able to receive the other interrupts like GPIO as the interrupts are not disabled. It will process that. But if it receives the same UART interrupt, the UART ISR will be called but the UART thread handler (thread_fn) may not be called as the UART thread handler is still processing the old received data.
|
|
|
I hope there is no confusion. If you have any questions, please comment below.
Let’s jump into programming.
Threaded IRQ in Linux – Example Programming
Concept
As we are using the GPIO interrupt, the ISR handler gpio_irq_handler will be called when we press the button or vibration is detected in the vibration sensor. There we are returning IRQ_WAKE_THREAD. So, the kernel will call the thread handler gpio_interrupt_thread_fn. In that threaded IRQ handler, we are toggling the GPIO where the LED has been connected. Please look at the softirq Linux source code below.
Driver Source Code
[Get the full updated source code from GitHub]
/***************************************************************************//**
*  \file       driver.c
*
*  \details    Simple GPIO driver explanation (Threaded IRQ)
*
*  \author     EmbeTronicX
*
*  \Tested with Linux raspberrypi 5.10.27-v7l-embetronicx-custom+
*
*******************************************************************************/
#include <linux/kernel.h>
#include <linux/init.h>
#include <linux/module.h>
#include <linux/kdev_t.h>
#include <linux/fs.h>
#include <linux/cdev.h>
#include <linux/device.h>
#include <linux/delay.h>
#include <linux/uaccess.h>  //copy_to/from_user()
#include <linux/gpio.h>     //GPIO
#include <linux/interrupt.h>
#include <linux/err.h>
/* Since debounce is not supported in Raspberry pi, I have addded this to disable
** the false detection (multiple IRQ trigger for one interrupt).
** Many other hardware supports GPIO debounce, I don't want care about this even
** if this has any overhead. Our intention is to explain the GPIO interrupt.
** If you want to disable this extra coding, you can comment the below macro.
** This has been taken from : https://raspberrypi.stackexchange.com/questions/8544/gpio-interrupt-debounce
**
** If you want to use Hardaware Debounce, then comment this EN_DEBOUNCE.
**
*/
#define EN_DEBOUNCE

#ifdef EN_DEBOUNCE
#include <linux/jiffies.h>

extern unsigned long volatile jiffies;
unsigned long old_jiffie = 0;
#endif

//LED is connected to this GPIO
#define GPIO_21_OUT (21)

//LED is connected to this GPIO
#define GPIO_25_IN  (25)

//GPIO_25_IN value toggle
unsigned int led_toggle = 0;

//This used for storing the IRQ number for the GPIO
unsigned int GPIO_irqNumber;

//Interrupt handler for GPIO 25. This will be called whenever there is a raising edge detected.
static irqreturn_t gpio_irq_handler(int irq, void *dev_id)
{

#ifdef EN_DEBOUNCE
   unsigned long diff = jiffies - old_jiffie;
   if (diff < 20)
   {
     return IRQ_HANDLED;
   }

  old_jiffie = jiffies;
#endif

  pr_info("Interrupt(IRQ Handler)\n");

  /*
  ** If you don't want to call the thread fun, then you can just return
  ** IRQ_HANDLED. If you return IRQ_WAKE_THREAD, then thread fun will be called.
  */
  return IRQ_WAKE_THREAD;
}

/*
** This function is the threaded irq handler
*/
static irqreturn_t gpio_interrupt_thread_fn(int irq, void *dev_id)
{
  led_toggle = (0x01 ^ led_toggle);                             // toggle the old value
  gpio_set_value(GPIO_21_OUT, led_toggle);                      // toggle the GPIO_21_OUT
  pr_info("Interrupt(Threaded Handler) : GPIO_21_OUT : %d ",gpio_get_value(GPIO_21_OUT));

  return IRQ_HANDLED;
}


dev_t dev = 0;
static struct class *dev_class;
static struct cdev etx_cdev;

static int __init etx_driver_init(void);
static void __exit etx_driver_exit(void);


/*************** Driver functions **********************/
static int etx_open(struct inode *inode, struct file *file);
static int etx_release(struct inode *inode, struct file *file);
static ssize_t etx_read(struct file *filp,
                char __user *buf, size_t len,loff_t * off);
static ssize_t etx_write(struct file *filp,
                const char *buf, size_t len, loff_t * off);
/******************************************************/

//File operation structure
static struct file_operations fops =
{
  .owner          = THIS_MODULE,
  .read           = etx_read,
  .write          = etx_write,
  .open           = etx_open,
  .release        = etx_release,
};

/*
** This function will be called when we open the Device file
*/
static int etx_open(struct inode *inode, struct file *file)
{
  pr_info("Device File Opened...!!!\n");
  return 0;
}

/*
** This function will be called when we close the Device file
*/
static int etx_release(struct inode *inode, struct file *file)
{
  pr_info("Device File Closed...!!!\n");
  return 0;
}

/*
** This function will be called when we read the Device file
*/
static ssize_t etx_read(struct file *filp,
                char __user *buf, size_t len, loff_t *off)
{
  uint8_t gpio_state = 0;

  //reading GPIO value
  gpio_state = gpio_get_value(GPIO_21_OUT);

  //write to user
  len = 1;
  if( copy_to_user(buf, &gpio_state, len) > 0) {
    pr_err("ERROR: Not all the bytes have been copied to user\n");
  }

  pr_info("Read function : GPIO_21 = %d \n", gpio_state);

  return 0;
}

/*
** This function will be called when we write the Device file
*/
static ssize_t etx_write(struct file *filp,
                const char __user *buf, size_t len, loff_t *off)
{
  uint8_t rec_buf[10] = {0};

  if( copy_from_user( rec_buf, buf, len ) > 0) {
    pr_err("ERROR: Not all the bytes have been copied from user\n");
  }

  pr_info("Write Function : GPIO_21 Set = %c\n", rec_buf[0]);

  if (rec_buf[0]=='1') {
    //set the GPIO value to HIGH
    gpio_set_value(GPIO_21_OUT, 1);
  } else if (rec_buf[0]=='0') {
    //set the GPIO value to LOW
    gpio_set_value(GPIO_21_OUT, 0);
  } else {
    pr_err("Unknown command : Please provide either 1 or 0 \n");
  }

  return len;
}

/*
** Module Init function
*/
static int __init etx_driver_init(void)
{
  /*Allocating Major number*/
  if((alloc_chrdev_region(&dev, 0, 1, "etx_Dev")) <0){
    pr_err("Cannot allocate major number\n");
    goto r_unreg;
  }
  pr_info("Major = %d Minor = %d \n",MAJOR(dev), MINOR(dev));

  /*Creating cdev structure*/
  cdev_init(&etx_cdev,&fops);

  /*Adding character device to the system*/
  if((cdev_add(&etx_cdev,dev,1)) < 0){
    pr_err("Cannot add the device to the system\n");
    goto r_del;
  }

  /*Creating struct class*/
  if(IS_ERR(dev_class = class_create(THIS_MODULE,"etx_class"))){
    pr_err("Cannot create the struct class\n");
    goto r_class;
  }

  /*Creating device*/
  if(IS_ERR(device_create(dev_class,NULL,dev,NULL,"etx_device"))){
    pr_err( "Cannot create the Device \n");
    goto r_device;
  }

  //Output GPIO configuration
  //Checking the GPIO is valid or not
  if(gpio_is_valid(GPIO_21_OUT) == false){
    pr_err("GPIO %d is not valid\n", GPIO_21_OUT);
    goto r_device;
  }

  //Requesting the GPIO
  if(gpio_request(GPIO_21_OUT,"GPIO_21_OUT") < 0){
    pr_err("ERROR: GPIO %d request\n", GPIO_21_OUT);
    goto r_gpio_out;
  }

  //configure the GPIO as output
  gpio_direction_output(GPIO_21_OUT, 0);

  //Input GPIO configuratioin
  //Checking the GPIO is valid or not
  if(gpio_is_valid(GPIO_25_IN) == false){
    pr_err("GPIO %d is not valid\n", GPIO_25_IN);
    goto r_gpio_in;
  }

  //Requesting the GPIO
  if(gpio_request(GPIO_25_IN,"GPIO_25_IN") < 0){
    pr_err("ERROR: GPIO %d request\n", GPIO_25_IN);
    goto r_gpio_in;
  }

  //configure the GPIO as input
  gpio_direction_input(GPIO_25_IN);

  /*
  ** I have commented the below few lines, as gpio_set_debounce is not supported
  ** in the Raspberry pi. So we are using EN_DEBOUNCE to handle this in this driver.
  */
#ifndef EN_DEBOUNCE
  //Debounce the button with a delay of 200ms
  if(gpio_set_debounce(GPIO_25_IN, 200) < 0){
    pr_err("ERROR: gpio_set_debounce - %d\n", GPIO_25_IN);
    //goto r_gpio_in;
  }
#endif

  //Get the IRQ number for our GPIO
  GPIO_irqNumber = gpio_to_irq(GPIO_25_IN);
  pr_info("GPIO_irqNumber = %d\n", GPIO_irqNumber);

  if (request_threaded_irq( GPIO_irqNumber,             //IRQ number
                            (void *)gpio_irq_handler,   //IRQ handler (Top half)
                            gpio_interrupt_thread_fn,   //IRQ Thread handler (Bottom half)
                            IRQF_TRIGGER_RISING,        //Handler will be called in raising edge
                            "etx_device",               //used to identify the device name using this IRQ
                            NULL))                      //device id for shared IRQ
  {
    pr_err("my_device: cannot register IRQ ");
    goto r_gpio_in;
  }

  pr_info("Device Driver Insert...Done!!!\n");
  return 0;

r_gpio_in:
  gpio_free(GPIO_25_IN);
r_gpio_out:
  gpio_free(GPIO_21_OUT);
r_device:
  device_destroy(dev_class,dev);
r_class:
  class_destroy(dev_class);
r_del:
  cdev_del(&etx_cdev);
r_unreg:
  unregister_chrdev_region(dev,1);

  return -1;
}

/*
** Module exit function
*/
static void __exit etx_driver_exit(void)
{
  free_irq(GPIO_irqNumber,NULL);
  gpio_free(GPIO_25_IN);
  gpio_free(GPIO_21_OUT);
  device_destroy(dev_class,dev);
  class_destroy(dev_class);
  cdev_del(&etx_cdev);
  unregister_chrdev_region(dev, 1);
  pr_info("Device Driver Remove...Done!!\n");
}

module_init(etx_driver_init);
module_exit(etx_driver_exit);

MODULE_LICENSE("GPL");
MODULE_AUTHOR("EmbeTronicX <[email protected]>");
MODULE_DESCRIPTION("A simple device driver - Threaded IRQ (GPIO Interrupt) ");
MODULE_VERSION("1.43);
Makefile
obj-m += driver.o

KDIR = /lib/modules/$(shell uname -r)/build


all:
  make -C $(KDIR)  M=$(shell pwd) modules

clean:
  make -C $(KDIR)  M=$(shell pwd) clean
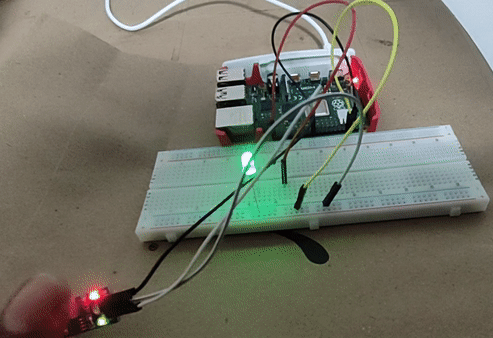
Testing the Device Driver
- Build the driver by using Makefile (
sudo make) - Load the driver using
sudo insmod driver.ko - Just press the button or vibrate the vibration sensor.
- That output LED should be toggled (This has been done from the thread function handler).
- Also, check the dmesg.
[Apr13 12:37] Major = 234 Minor = 0
[  +0.006986] GPIO_irqNumber = 67
[  +0.001567] Device Driver Insert...Done!!!
[  +7.250055] Interrupt(IRQ Handler)
[  +0.000081] Interrupt(Threaded Handler) : GPIO_21_OUT : 1
Output Video
Click here if you don’t see the output gif
|
|
|
Please find the other Linux device driver tutorials here.
You can also read the below tutorials.
Embedded Software | Firmware | Linux Devic Deriver | RTOS
Hi, I am a tech blogger and an Embedded Engineer. I am always eager to learn and explore tech-related concepts. And also, I wanted to share my knowledge with everyone in a more straightforward way with easy practical examples. I strongly believe that learning by doing is more powerful than just learning by reading. I love to do experiments. If you want to help or support me on my journey, consider sharing my articles, or Buy me a Coffee! Thank you for reading my blog! Happy learning!
