This article is a continuation of the Series on STM32 Bootloader and carries the discussion on Bootloader design and implementation. The aim of this series is to provide easy and practical examples that anyone can understand. This post is STM32 Firmware Update using SD card – Bootloader Tutorial Part 7.
We have attached the video explanation also at the bottom of this post. We have posted another variant of the Bootloader development using the STM32F103. Please check that and learn that too.
Table of Contents
Prerequisites
In this STM32 Wireless Firmware Update example, we will be using the concepts which have been explained already in the below-given tutorials. So I would request you to go through those tutorials first if you are not familiar with those topics.
- Bootloader Basics
- Bootloader and Application Design
- Simple Bootloader Implementation
- Updating the application using the bootloader
- Adde Slot 0 and Slot 1 to the bootloader
- STM32 Wireless Firmware update (FOTA using BLE)
We are providing the video format of this Bootloader series. Please check out the video playlist. You can also get the source code of this tutorial from GitHub.
Hardware Required
We have our own EmbeTronicX Store called ChipTronicX. You can purchase the hardware from ChipTronicX.
|
|
|
- STM32F767Zi Nucleo (You can use any STM32 boards. But use the addresses and flash size based on your controller).
- LED (If you don’t have onboard LED)
- Micro SD Card
- SD Card Breakout Board
STM32 Firmware Update using SD Card
What did we do in our previous tutorial?
In our last tutorial, we have tried updating the firmware over the air using Bluetooth Low Energy.
Concept of this tutorial
In this tutorial,
- We will interface the SD card to our STM32 board (SPI).
- Copy the firmware file to that SD card.
- Then we read that firmware file and update the firmware to the flash memory.
SD card interfacing with STM32
I have followed this tutorial to interface the SD card with the STM32 using STM32CubeIDE.
We will move to the Bootloader 0.3 source code, and we will add this feature on top of that. You can check the below video also.
|
|
|
- Click the Bootloader.ioc file.

- Goto Middleware and click the FATFS. Select the User-defined.
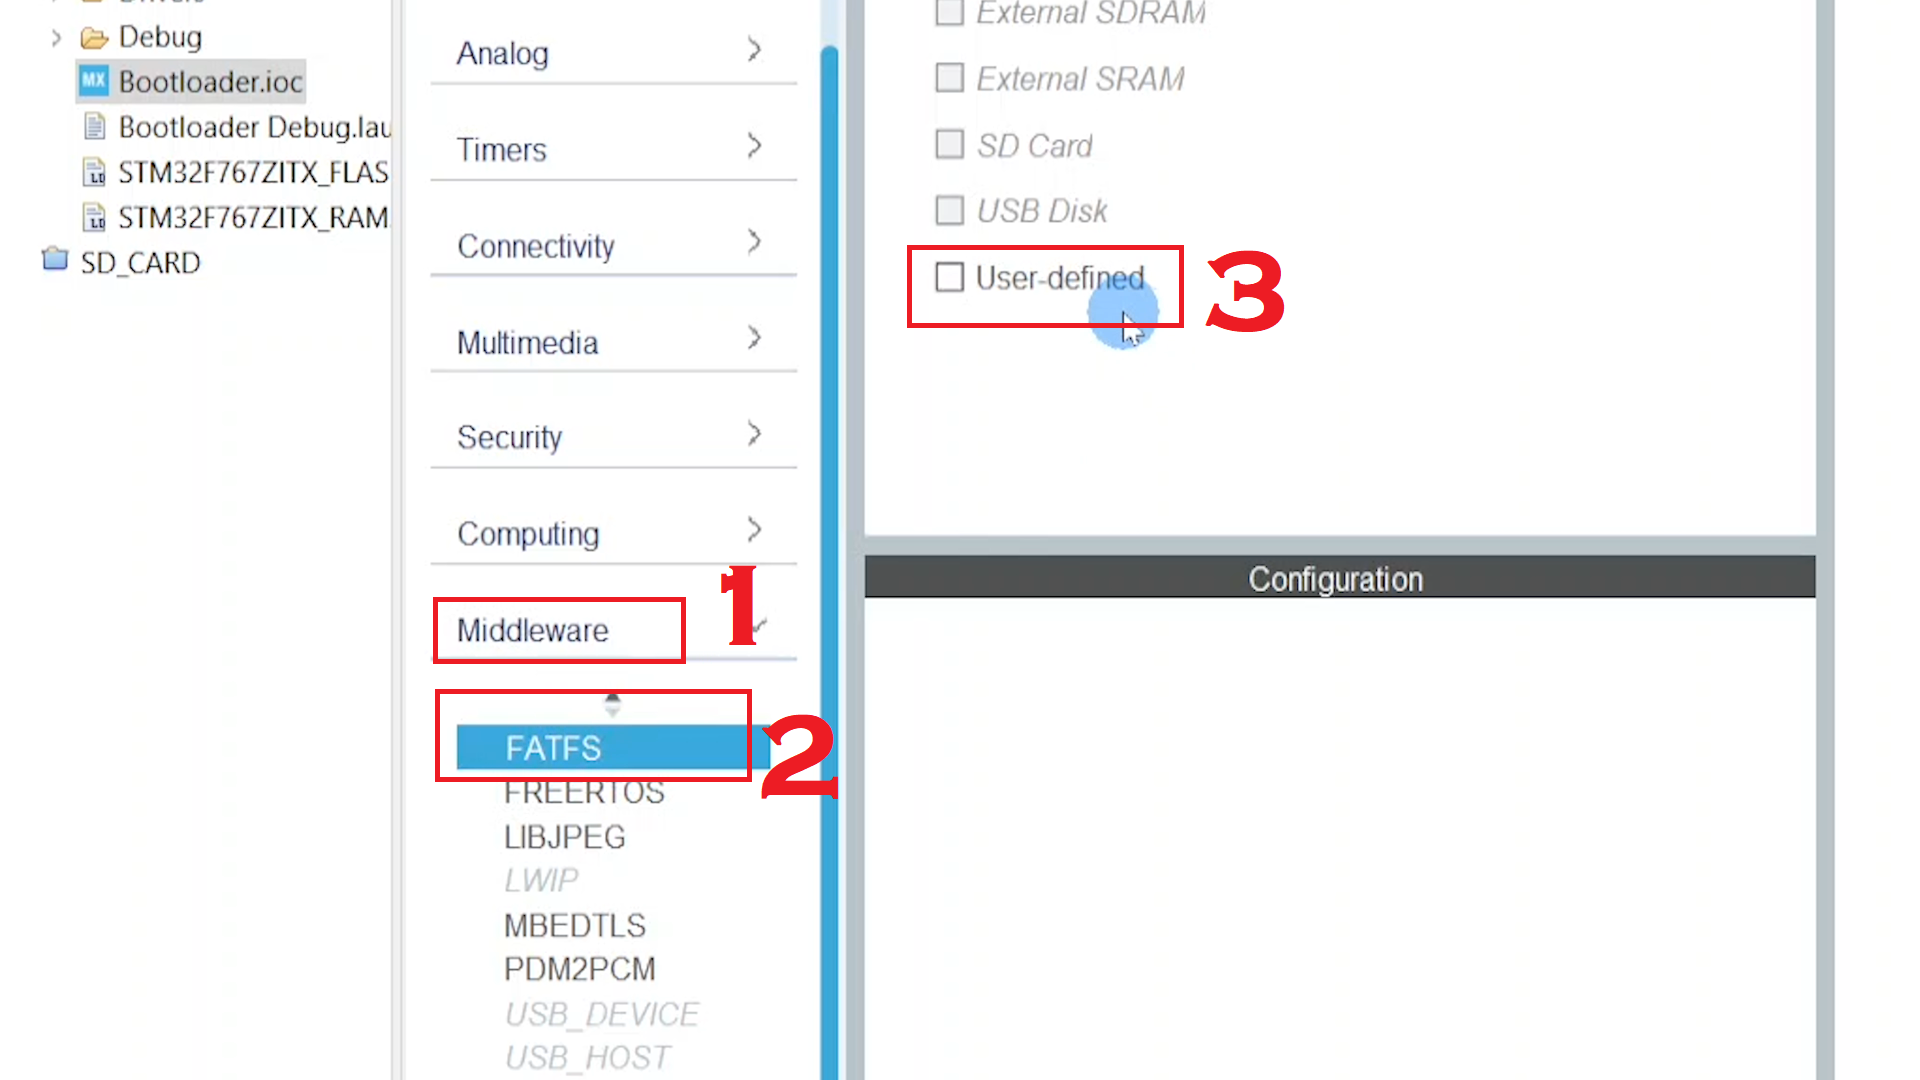
- Enable the USE_LFN which will allow us to use the Long file name.
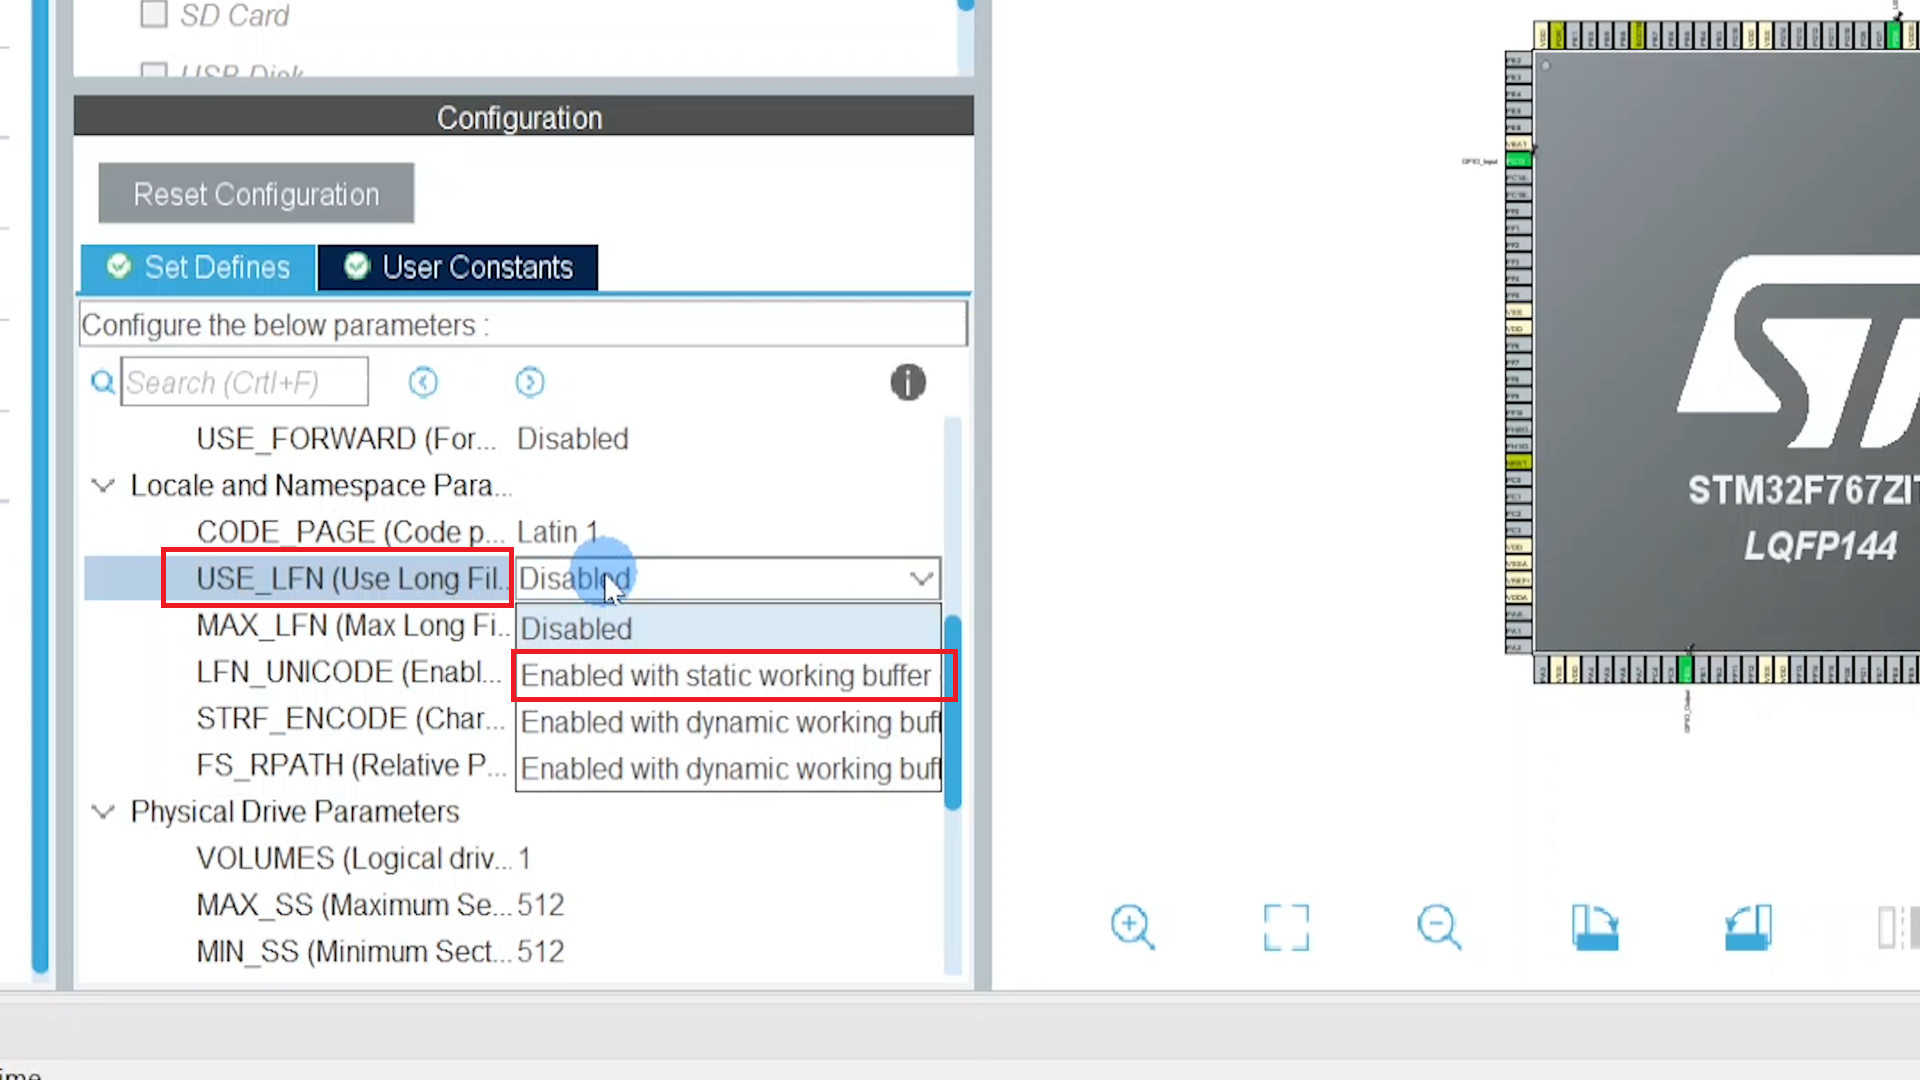
Till now, we have configured the FatFs. Let’s configure the SPI.
|
|
|
- In this tutorial, I am going to connect the SD card to SPI 1. So, enable the SPI as a Full duplex Master. Set the data size to 8 Bits. Prescaler to 128.

- Now, PA5 will act as SPI 1 CLK, PA6 will act as SPI 1 MISO, and PA7 will act as MOSI.
- Chip select pin is missing. So, let’s use the PD14 as CS. Set the PD16 as GPIO output and change the name to SD_CS for our understanding.
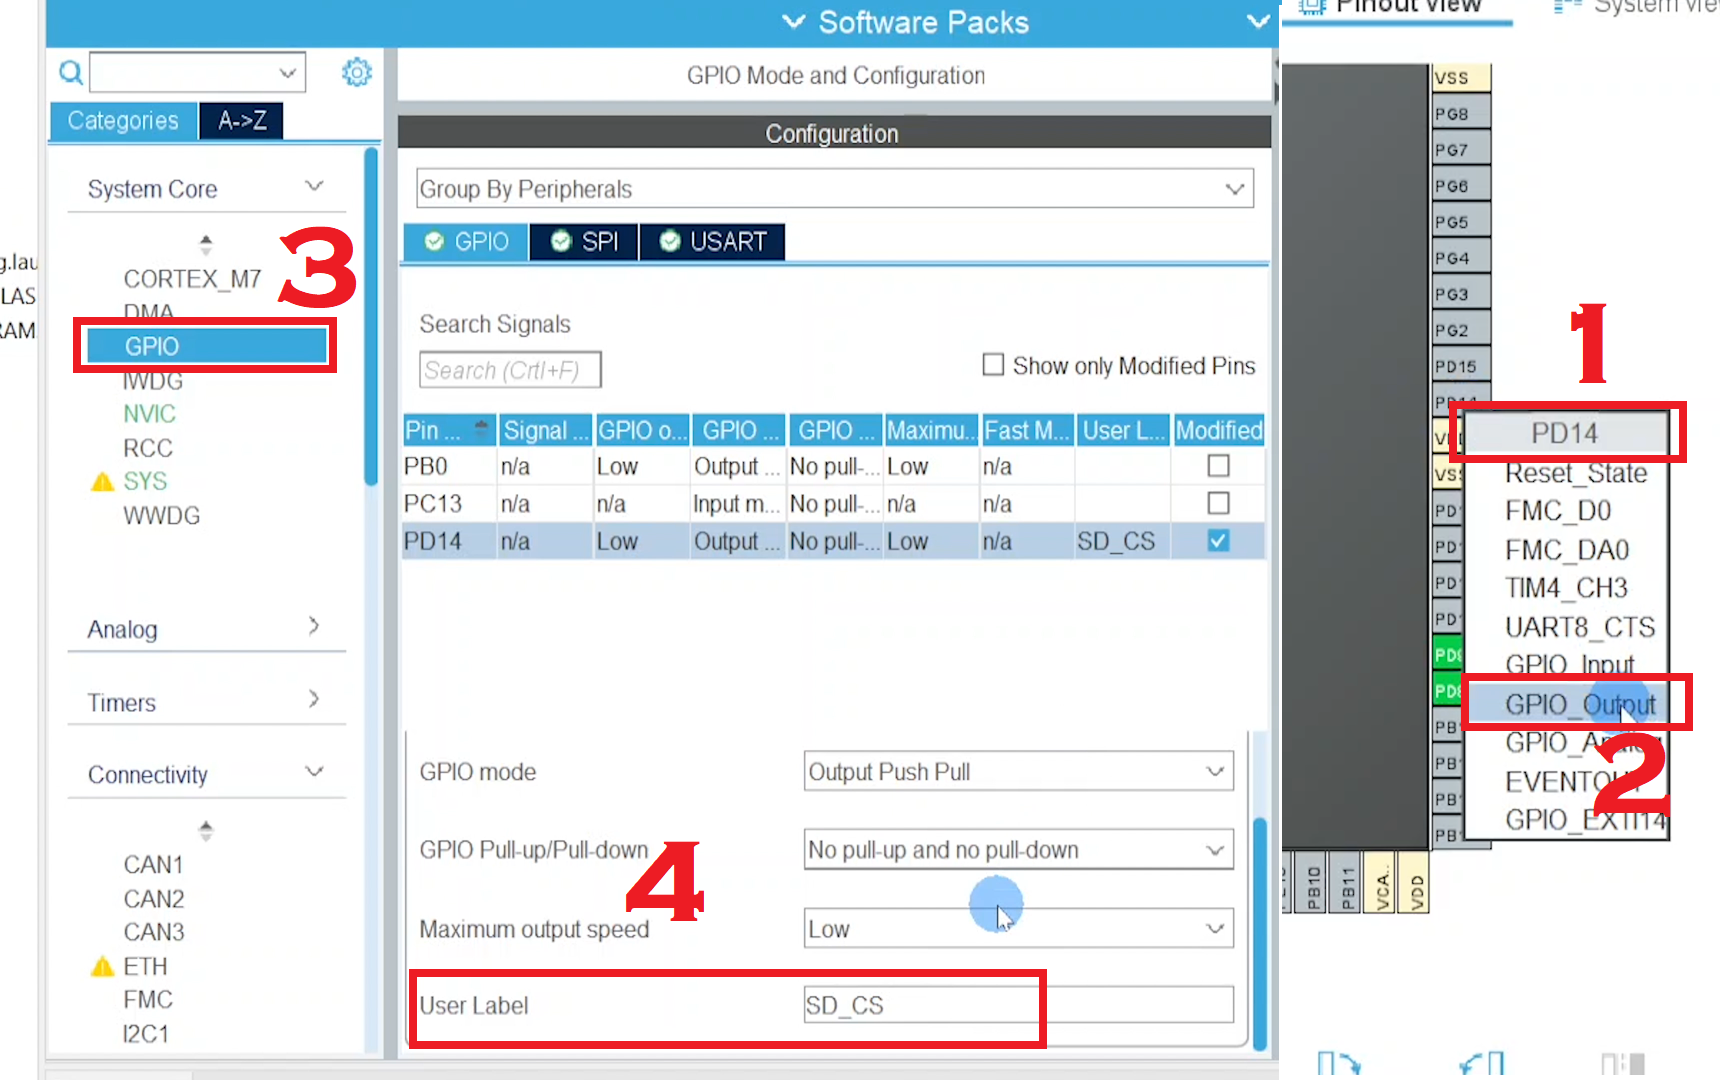
- We have configured everything. Let’s save and generate the code.
It will generate two directories called FATFS and Middlewares. Create a new c file called user_diskio_spi.c in FATFS Target. Copy the code from our GitHub. And past it to that file.
Then, create a header file called as user_diskio_spi.h. Copy the header file content from GitHub and paste it there.
Then, In user_diskio.c add the line #include "user_diskio_spi.h".
|
|
|
/* USER CODE BEGIN DECL */

/* Includes ------------------------------------------------------------------*/
#include <string.h>
#include "ff_gen_drv.h"
#include "user_diskio_spi.h" //<<<<-------- this line
In user_diskio.c Private Functions, add the USER_SPI_initialize to USER_initialize, USER_SPI_status to USER_status , USER_SPI_read to USER_read , USER_SPI_write to USER_write, and USER_SPI_ioctl to USER_ioctl. Refer to the below code.
/* Private functions ---------------------------------------------------------*/

/**
  * @brief  Initializes a Drive
  * @param  pdrv: Physical drive number (0..)
  * @retval DSTATUS: Operation status
  */
DSTATUS USER_initialize (
  BYTE pdrv           /* Physical drive nmuber to identify the drive */
)
{
  /* USER CODE BEGIN INIT */
  return USER_SPI_initialize(pdrv); //<<<<<<<<<<<------------ADD THIS LINE
  /* USER CODE END INIT */
}

/**
  * @brief  Gets Disk Status
  * @param  pdrv: Physical drive number (0..)
  * @retval DSTATUS: Operation status
  */
DSTATUS USER_status (
  BYTE pdrv       /* Physical drive number to identify the drive */
)
{
  /* USER CODE BEGIN STATUS */
  return USER_SPI_status(pdrv); //<<<<<<<<<<<------------ADD THIS LINE
  /* USER CODE END STATUS */
}

/**
  * @brief  Reads Sector(s)
  * @param  pdrv: Physical drive number (0..)
  * @param  *buff: Data buffer to store read data
  * @param  sector: Sector address (LBA)
  * @param  count: Number of sectors to read (1..128)
  * @retval DRESULT: Operation result
  */
DRESULT USER_read (
  BYTE pdrv,      /* Physical drive nmuber to identify the drive */
  BYTE *buff,     /* Data buffer to store read data */
  DWORD sector,   /* Sector address in LBA */
  UINT count      /* Number of sectors to read */
)
{
  /* USER CODE BEGIN READ */
  return USER_SPI_read(pdrv, buff, sector, count); //<<<<<<<<<<<------------ADD THIS LINE
  /* USER CODE END READ */
}

/**
  * @brief  Writes Sector(s)
  * @param  pdrv: Physical drive number (0..)
  * @param  *buff: Data to be written
  * @param  sector: Sector address (LBA)
  * @param  count: Number of sectors to write (1..128)
  * @retval DRESULT: Operation result
  */
#if _USE_WRITE == 1
DRESULT USER_write (
  BYTE pdrv,          /* Physical drive nmuber to identify the drive */
  const BYTE *buff,   /* Data to be written */
  DWORD sector,       /* Sector address in LBA */
  UINT count          /* Number of sectors to write */
)
{
  /* USER CODE BEGIN WRITE */
  /* USER CODE HERE */
  return USER_SPI_write(pdrv, buff, sector, count); //<<<<<<<<<<<------------ADD THIS LINE
  /* USER CODE END WRITE */
}
#endif /* _USE_WRITE == 1 */

/**
  * @brief  I/O control operation
  * @param  pdrv: Physical drive number (0..)
  * @param  cmd: Control code
  * @param  *buff: Buffer to send/receive control data
  * @retval DRESULT: Operation result
  */
#if _USE_IOCTL == 1
DRESULT USER_ioctl (
  BYTE pdrv,      /* Physical drive nmuber (0..) */
  BYTE cmd,       /* Control code */
  void *buff      /* Buffer to send/receive control data */
)
{
  /* USER CODE BEGIN IOCTL */
  return USER_SPI_ioctl(pdrv, cmd, buff); //<<<<<<<<<<<------------ADD THIS LINE
  /* USER CODE END IOCTL */
}
#endif /* _USE_IOCTL == 1 */
In main.h Private defines, add #define SD_SPI_HANDLE hspi1
Note: Please note that you have to place your code between USER CODE BEGIN and USER CODE END. If you place it randomly, then it will mess up your code when you regenerate your code.
/* USER CODE BEGIN Private defines */
#define SD_SPI_HANDLE hspi1
/* USER CODE END Private defines */
In user_diskio_spi.c, replace the existing FCLK_SLOW and FCLK_FAST with the below lines.
#define FCLK_SLOW() { MODIFY_REG(SD_SPI_HANDLE.Instance->CR1, SPI_BAUDRATEPRESCALER_256, SPI_BAUDRATEPRESCALER_128); }	/* Set SCLK = slow, approx 280 KBits/s*/
#define FCLK_FAST() { MODIFY_REG(SD_SPI_HANDLE.Instance->CR1, SPI_BAUDRATEPRESCALER_256, SPI_BAUDRATEPRESCALER_8); }	/* Set SCLK = fast, approx 4.5 MBits/s */
That’s all. Till now we have interfaced the SD card with STM32F767zi. Let’s use this SD card for our project.
|
|
|
Adding Firmware update using SD card feature to our Bootloader
You can get the complete bootloader source code from GitHub.
Let’s add the firmware update using the SD card feature to our bootloader. For that purpose, I have created one function called check_update_frimware_SD_card() in etx_ota_update.c.
#include "fatfs.h"

/**
  * @brief Check the SD for Firmware update
  * @param none
  * @retval ETX_SD_EX_
  */
ETX_SD_EX_ check_update_frimware_SD_card( void )
{
  ETX_SD_EX_  ret = ETX_SD_EX_ERR;
  FATFS       FatFs;                //Fatfs handle
  FIL         fil;                  //File handle
  FRESULT     fres;                 //Result after operations

  do
  {
    //Mount the SD Card
    fres = f_mount(&FatFs, "", 1);    //1=mount now
    if (fres != FR_OK)
    {
      printf("No SD Card found : (%i)\r\n", fres);
      ret = ETX_SD_EX_NO_SD;
      break;
    }
    printf("SD Card Mounted Successfully!!!\r\n");

    fres = f_open(&fil, ETX_SD_CARD_FW_PATH, FA_WRITE | FA_READ | FA_OPEN_EXISTING);
    if(fres != FR_OK)
    {
      printf("No Firmware found in SD Card : (%i)\r\n", fres);
      break;
    }

    UINT bytesRead;
    BYTE readBuf[ETX_OTA_DATA_MAX_SIZE];
    UINT fw_size = f_size(&fil);
    UINT size;

    printf("Firmware found in SD Card. \r\nFW Size = %d Bytes\r\n", fw_size);

    //get the slot number
    slot_num_to_write = get_available_slot_number();
    if( slot_num_to_write == 0xFF )
    {
      printf("f_getfree error (%i)\r\n", fres);
      ret = ETX_SD_EX_FU_ERR;
      f_close(&fil);
      break;
    }

    bool is_first_block = true;

    /* Read the configuration */
    ETX_GNRL_CFG_ cfg;
    memcpy( &cfg, cfg_flash, sizeof(ETX_GNRL_CFG_) );

    /* Before writing the data, reset the available slot */
    cfg.slot_table[slot_num_to_write].is_this_slot_not_valid = 1u;

    /* write back the updated config */
    HAL_StatusTypeDef ex = write_cfg_to_flash( &cfg );
    if( ex != HAL_OK )
    {
      ret = ETX_SD_EX_FU_ERR;
      f_close(&fil);
      break;
    }

    ota_fw_received_size = 0;

    for(uint32_t i = 0; i < fw_size; )
    {
      if( (fw_size - i) >= ETX_OTA_DATA_MAX_SIZE )
      {
        size = ETX_OTA_DATA_MAX_SIZE;
      }
      else
      {
        size = fw_size - i;
      }

      //clear the buffer
      memset(readBuf, 0, ETX_OTA_DATA_MAX_SIZE);

      fres = f_read(&fil, readBuf, size, &bytesRead);
      if( ( fres != FR_OK) || (size != bytesRead ) )
      {
        printf("FW Read Error : (%i)\r\n", fres);
        ret = ETX_SD_EX_FU_ERR;
        break;
      }

      /* write the chunk to the Flash (Slot location) */
      ex = write_data_to_slot( slot_num_to_write, readBuf, size, is_first_block );
      if( ex != HAL_OK )
      {
        printf("Flash Erite Error : (%d)\r\n", ex);
        ret = ETX_SD_EX_FU_ERR;
        break;
      }

      is_first_block = false;
      i += size;
    }

    if( ret == ETX_SD_EX_FU_ERR )
    {
      f_close(&fil);
      break;
    }

    uint32_t slot_addr;
    if( slot_num_to_write == 0u )
    {
      slot_addr = ETX_APP_SLOT0_FLASH_ADDR;
    }
    else
    {
      slot_addr = ETX_APP_SLOT1_FLASH_ADDR;
    }

    //Calculate the CRC
    uint32_t cal_crc = HAL_CRC_Calculate( &hcrc, (uint32_t*)slot_addr, fw_size);

    /* Read the configuration */
    memcpy( &cfg, cfg_flash, sizeof(ETX_GNRL_CFG_) );

    //update the slot
    cfg.slot_table[slot_num_to_write].fw_crc                 = cal_crc;
    cfg.slot_table[slot_num_to_write].fw_size                = fw_size;
    cfg.slot_table[slot_num_to_write].is_this_slot_not_valid = 0u;
    cfg.slot_table[slot_num_to_write].should_we_run_this_fw  = 1u;

    //reset other slots
    for( uint8_t i = 0; i < ETX_NO_OF_SLOTS; i++ )
    {
      if( slot_num_to_write != i )
      {
        //update the slot as inactive
        cfg.slot_table[i].should_we_run_this_fw = 0u;
      }
    }

    //update the reboot reason
    cfg.reboot_cause = ETX_NORMAL_BOOT;

    /* write back the updated config */
    ex = write_cfg_to_flash( &cfg );
    if( ex != HAL_OK )
    {
      printf("Flash Erite Error : (%d)\r\n", ex);
      ret = ETX_SD_EX_FU_ERR;
      break;
    }

    //close your file
    f_close(&fil);

    //Once you flash the file, please delete it.
    fres = f_unlink(ETX_SD_CARD_FW_PATH);
    if (fres != FR_OK)
    {
      printf("Cannot able to delete the FW file\n");
    }

    //update the status okay
    ret = ETX_SD_EX_OK;

  } while( false );

  if( ret != ETX_SD_EX_NO_SD )
  {
    //We're done, so de-mount the drive
    f_mount(NULL, "", 0);
  }

  return ret;
}
check_update_frimware_SD_card
This check_update_frimware_SD_card(), mounts the SD card and check for the Firmware file called app.bin under the ETX_FW directory. If it found anything, then will copy the data and flash it to slot 0 or slot 1. Then calculate the CRC and update the Slot details. Finally, delete the firmware file and unmount the SD card.
Then add the below lines to etx_ota_update.h.
#define ETX_SD_CARD_FW_PATH "ETX_FW/app.bin"    //Firmware name present in SD card

/*
* Exception codes for SD Card
*/
typedef enum
{
ETX_SD_EX_OK = 0, // Updated firmware successfully
ETX_SD_EX_NO_SD = 1, // No SD card Found
ETX_SD_EX_FU_ERR = 2, // Failure during Firmware update
ETX_SD_EX_ERR = 3, // Other Failure
}ETX_SD_EX_;

ETX_SD_EX_ check_update_frimware_SD_card( void );
We are one step ahead. Let’s call this check_update_frimware_SD_card() function from the main.c. That’s it. Whenever the microcontroller boots, it will check for the firmware update from the SD card. If it is available, then it will update the new application or firmware.
|
|
|
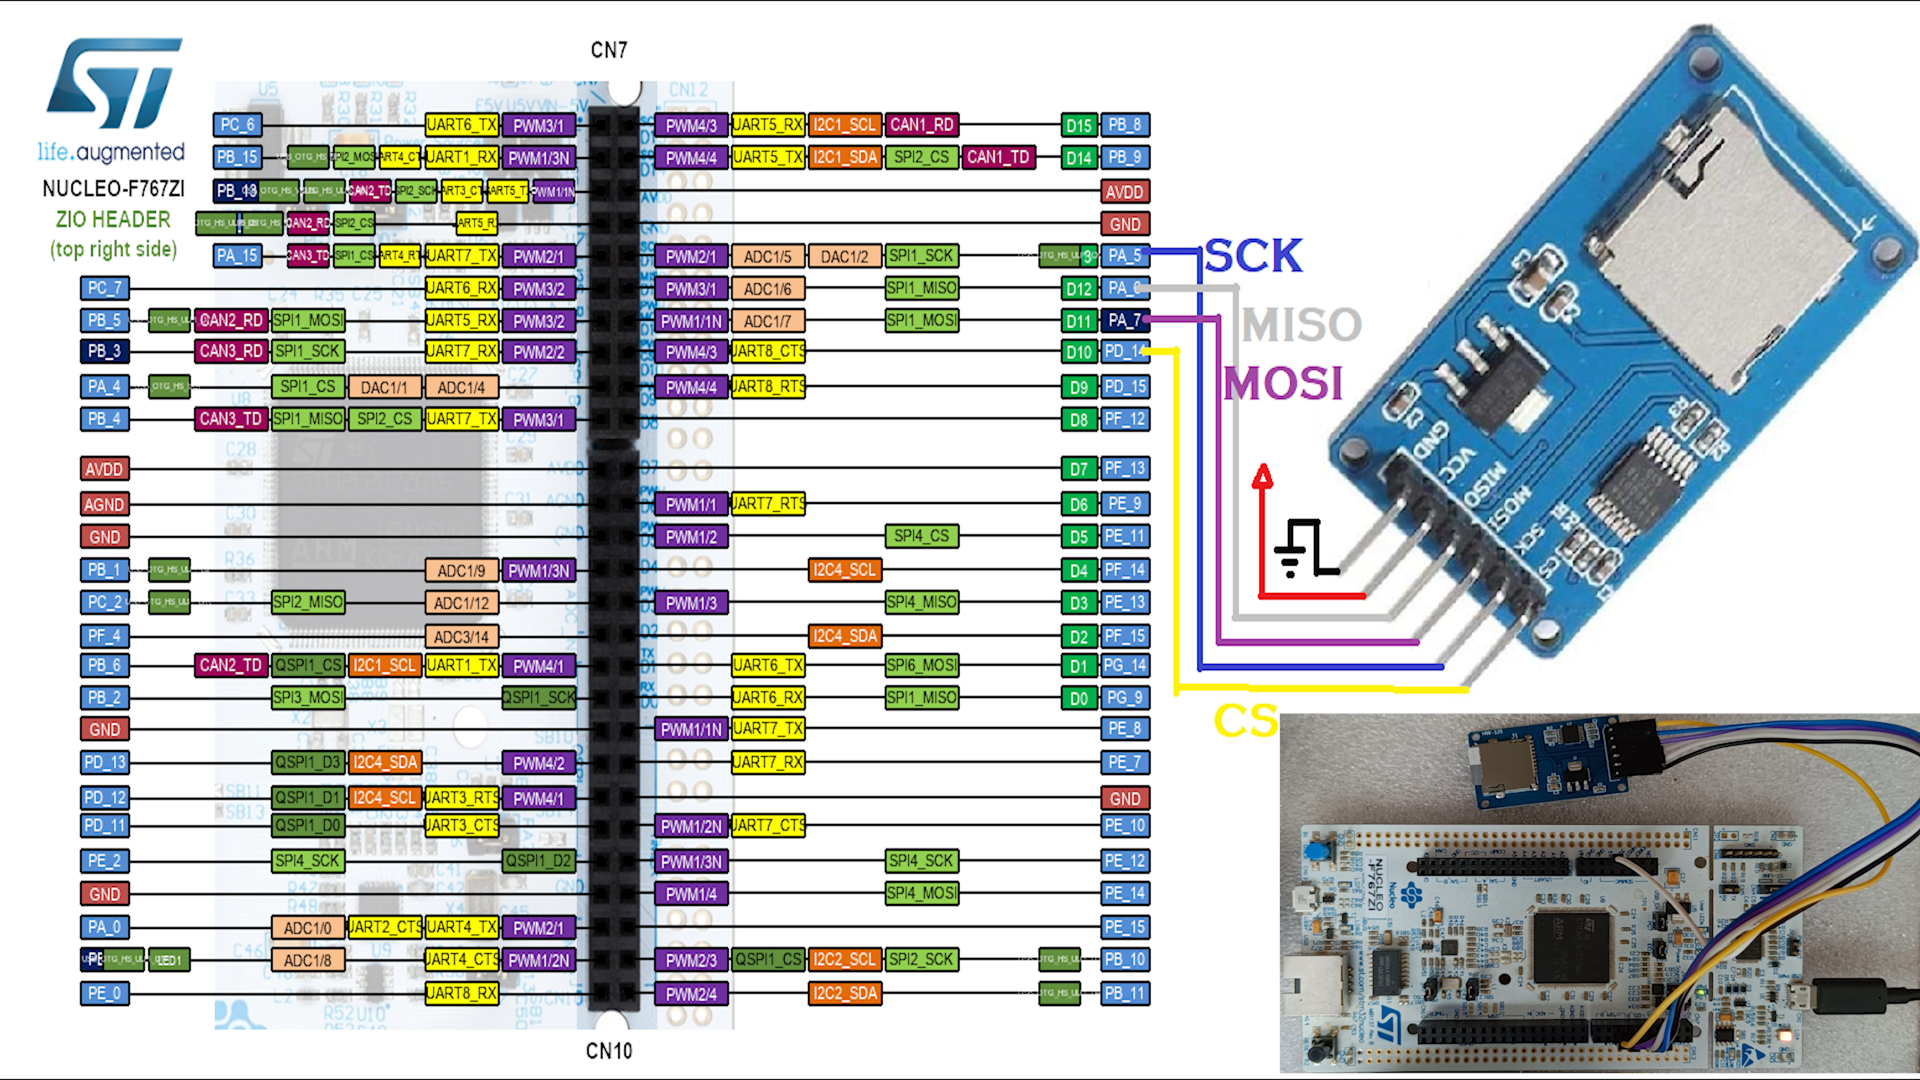
Connection Diagram
| SD Adapter | STM32F767Zi |
|---|---|
| CS | PD14 (GPIO SD_CS) |
| SCK | PA5 (SPI1 SCLK) |
| MOSI | PA7 (SPI1 MOSI) |
| MISO | PA6 (SPI1 MISO) |
| VCC | 5V |
| GND | GND |
Demo
Let’s build the code and Flash it. Please check the below video demo.
Video Explanation
You can also check the video format of this tutorial. You will understand it in a better way.
|
|
|
We have posted another variant of the Bootloader development using the STM32F103. Please check that and learn that too.
You can also read the below tutorials.
Reference
- https://01001000.xyz/2020-08-09-Tutorial-STM32CubeIDE-SD-card/
Embedded Software | Firmware | Linux Devic Deriver | RTOS
Hi, I am a tech blogger and an Embedded Engineer. I am always eager to learn and explore tech-related concepts. And also, I wanted to share my knowledge with everyone in a more straightforward way with easy practical examples. I strongly believe that learning by doing is more powerful than just learning by reading. I love to do experiments. If you want to help or support me on my journey, consider sharing my articles, or Buy me a Coffee! Thank you for reading my blog! Happy learning!
