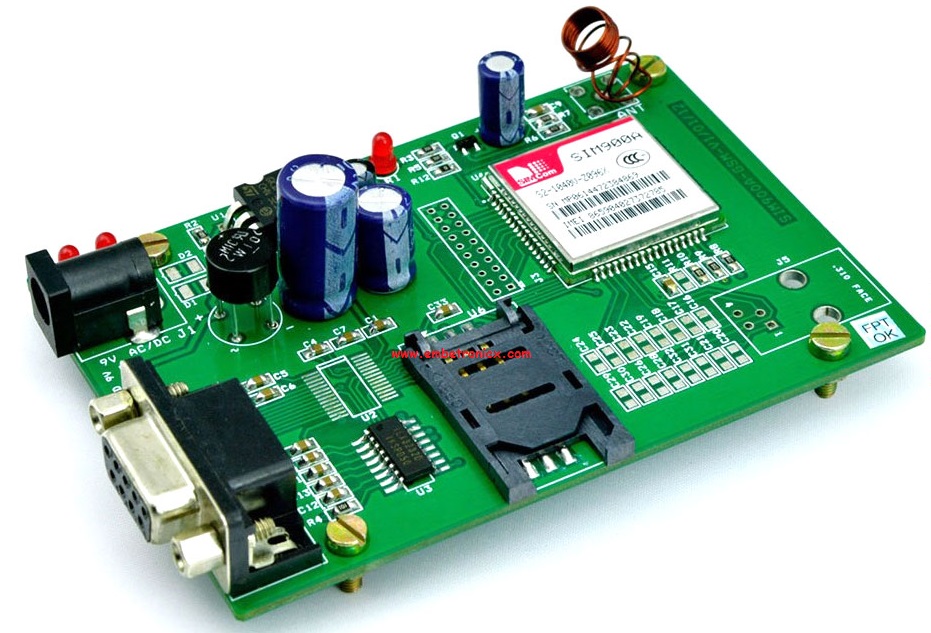
This article is a continuation of the series of tutorials on the PIC16F877A Microcontroller. The aim of this series is to provide easy and practical examples that anyone can understand. In the previous tutorial, we have interfaced the Keypad with PIC16F877A. In this tutorial, we will see GSM Interfacing with PIC16F877A.
Table of Contents
Suggestion to read
Components Required
- GSM SIM900A module
- PIC16F877A Development Board
GSM Interfacing with PIC16F877A
Connection
Micro controller’s RX (RC7) is connected to GSM module’s TX and Micro controller’s TX(RC6) is Connected to GSM module’s RX pin.
Code
SMS Sending Code
This code is used to send the sms message to a particular number.
#include<htc.h>

__CONFIG( FOSC_HS & WDTE_OFF & PWRTE_OFF & CP_OFF & BOREN_ON & LVP_OFF & CPD_OFF & WRT_OFF & DEBUG_OFF);

#define NUMBER 9876543210          //Here insert your number where you want to send message

void ser_int();
void tx(unsigned char);
unsigned char rx();
void tx_str(unsigned char *);

void sms(unsigned char *num1,unsigned char *msg);
void gsm_delay();

unsigned int dell;

int main()
{
        TRISC6=TRISC7=1;
        ser_int();
        sms(NUMBER, "Welcome to the Embetronicx");
        while(1);
}

void sms(unsigned char *num1,unsigned char *msg)
{
	tx_str("AT");
	tx(0x0d);
	gsm_delay();

	tx_str("AT+CMGF=1");
	tx(0x0d);
	gsm_delay();

	tx_str("AT+CMGS=");
	tx('"');
	while(*num1)
		tx(*num1++);
	tx('"');
	tx(0x0d);
	gsm_delay();

	while(*msg)
		tx(*msg++);
	tx(0x1a);
	gsm_delay();
}

void gsm_delay()
{
	unsigned long int gsm_del;
	for(gsm_del=0;gsm_del<=50000;gsm_del++);
}

void ser_int()
{
	TXSTA=0x20;	//BRGH=0, TXEN = 1, Asynchronous Mode, 8-bit mode
	RCSTA=0b10010000; //Serial Port enabled,8-bit reception
	SPBRG=17;			//9600 baudrate for 11.0592Mhz
	TXIF=RCIF=0;
}

void tx(unsigned char a)
{
	TXREG=a;
	while(!TXIF);
	TXIF = 0;
}

unsigned char rx()
{
	while(!RCIF);
	RCIF=0;
	return RCREG;
}

void tx_str(unsigned char *s)
{
	while(*s) {
		tx(*s++);
	}
}
Calling Code
This code is used to Call a particular number.
|
|
|
#include<htc.h>

__CONFIG( FOSC_HS & WDTE_OFF & PWRTE_OFF & CP_OFF & BOREN_ON & LVP_OFF & CPD_OFF & WRT_OFF & DEBUG_OFF);

#define NUMBER 9876543210          //Here insert your number where you want to send message

void ser_int();
void tx(unsigned char);
unsigned char rx();
void tx_str(unsigned char *);

void call(unsigned char *num2);
void gsm_delay();

unsigned int dell;

int main()
{
        TRISC6=TRISC7=1;
        ser_int();
        call(NUMBER);
        while(1);
}

void call(unsigned char *num2)
{
	tx_str("AT");
	tx(0x0d);
	gsm_delay();

	tx_str("AT+CMGF=1");
	tx(0x0d);
	gsm_delay();

	tx_str("ATD");
	while(*num2)
		tx(*num2++);
	tx(';');
	tx(0x0d);
	for(dell=0;dell<=30;dell++)
		gsm_delay();

	tx_str("ATH");
	tx(0x0d);
	gsm_delay();
}

void gsm_delay()
{
	unsigned long int gsm_del;
	for(gsm_del=0;gsm_del<=50000;gsm_del++);
}

void ser_int()
{
	TXSTA=0x20;	//BRGH=0, TXEN = 1, Asynchronous Mode, 8-bit mode
	RCSTA=0b10010000; //Serial Port enabled,8-bit reception
	SPBRG=17;			//9600 baudrate for 11.0592Mhz
	TXIF=RCIF=0;
}

void tx(unsigned char a)
{
	TXREG=a;
	while(!TXIF);
	TXIF = 0;
}

unsigned char rx()
{
	while(!RCIF);
	RCIF=0;
	return RCREG;
}

void tx_str(unsigned char *s)
{
	while(*s) {
		tx(*s++);
	}
}
That’s all guys… You can use this code to send a message and call a particular number.
In our next tutorial, we will see how to interface the RFID reader with PIC16F877A.
You can also read the below tutorials.

Embedded Software | Firmware | Linux Devic Deriver | RTOS
Hi, I am a tech blogger and an Embedded Engineer. I am always eager to learn and explore tech-related concepts. And also, I wanted to share my knowledge with everyone in a more straightforward way with easy practical examples. I strongly believe that learning by doing is more powerful than just learning by reading. I love to do experiments. If you want to help or support me on my journey, consider sharing my articles, or Buy me a Coffee! Thank you for reading my blog! Happy learning!


