This article is a continuation of the series of tutorials on the PIC16F877A Microcontroller. The aim of this series is to provide easy and practical examples that anyone can understand. Now we are going to see PIC16F877A LED Interfacing Tutorial (PIC16F877A GPIO Tutorial). If you want to interface with LED, you should know the Registers used for GPIO. At the end of this tutorial, you will be familiar with the PIC GPIO’s and the associated registers for configuring and accessing the GPIO’s.
Table of Contents
Prerequisites
PIC16F877A GPIO Tutorial
Introduction
PIC16F877A has 33-GPIO‘s grouped into five ports namely PORTA to PORTE. They are used for the input/output interfacing with other devices/circuits. Most of these port pins are multiplexed for handling alternate functions for peripheral features on the devices. All ports in a PIC chip are bi-directional. When the peripheral action is enabled in a pin, it may not be used as its general input/output functions.
- PORTA
- PORTB
- PORTC
- PORTD
- PORTE
Now we will get into GPIO registers.
GPIO Registers
| Register | Description |
|---|---|
| TRISX | This Register is used for Select that respected IO port as a input or output. |
| PORTX | This is the IO Port |
Note: Here ‘x’ could be A,B,C,D,E so on depending on the number of ports supported by the controller.
|
|
|
TRISX Register
Before accessing the PORTX register, we should declare that port whether input or output. So this register is used to select that direction. If you set 0 that IO port will act as the output port. If you set 1 that IO port will act as an input port. Just see the snippet below. Then you will understand.
TRISB = 0xff;  // Configure PORTB as Input.

TRISC = 0x00; // Configure PORTC as Output.

TRISD = 0x0F; // Configure lower nibble of PORTD as Input and higher nibble as Output

TRISD = (1<<0) | (1<3) | (1<<6); // Configure PD0,PD3,PD6 as Input and others as Output
PORTX Register
This register is used to read/write the data from/to port pins. Writing 1’s to PORTx will make the corresponding PORTx pins as HIGH. Similarly writing 0’s to PORTx will make the corresponding PORTx pins as LOW. PORTX registers and their alternate functions are shown in the below table.
| PORT | Number of Pins | Alternative Function |
|---|---|---|
| PORTA | 6 (PA0-PA5) | ADC |
| PORTB | 8 (PB0-PB7) | Interrupts |
| PORTC | 8 (PC0-PC7) | UART,I2C,PWM |
| PORTD | 8 (PD0-PD7) | Parallel Slave Port |
| PORTE | 3 (PE0-PB2) | ADC |
I think this is enough to make code. Let’s move into the coding part.
LED Interfacing
Code
In this code, I’ve connected LEDs to Port D.
|
|
|
#include<htc.h>

void delay()
{
    unsigned int a;
    for(a=0;a<10000;a++);
}

void main()
{
    TRISD=0;              //Port D is act as Output
    while(1) {
        PORTD=0xFF;   //Port D ON
        delay();
        PORTD=0x00;   //Port D OFF
        delay();
    }
}
Output
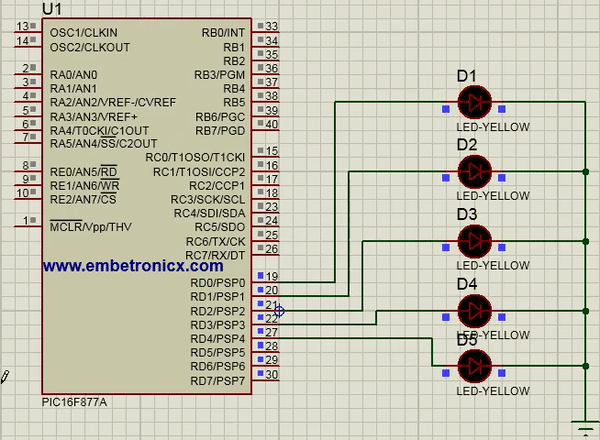
[ Please find the output image Here ]
Switch Interfacing
Code
In this code, Switch is connected to Port D. LEDs are connected to Port B.
#include<htc.h>

#define sw RD0                  //Switch is connected at PORTD.0

void delay()
{
    unsigned int a;
    for(a=0;a<10000;a++);
}

void main()
{
    TRISB=0;               //Port B act as Output
    TRISD=0xff;            //Port D act as Input
    while(1) {
        if(!sw) {
            PORTB=0xff;       //LED ON
        } else
            PORTB=0;          //LED OFF
    }
}
Output
 [ Please find the output image Here ]
In our next tutorial, we will see how to use the Timer in PIC16F877A. And also you can see LCD interfacing with the PIC16F877A.
|
|
|
You can also read the below tutorials.
Embedded Software | Firmware | Linux Devic Deriver | RTOS
Hi, I am a tech blogger and an Embedded Engineer. I am always eager to learn and explore tech-related concepts. And also, I wanted to share my knowledge with everyone in a more straightforward way with easy practical examples. I strongly believe that learning by doing is more powerful than just learning by reading. I love to do experiments. If you want to help or support me on my journey, consider sharing my articles, or Buy me a Coffee! Thank you for reading my blog! Happy learning!
