This article is a continuation of the series of tutorials on the PIC16F877A Microcontroller. The aim of this series is to provide easy and practical examples that anyone can understand. We have already seen External Interrupt, Serial, Timer Interrupts in our previous tutorial. In this tutorial, we are going to see How to use Multiple External Interrupts in PIC16F877A.
Table of Contents
Interrupts in PIC16F877A
As the name suggests Interrupts are special events that require immediate attention, it stops a microcontroller/microprocessor from the running task and serves a special task known as Interrupt Service Routine (ISR) or Interrupt Handler.
PIC 16F877A has the following 15 interrupt sources :
- External
- Timer 0
- Timer 1
- RB Port Change
- Parallel Slave Port Read/Write
- A/D Converter
- USART Receive
- USART Transmit
- Synchronous Serial Port
- CCP1 (Capture, Compare, PWM)
- CCP2 (Capture, Compare, PWM)
- TMR2 to PR2 Match
- Comparator
- EEPROM Write Operation
- Bus Collision
As we know already, we have only one external interrupt which is in PortB.0. For example, in my project, I need to use many external interrupts. How to use many since we have only one in PORTB.0. So In this tutorial, we will see How to use Multiple External Interrupts in PIC16F877A.
PORTB Interrupt in PIC16F877A
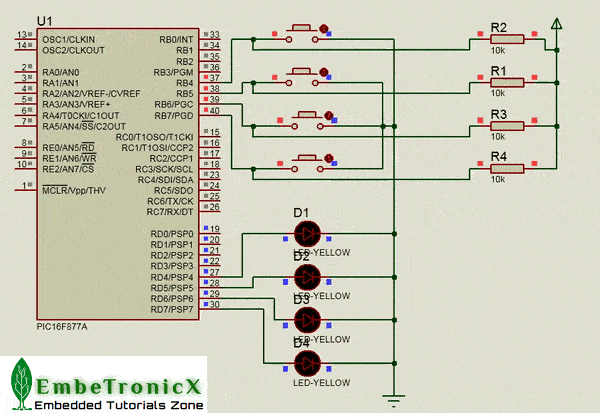
In PIC16F877A we have one interrupt which is the PORTB change interrupt. This Interrupt is used to identify the Port change in PORTB. This will monitor only the PORTB.4, PORTB.5, PORTB.6 and PORTB.7. So first we will see this PORTB change interrupt. For this, you have to familiar with the interrupt register available in PIC16F877A. We’ve already discussed those registers. You can refresh here.
|
|
|
Steps to be followed
- Enable PORTB Change Interrupt.
- Connect external Interrupts pins to RB4, RB5, RB6, and RB7 (PORTB.4 – PORTB.7).
- Whenever anyone of the RB4, RB5, RB6, RB7 state changes, ISR will hit.
- In ISR you should read the PORTB register. Then only it will clear the PORTB interrupt.
Source Code
Whenever anyone of the RB4, RB5, RB6, RB7 state changes, Interrupt will happen. In ISR I am toggling the LED in PORTD.
//PORTB Interrupt

#include<pic.h>

#define delay  for(i=0; i<= 50000; i++)

#define LED PORTD

unsigned int i;

void interrupt  ISR(void)
{
    unsigned char temp_PORTB = PORTB;

    LED = 0xff;
    delay;
    LED=0x00;
    RBIF=0;
}


void main(void)
{
    /*Port B as a Input */
    TRISB0=0xFF;

    /*Port D as a Output */
    TRISD=0;
    LED=0;

    /* Register PORTB interrupt */
    OPTION_REG |= 0b00000000;
    INTCON |= 0b10011000;
    while(1) {

    }
}
Output
 [ Please find the output image Here ]
Multiple External Interrupts in PIC16F877A
Steps to be followed
- Before Initializing the Interrupt first store the PORTB value into one variable.
- Enable PORTB Change Interrupt.
- Connect external Interrupts pins to RB4, RB5, RB6, and RB7 (PORTB.4 – PORTB.7).
- Whenever ISR hits, you need to read the PORTB value and compare it with the old PORTB value using the XOR method.
- Then you will get the new value and then using OR operator you can find the exact pin interrupted.
Source Code
In this source, whenever PORTB.4 – PORTB.7 changes, I’ve to blink the respected LED connected in PORTD.
//Multiple Externel Interrupt

#include<pic.h>

#define delay  for(i=0; i<= 50000; i++)

#define LED PORTD

#define PORTB_4    (1<<4)
#define PORTB_5    (1<<5)
#define PORTB_6    (1<<6)
#define PORTB_7    (1<<7)

unsigned char old_PORTB = 0;
unsigned int i;

void interrupt  ISR(void)
{
    unsigned char key_pressed;
    unsigned char new_PORTB = PORTB;

    key_pressed =  old_PORTB ^ new_PORTB;

    if(key_pressed & PORTB_4) {
        LED = PORTB_4;
    } else if(key_pressed & PORTB_5) {
        LED = PORTB_5;
    } else if(key_pressed & PORTB_6) {
        LED = PORTB_6;
    } else if(key_pressed & PORTB_7) {
        LED = PORTB_7;
    } else {
        //junk interrupt
    }
    delay;
    RBIF=0;
}


void main(void)
{
    /*Port B as a Input */
    TRISB0=0xFF;

    /*Port D as a Output */
    TRISD=0;
    LED=0;

    /*Storing Original PORTB value*/
    old_PORTB = PORTB;

    /* Register PORTB interrupt */
    OPTION_REG |= 0b00000000;
    INTCON |= 0b10011000;
    while(1) {
        LED=0x00;
    }
}
Output
 [ Please find the output image Here ]
So, now we have 5 external interrupts including PORTB.0 interrupt. You can play with it.
|
|
|
In our next tutorial, we will see how to use the LCD with PIC16F877A.
You can also read the below tutorials.
Embedded Software | Firmware | Linux Devic Deriver | RTOS
Hi, I am a tech blogger and an Embedded Engineer. I am always eager to learn and explore tech-related concepts. And also, I wanted to share my knowledge with everyone in a more straightforward way with easy practical examples. I strongly believe that learning by doing is more powerful than just learning by reading. I love to do experiments. If you want to help or support me on my journey, consider sharing my articles, or Buy me a Coffee! Thank you for reading my blog! Happy learning!
