In our previous tutorial, we have seen how to interface the PIR sensor with 8051. In this tutorial, we are going to see IR Sensor Interfacing with 8051.
Table of Contents
Prerequisites
Before starting this tutorial we should know the below topics. If you know already, please go further.
Components Required
- 8051 Development Board
- IR Sensor
- LCD Module (To print the Sensor output)
Introduction
Infrared is light that has a wavelength longer than visible red light. The ranges of infrared include near-infrared, mid-infrared, and far-infrared, spanning wavelengths from about 710 nanometers (near-infrared) to 100 micrometers (far infrared).
All objects emit light according to their temperature–this is called “black body radiation.” The hotter the object, the shorter wavelength of light it emits. The Earth emits infrared light at a peak of about nine to 10 micrometers–and so do warm-blooded animals like humans. This light can be used to detect motion or warmth.
IR Sensor
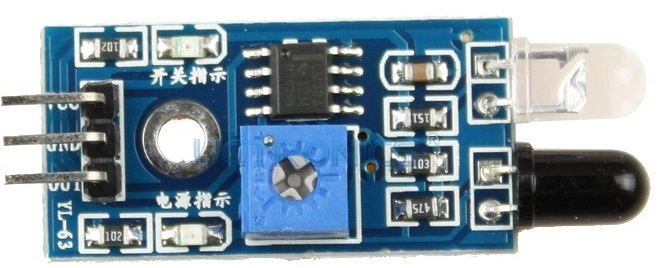
The infrared Obstacle Sensor Module has a built-in IR transmitter and IR receiver that sends out IR energy and looks for reflected IR energy to detect the presence of any obstacle in front of the sensor module. The PCB of this electronic circuit has a potentiometer. That onboard potentiometer lets users adjust the detection range. The sensor has a very good and stable response even in ambient light or in complete darkness.
|
|
|

Specifications
- Operating Voltage: 3.0V – 5.0V
- Detection range: 2cm – 30cm (Adjustable using potentiometer)
- Current Consumption:at 3.3V : ~23 mA,at 5.0V: ~43 mA
- Active output level: Outputs Low logic level when an obstacle is detected
- Onboard Obstacle Detection LED indicator

Working Principle of IR Obstacle Sensor
An IR sensor consists of an IR LED and an IR Photodiode; together they are called as Photo–Coupler or Opto–Coupler. As said before, the Infrared Obstacle Sensor has a built-in IR transmitter and IR receiver. An infrared Transmitter is a light-emitting diode (LED) that emits infrared radiations. Hence, they are called IR LED. Even though an IR LED looks like a normal LED, the radiation emitted by it is invisible to the human eye.

Infrared receivers are also called as infrared sensors as they detect the radiation from an IR transmitter. IR receivers come in the form of photodiodes and phototransistors. Infrared Photodiodes are different from normal photodiodes as they detect only infrared radiation. When the IR transmitter emits radiation, it reaches the object and some of the radiation reflects back to the IR receiver. Based on the intensity of the reception by the IR receiver, the output of the sensor is defined.
|
|
|
IR Sensor Interfacing with 8051
Connection
IR Sensor
- Vcc – 5v
- GND – Ground
- Vout – P1.0
LCD
- RS – P2.0
- RW – P2.1
- EN – P2.2
- Data Lines – P3.0 – P3.7

Source Code
If it is detecting an object in front of this sensor, LCD will display “Obstacle Detected”.
#include<reg51.h>
#define lcd P3

sbit IR=P1^0;

sbit rs=P2^0; //register select
sbit rw=P2^1; //RW
sbit en=P2^2; //enable

void lcd_init();
void cmd(unsigned char);
void dat(unsigned char);
void delay();
void lcd_string(char *s);

void main()
{
    lcd_init();
    lcd_string("  EmbeTronicX   ");
    while(1) {
        if(IR == 0) {
            cmd(0xc0);
            lcd_string("Obstacle Detected");
            delay();
        } else {
            cmd(0xc0);
            lcd_string("                ");
        }
    }
}

void lcd_init()
{
    cmd(0x38);
    cmd(0x0e);
    cmd(0x06);
    cmd(0x01);
    cmd(0x80);
}

void cmd(unsigned char a)
{
    lcd=a;
    rs=0;
    rw=0;
    en=1;
    delay();
    en=0;
}

void dat(unsigned char b)
{
    lcd=b;
    rs=1;
    rw=0;
    en=1;
    delay();
    en=0;
}

void lcd_string(char *s)
{
    while(*s) {
       dat(*s++);
     }
}

void delay()
{
    unsigned int i;
    for(i=0;i<20000;i++);
}
If you want to sense more distance you can use below IR sensor. You can also adjust the distance using this.  This is an Infrared Transmitter and receiver which together make up a photoelectric sensor. The sensor has a long detection distance and has less interference by visible light because it uses modulated Infrared light. This sensor has a screwdriver adjustment to set the detected distance, then gives a digital output when it senses something within that range. This sensor does not return a distance VALUE.
|
|
|
In our next tutorial, we will see how to interface the GPS with 8051.
You can also read the below tutorials.
Embedded Software | Firmware | Linux Devic Deriver | RTOS
Hi, I am a tech blogger and an Embedded Engineer. I am always eager to learn and explore tech-related concepts. And also, I wanted to share my knowledge with everyone in a more straightforward way with easy practical examples. I strongly believe that learning by doing is more powerful than just learning by reading. I love to do experiments. If you want to help or support me on my journey, consider sharing my articles, or Buy me a Coffee! Thank you for reading my blog! Happy learning!
