This article is a continuation of the Series on Linux Device Drivers and carries the discussion on character drivers and their implementation. The aim of this series is to provide easy and practical examples that anyone can understand. This is the Character Device Driver Major Number and Minor Number – Linux Device Driver Tutorial Part 4.
In our previous tutorial, we discussed how to pass the argument to the Linux device driver during the load time. So now, let’s learn about the major and minor numbers.
Table of Contents
Prerequisites
To continue with this tutorial, you must have set up the Ubuntu or Raspberry Pi, or Beaglebone. If you aren’t set up anything yet, we suggest you to set up the boards that you have using the below-given tutorials.
You can find a video explanation of this tutorial here. You can also find all the Linux device driver’s video playlists here.
Introduction
We already know what drivers are, and why we need them. What is so special about character drivers? If we write drivers for byte-oriented operations then we refer to them as character drivers. Since the majority of devices are byte-oriented, the majority of device drivers are character device drivers. Take, for example, serial drivers, audio drivers, video drivers, camera drivers, and basic I/O drivers. In fact, all device drivers that are neither storage nor network device drivers are some type of character driver.
|
|
|
How Applications will communicate with Hardware devices?
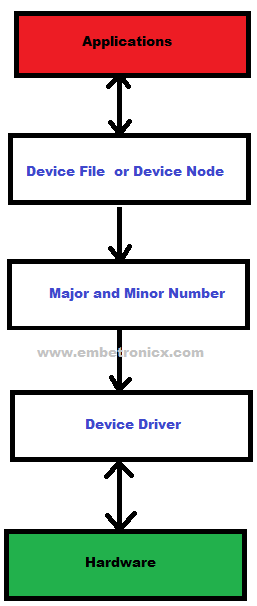
The below diagram will show the full path of communication.
- Initially, the Application will open the device file. This device file is created by the device driver).
- Then this device file will find the corresponding device driver using major and minor numbers.
- Then that Device driver will talk to the Hardware device.
Character Device Driver Major Number and Minor Number
One of the basic features of the Linux kernel is that it abstracts the handling of devices. All hardware devices look like regular files; they can be opened, closed, read, and written using the same, standard, system calls that are used to manipulate files. To Linux, everything is a file. To write to the hard disk, you write to a file. To read from the keyboard is to read from a file. To store backups on a tape device is to write to a file. Even to read from memory is to read from a file. If the file from which you are trying to read or to which you are trying to write is a “normal” file, the process is fairly easy to understand: the file is opened and you read or write data. So the device driver also likes the file. The driver will create a special file for every hardware device. We can communicate with the hardware using those special files (device files).
If you want to create a special file, we should know about the major number and minor number in the device driver. In this tutorial, we will learn the major and minor numbers.
Major Number and Minor Number
The Linux kernel represents character and block devices as pairs of numbers <major>:<minor>.
|
|
|
Major number
Traditionally, the major number identifies the driver associated with the device. A major number can also be shared by multiple device drivers. See /proc/devices to find out how major numbers are assigned on a running Linux instance.
linux@embetronicx-VirtualBox:~/project/devicedriver/devicefile$ cat /proc/devices

Character devices:
1 mem
4 /dev/vc/0
4 tty
Block devices:
1 ramdisk
259 blkext
These numbers are major numbers.
Minor Number
The major number is to identify the corresponding driver. Many devices may use the same major number. So we need to assign the number to each device that is using the same major number. So, this is a minor number. In other words, The device driver uses the minor number <minor> to distinguish individual physical or logical devices.
Allocating Major and Minor Number
We can allocate the major and minor numbers in two ways.
- Statically allocating
- Dynamically Allocating
Statically allocating
If you want to set a particular major number for your driver, you can use this method. This method will allocate that major number if it is available. Otherwise, it won’t.
|
|
|
int register_chrdev_region(dev_t first, unsigned int count, char *name); |
Here, first is the beginning device number of the range you would like to allocate.
count is the total number of contiguous device numbers you are requesting. Note that, if the count is large, the range you request could spill over to the next major number; but everything will still work properly as long as the number range you request is available.
name is the name of the device that should be associated with this number range; it will appear in /proc/devices and sysfs.
The return value from register_chrdev_region will be 0 if the allocation was successfully performed. In case of error, a negative error code will be returned, and you will not have access to the requested region.
The dev_t type (defined in <linux/types.h>) is used to hold device numbers—both the major and minor parts. dev_t is a 32-bit quantity with 12 bits set aside for the major number and 20 for the minor number.
|
|
|
If you want to create the dev_t structure variable for your major and minor number, please use the below function.
MKDEV(int major, int minor); |
If you want to get your major number and minor number from dev_t, use the below method.
MAJOR(dev_t dev); |
MINOR(dev_t dev); |
If you pass the dev_t structure to this MAJOR or MONOR function, it will return that major/minor number of your driver.
Example,
dev_t dev = MKDEV(235, 0);

register_chrdev_region(dev, 1, "Embetronicx_Dev");
Dynamically Allocating
If we don’t want the fixed major and minor numbers please use this method. This method will allocate the major number dynamically to your driver which is available.
|
|
|
int alloc_chrdev_region(dev_t *dev, unsigned int firstminor, unsigned int count, char *name); |
dev is an output-only parameter that will, on successful completion, hold the first number in your allocated range.
firstminor should be the requested first minor number to use; it is usually 0.
count is the total number of contiguous device numbers you are requesting.
name is the name of the device that should be associated with this number range; it will appear in /proc/devices and sysfs.
Difference between static and dynamic method
A static method is only really useful if you know in advance which major number you want to start with. With the Static method, you are telling the kernel that, what device numbers you want (the start major/minor number and count) and it either gives them to you or not (depending on availability).
|
|
|
With the Dynamic method, you are telling the kernel that how many device numbers you need (the starting minor number and count) and it will find a starting major number for you, if one is available, of course.
Partially to avoid conflict with other device drivers, it’s considered preferable to use the Dynamic method function, which will dynamically allocate the device numbers for you.
The disadvantage of dynamic assignment is that you can’t create the device nodes in advance, because the major number assigned to your module will vary. For normal use of the driver, this is hardly a problem, because once the number has been assigned, you can read it from /proc/devices.
Unregister the Major and Minor Number
Regardless of how you allocate your device numbers, you should free them when they are no longer in use. Device numbers are freed with:
void unregister_chrdev_region(dev_t first, unsigned int count); |
The usual place to call unregister_chrdev_region would be in your module’s cleanup function (Exit Function).
|
|
|
Program for Statically Allocating Major Number
[Get the source code from GitHub]
In this program, I’m assigning 235 as a major number.
/***************************************************************************//**
*  \file       driver.c
*
*  \details    Simple linux driver (Statically allocating the Major and Minor number)
*
*  \author     EmbeTronicX
*
* *******************************************************************************/
#include<linux/kernel.h>
#include<linux/init.h>
#include<linux/module.h>
#include <linux/fs.h>

//creating the dev with our custom major and minor number
dev_t dev = MKDEV(235, 0);

/*
** Module Init function
*/
static int __init hello_world_init(void)
{
    register_chrdev_region(dev, 1, "Embetronicx_Dev");
    printk(KERN_INFO "Major = %d Minor = %d \n",MAJOR(dev), MINOR(dev));
    printk(KERN_INFO "Kernel Module Inserted Successfully...\n");
    return 0;
}

/*
** Module exit function
*/
static void __exit hello_world_exit(void)
{
    unregister_chrdev_region(dev, 1);
    printk(KERN_INFO "Kernel Module Removed Successfully...\n");
}

module_init(hello_world_init);
module_exit(hello_world_exit);

MODULE_LICENSE("GPL");
MODULE_AUTHOR("EmbeTronicX <[email protected]>");
MODULE_DESCRIPTION("Simple linux driver (Statically allocating the Major and Minor number)");
MODULE_VERSION("1.0");
- Build the driver by using Makefile (
sudo make) or if you are using the Beaglebone board, then you can usesudo make ARCH=arm CROSS_COMPILE=arm-linux-gnueabi-. - Load the driver using
sudo insmod - Check the major number using
cat /proc/devices
linux@embetronicx-VirtualBox::/home/driver/driver$ cat /proc/devices | grep "Embetronicx_Dev"

235 Embetronicx_Dev
- Unload the driver using
sudo rmmod
You can refer to the below video for the Beaglebone Demo.
https://www.youtube.com/watch?v=aTwBCUjtTnw
Program for Dynamically Allocating Major Number
[Get the source code from GitHub]
|
|
|
This program will allocate a major number dynamically.
/***************************************************************************//**
*  \file       driver.c
*
*  \details    Simple linux driver (Dynamically allocating the Major and Minor number)
*
*  \author     EmbeTronicX
*
* *******************************************************************************/
#include<linux/kernel.h>
#include<linux/init.h>
#include<linux/module.h>
#include<linux/kdev_t.h>
#include<linux/fs.h>

dev_t dev = 0;

/*
** Module Init function
*/
static int __init hello_world_init(void)
{
        /*Allocating Major number*/
        if((alloc_chrdev_region(&dev, 0, 1, "Embetronicx_Dev")) <0){
                printk(KERN_INFO "Cannot allocate major number for device 1\n");
                return -1;
        }
        printk(KERN_INFO "Major = %d Minor = %d \n",MAJOR(dev), MINOR(dev));
        printk(KERN_INFO "Kernel Module Inserted Successfully...\n");

        return 0;
}

/*
** Module exit function
*/
static void __exit hello_world_exit(void)
{
        unregister_chrdev_region(dev, 1);
        printk(KERN_INFO "Kernel Module Removed Successfully...\n");
}

module_init(hello_world_init);
module_exit(hello_world_exit);

MODULE_LICENSE("GPL");
MODULE_AUTHOR("EmbeTronicX <[email protected]>");
MODULE_DESCRIPTION("Simple linux driver (Dynamically allocating the Major and Minor number)");
MODULE_VERSION("1.1");
- Build the driver by using Makefile (
sudo make) or if you are using the Beaglebone board, then you can usesudo make ARCH=arm CROSS_COMPILE=arm-linux-gnueabi-. - Load the driver using
sudo insmod - Check the major number using
cat /proc/devices
linux@embetronicx-VirtualBox::/home/driver/driver$ cat /proc/devices | grep "Embetronicx_Dev"

243 Embetronicx_Dev
- Unload the driver using
sudo rmmod
This function allocates a major number of 243 for this driver.
Before unloading the driver just check the files in /dev directory using ls /dev/. You won’t find our driver file. Because we haven’t created it yet. In our next tutorial, we will see the device file.
You can refer to the below video for the Beaglebone Demo.
https://www.youtube.com/watch?v=aTwBCUjtTnw
|
|
|
Video Explanation
You can check the video explanation of this tutorial below.
Please find the other Linux Device Tutorials here.
You can also read the below tutorials.
|
|
|

Embedded Software | Firmware | Linux Devic Deriver | RTOS
Hi, I am a tech blogger and an Embedded Engineer. I am always eager to learn and explore tech-related concepts. And also, I wanted to share my knowledge with everyone in a more straightforward way with easy practical examples. I strongly believe that learning by doing is more powerful than just learning by reading. I love to do experiments. If you want to help or support me on my journey, consider sharing my articles, or Buy me a Coffee! Thank you for reading my blog! Happy learning!


