This article is a continuation of the series on NuttX RTOS tutorials using the ESP32 Dev board and carries the discussion on NuttX RTOS and their usage. The aim of this series is to provide easy and practical examples that anyone can understand. In our previous tutorial, we saw how to use the inbuilt code to toggles the onboard LED. This is the ESP32 LED Blinky Example using NuttX RTOS. In this tutorial, we will write our own driver and application to control the onboard LED as well as other GPIO LEDs.
You can also read the FreeRTOS Tutorials, ESP32 Intro, ESP32 IDF Getting Started, ESP32 Serial Communication Tutorials, STM32 RTOS Getting started, Boot sequence in Cortex-M4, and 8051 GPIO Tutorial.
Table of Contents
ESP32 LED Blinky Example using NuttX RTOS
Prerequisites
To continue with this tutorial, you must have configured the ESP32 toolchain and compiled the NuttX RTOS. If you aren’t configured anything yet, we suggest you to set up the esp32 using the below-given tutorials.
Hardware Required
- ESP32 Dev board
- Laptop machine (Host System)
- LED with Resistor (If you don’t have onboard LED)
Introduction
As we mentioned earlier, we are going to write a code to control the LEDs. Basically, NuttX is a POSIX compliant operating system, and it likes to use the same naming convention of many of the functions and files you’d find in your standard UNIX/Linux system. And it is operating like a Linux system. In a Linux system, we have to write a kernel driver to talk to the hardware. This kernel driver will be residing in the kernel space. And the application has to be there to talk to that kernel driver. That application will reside in the userspace.
So, we are going to develop a LED driver and a LED application. If you are already familiar with the Linux kernel driver and a userspace application, then I promise you it will be very easy to understand the NuttX RTOS. If you are not familiar also fine. You take this chance and learn the NuttX RTOS. I am sure that you will start loving to work on Linux kernel drivers and an application also. We are providing the Linux device driver tutorials, that may help you to understand this concept better.
|
|
|
Let’s start. We are dividing the tutorial into two parts.
- Writing a LED driver
- Writing an Application
In this demonstration, I have installed the VirtualBox in my Windows machine which contains Ubuntu 20.04 ,Linux kernel 5.8.0-50-generic and NuttX-10.1.0-RC1
Writing a LED driver
In Linux/POSIX, all things are considered as a file. So, we are going to create a file under /dev/. In our example, our driver will create the /dev/etx_led file.
First, let’s see the code below.
esp32_etx_led.c
I have added this file to the nuttx/boards/xtensa/esp32/common/src/.
|
|
|
/****************************************************************************
 * boards/xtensa/esp32/common/src/esp32_etx_led.c
 *
 * Licensed to the Apache Software Foundation (ASF) under one or more
 * contributor license agreements.  See the NOTICE file distributed with
 * this work for additional information regarding copyright ownership.  The
 * ASF licenses this file to you under the Apache License, Version 2.0 (the
 * "License"); you may not use this file except in compliance with the
 * License.  You may obtain a copy of the License at
 *
 *   http://www.apache.org/licenses/LICENSE-2.0
 *
 * Unless required by applicable law or agreed to in writing, software
 * distributed under the License is distributed on an "AS IS" BASIS, WITHOUT
 * WARRANTIES OR CONDITIONS OF ANY KIND, either express or implied.  See the
 * License for the specific language governing permissions and limitations
 * under the License.
 *
 ****************************************************************************/

/****************************************************************************
 * Included Files
 ****************************************************************************/

#include <nuttx/config.h>

#include <stdint.h>
#include <stdbool.h>
#include <debug.h>
#include <assert.h>

#include <nuttx/board.h>
#include <arch/board/board.h>
#include <nuttx/arch.h>
#include "esp32-devkitc.h"
#include "esp32_gpio.h"
#include "esp32_etx_led.h"

#ifdef CONFIG_ESP32_ETX_LED

/****************************************************************************
 * Private Function Prototypes
 ****************************************************************************/

/* Character driver methods */

static int     etx_led_open(FAR struct file *filep);
static int     etx_led_close(FAR struct file *filep);
static ssize_t etx_led_write(FAR struct file *filep, FAR const char *buffer,
                        size_t buflen);


/****************************************************************************
 * Private Data
 ****************************************************************************/

static const struct file_operations etx_led_fops =
{
  etx_led_open,   /* open   */
  etx_led_close,  /* close  */
  NULL,           /* read   */
  etx_led_write,  /* write  */
  NULL,           /* seek   */
  NULL,           /* ioctl  */
  NULL,           /* poll   */
#ifndef CONFIG_DISABLE_PSEUDOFS_OPERATIONS
  NULL            /* unlink */
#endif
};

/****************************************************************************
 * Private Functions
 ****************************************************************************/

/****************************************************************************
 * Name: etx_led_open
 *
 * Description:
 * 	This function will be getting called when the application
 *	opens the "/dev/etx_led" file.
 ****************************************************************************/

static int etx_led_open(FAR struct file *filep)
{
  int ret = 0;

  return ( ret );
}

/****************************************************************************
 * Name: etx_led_close
 *
 * Description:
 * 	This function will be getting called when the application
 *	closess the "/dev/etx_led" file.
 ****************************************************************************/

static int etx_led_close(FAR struct file *filep)
{
  int ret = 0;

  return ( ret );
}

/****************************************************************************
 * Name: etx_led_write
 *
 * Description:
 * 	This function will be getting called when the application
 *	writes data the "/dev/etx_led" file.
 ****************************************************************************/

static ssize_t etx_led_write(FAR struct file *filep, FAR const char *buffer,
                             size_t len)
{
  DEBUGASSERT(buffer != NULL);

  //buffer[0] contains the value (ON/OFF)
  //buffer[1] contains the GPIO Number


  int32_t value     = buffer[0];
  int32_t gpio_pin  = buffer[1];


  if( gpio_pin < 0 || gpio_pin > ESP32_NGPIOS )
  {
    syslog(LOG_ERR, "Invalid GPIO Number - %d\n", gpio_pin);
    return (-1);
  }

  // Configure the GPIO as Output
  esp32_configgpio( gpio_pin, OUTPUT );


  //syslog(LOG_ERR, "GPIO Number - %d\n", gpio_pin);
  //syslog(LOG_ERR, "value - %d\n", value);

  // Write to the GPIO
  esp32_gpiowrite(gpio_pin, value);

  return ( len );
}

/****************************************************************************
 * Public Functions
 ****************************************************************************/

/****************************************************************************
 * Name: etx_led_driver_init
 *
 * Description:
 *   Initialize the EmbeTronicX LED device Driver.
 *   This will create the device file as "/dev/etx_led"
 *
 *   return negative number on failure.
 *   return 0 on success.
 *
 ****************************************************************************/

int etx_led_driver_init( void )
{
  int ret = 0;
  ret = register_driver("/dev/etx_led", &etx_led_fops, 0666, NULL);
  if (ret < 0)
  {
    _err("ERROR: register_driver failed : /dev/etx_led : %d\n", ret);
    ret = -1;;
  }

  return ( ret );

}

#endif /* CONFIG_ESP32_ETX_LED */
esp32_etx_led.h
I have added this file to the path nuttx/boards/xtensa/esp32/common/include/.
/****************************************************************************
 * boards/xtensa/esp32/common/include/esp32_etx_led.h
 *
 * Licensed to the Apache Software Foundation (ASF) under one or more
 * contributor license agreements.  See the NOTICE file distributed with
 * this work for additional information regarding copyright ownership.  The
 * ASF licenses this file to you under the Apache License, Version 2.0 (the
 * "License"); you may not use this file except in compliance with the
 * License.  You may obtain a copy of the License at
 *
 *   http://www.apache.org/licenses/LICENSE-2.0
 *
 * Unless required by applicable law or agreed to in writing, software
 * distributed under the License is distributed on an "AS IS" BASIS, WITHOUT
 * WARRANTIES OR CONDITIONS OF ANY KIND, either express or implied.  See the
 * License for the specific language governing permissions and limitations
 * under the License.
 *
 ****************************************************************************/

#ifndef __BOARDS_XTENSA_ESP32_COMMON_INCLUDE_ETX_LED_H
#define __BOARDS_XTENSA_ESP32_COMMON_INCLUDE_ETX_LED_H

/****************************************************************************
 * Included Files
 ****************************************************************************/

#include <nuttx/config.h>

#ifdef __cplusplus
#define EXTERN extern "C"
extern "C"
{
#else
#define EXTERN extern
#endif

/****************************************************************************
 * Name: etx_led_driver_init
 *
 * Description:
 *   Initialize the EmbeTronicX LED device Driver.
 *   This will create the device file as "/dev/etx_led"
 *
 *   return negative number on failure.
 *   return 0 on success.
 *
 ****************************************************************************/

#ifdef CONFIG_ESP32_ETX_LED
int etx_led_driver_init( void );
#endif


#undef EXTERN
#ifdef __cplusplus
}
#endif

#endif /* __BOARDS_XTENSA_ESP32_COMMON_INCLUDE_ETX_LED_H */
Code explanation
I will just explain to you the code that has been given above.
There is a function called etx_led_driver_init(), that is a starting point of the driver and it registers the driver and it creates the device file called /dev/etx_led.
There is one structure called struct file_operations etx_led_fops. To understand this structure, please read this Linux device driver tutorial. Using this file_operations structure, we are registering our open(), close(), and write() functions.
open()function will be called whenever the application opens the/dev/etx_ledfile.close()function will be called whenever the application closes the/dev/etx_ledfile.write()function gets called when the application writes something to the/dev/etx_ledfile.
In the write() function, we are configuring the GPIO as an output using the esp32_configgpio(). And set the value to that GPIO using the esp32_gpiowrite(). So, whenever an application wants to turn on or turn off the LEDs it has to write the GPIO number and the value to this driver.
|
|
|
As I told you already, etx_led_driver_init() is the starting point of the driver. But someone has to call this. We are calling this function form the esp32_bringup.c. I am adding the below code into the nuttx/boards/xtensa/esp32/esp32-devkitc/src/esp32_bringup.c‘s esp32_bringup() function.
#ifdef CONFIG_ESP32_ETX_LED
#include "esp32_etx_led.h"
#endif

#ifdef CONFIG_ESP32_ETX_LED
  /* Register the EmbeTronicX LED Driver */

  ret = etx_led_driver_init();
  if (ret < 0)
    {
      syslog(LOG_ERR, "ERROR: etx_led_driver_init() failed: %d\n", ret);
    }
#endif
Makefile
Now we have to build this driver. So, we have to add the below lines into the nuttx/boards/xtensa/esp32/common/src/Make.defs
ifeq ($(CONFIG_ESP32_ETX_LED),y)
  CSRCS += esp32_etx_led.c
endif
Kconfig
Till now, we are ready with the LED driver. But if we add an option to enable/disable this driver during the build, it would be very good. So, to do that, I am adding the below lines into the nuttx/boards/xtensa/esp32/common/Kconfig.
comment "Drivers added by EmbeTronicX (www.embetronicx.com)"

menu "EmbeTronicX Drivers"

config ESP32_ETX_LED
  bool "EmbeTronicX LED driver"
  default n
  ---help---
    Enables the GPIOs to control the LEDs (ESP32).

    This is added by the EmbeTroincX to demonstrate the
    LED control using the ESP32 Dev board with NuttX.

    This includes the EmbeTronicX LED driver which controls
    the output.

endmenu # EmbeTronicX Drivers
That’s all about the driver. Let’s write our application to access this driver. You can refer to this commit in GitHub for the above changes. If you want the full source code, then take the code from GitHub.
Writing an Application
In application, I am going to create a task called “ETX_LED” using the task_create() function. In that task, I am writing the GPIO number and its value to the driver /dev/etx_led. Look at the below code.
|
|
|
etx_led_app.c
I am creating a new directory called etx_led under apps/examples.
/****************************************************************************
 * examples/etx_led/etx_led_app.c
 *
 * Licensed to the Apache Software Foundation (ASF) under one or more
 * contributor license agreements.  See the NOTICE file distributed with
 * this work for additional information regarding copyright ownership.  The
 * ASF licenses this file to you under the Apache License, Version 2.0 (the
 * "License"); you may not use this file except in compliance with the
 * License.  You may obtain a copy of the License at
 *
 *   http://www.apache.org/licenses/LICENSE-2.0
 *
 * Unless required by applicable law or agreed to in writing, software
 * distributed under the License is distributed on an "AS IS" BASIS, WITHOUT
 * WARRANTIES OR CONDITIONS OF ANY KIND, either express or implied.  See the
 * License for the specific language governing permissions and limitations
 * under the License.
 *
 ****************************************************************************/

/****************************************************************************
 * Included Files
 ****************************************************************************/

#include <nuttx/config.h>

#include <stdbool.h>
#include <stdlib.h>
#include <stdio.h>
#include <fcntl.h>
#include <sched.h>
#include <errno.h>

#ifdef CONFIG_EXAMPLES_ETX_LED

#define ETX_LED_DRIVER_PATH "/dev/etx_led"    // LED Driver path

/****************************************************************************
 * Private Data
 ****************************************************************************/

struct gpio
{
  uint8_t gpio_val;
  uint8_t gpio_num;
};

static struct gpio etx_gpio;

/****************************************************************************
 * Private Functions
 ****************************************************************************/

/****************************************************************************
 * Name: etx_led_task
 ****************************************************************************/

static int etx_led_task(int argc, char *argv[])
{
  int ret = 0;

  printf("ETX_LED: Task Starting\n");

  int fd = open( ETX_LED_DRIVER_PATH, O_WRONLY);
  if (fd < 0)
  {
    printf("ETX_LED:ERROR - Failed to open %s: %d\n", ETX_LED_DRIVER_PATH, errno);
    ret = -1;
  }

  while( ret >= 0 )
  {
    printf("ETX_LED: GPIO  = %d Value %d\n", etx_gpio.gpio_num, etx_gpio.gpio_val);
    ret = write( fd, (const void*)&etx_gpio, sizeof(etx_gpio) );

    //toggle the gpio val
    etx_gpio.gpio_val = !etx_gpio.gpio_val;

    usleep(500*1000L);
  }

  printf("ETX_LED: ERROR - Task finishing\n");
  return EXIT_FAILURE;
}

/****************************************************************************
 * Public Functions
 ****************************************************************************/

/****************************************************************************
 * main
 ****************************************************************************/

int main(int argc, FAR char *argv[])
{
  int ret;

  printf("ETX_LED: Starting the Application\n");

  if( argc < 2 )
  {
    printf("Usage : etx_led needs one argument which is GPIO number to toggle\n");
    printf("Example : To toggle the GPIO 2, please enter \"etx_led 2\"\n");
    return EXIT_FAILURE;
  }

  etx_gpio.gpio_val = 1;              //Initialy turn ON the LED
  etx_gpio.gpio_num = atoi(argv[1]);  //Get the GPIO Number from user

  ret = task_create( "ETX_LED",                         // Task Name
                     CONFIG_EXAMPLES_ETX_LED_PRIORITY,  // Task priority
                     CONFIG_EXAMPLES_ETX_LED_STACKSIZE, // Task Stack size
                     etx_led_task,                      // Task function
                     NULL
                   );
  if (ret < 0)
  {
    int errcode = errno;
    printf("ETX_LED: ERROR: Failed to start ETX LED task: %d\n", errcode);
    return EXIT_FAILURE;
  }

  return EXIT_SUCCESS;
}

#endif //#ifdef CONFIG_EXAMPLES_ETX_LED
Along with the etx_led_app.c, I am creating the three more files called Makefile, Make.defs, and Kconfig into the apps/examples/etx_led directory.
Makefile
############################################################################
# apps/examples/etx_led/Makefile
#
# Licensed to the Apache Software Foundation (ASF) under one or more
# contributor license agreements.  See the NOTICE file distributed with
# this work for additional information regarding copyright ownership.  The
# ASF licenses this file to you under the Apache License, Version 2.0 (the
# "License"); you may not use this file except in compliance with the
# License.  You may obtain a copy of the License at
#
#   http://www.apache.org/licenses/LICENSE-2.0
#
# Unless required by applicable law or agreed to in writing, software
# distributed under the License is distributed on an "AS IS" BASIS, WITHOUT
# WARRANTIES OR CONDITIONS OF ANY KIND, either express or implied.  See the
# License for the specific language governing permissions and limitations
# under the License.
#
############################################################################

include $(APPDIR)/Make.defs

# ETX LED built-in application info

PROGNAME  = $(CONFIG_EXAMPLES_ETX_LED_PROGNAME)
PRIORITY  = $(CONFIG_EXAMPLES_ETX_LED_PRIORITY)
STACKSIZE = $(CONFIG_EXAMPLES_ETX_LED_STACKSIZE)
MODULE    = $(CONFIG_EXAMPLES_ETX_LED)

# ETX LED Example

MAINSRC = etx_led_app.c

include $(APPDIR)/Application.mk
Make.defs
############################################################################
# apps/examples/etx_led/Make.defs
#
# Licensed to the Apache Software Foundation (ASF) under one or more
# contributor license agreements.  See the NOTICE file distributed with
# this work for additional information regarding copyright ownership.  The
# ASF licenses this file to you under the Apache License, Version 2.0 (the
# "License"); you may not use this file except in compliance with the
# License.  You may obtain a copy of the License at
#
#   http://www.apache.org/licenses/LICENSE-2.0
#
# Unless required by applicable law or agreed to in writing, software
# distributed under the License is distributed on an "AS IS" BASIS, WITHOUT
# WARRANTIES OR CONDITIONS OF ANY KIND, either express or implied.  See the
# License for the specific language governing permissions and limitations
# under the License.
#
############################################################################

ifneq ($(CONFIG_EXAMPLES_ETX_LED),)
CONFIGURED_APPS += $(APPDIR)/examples/etx_led
endif
Kconfig
#
# For a description of the syntax of this configuration file,
# see the file kconfig-language.txt in the NuttX tools repository.
#

comment "Applications added by EmbeTronicX (www.embetronicx.com)"

config EXAMPLES_ETX_LED
  tristate "EmbeTronicX LED app example"
  default n
  depends on ESP32_ETX_LED
  ---help---
    Enable the EmbeTronicX LED app example

if EXAMPLES_ETX_LED

config EXAMPLES_ETX_LED_PROGNAME
  string "Program name"
  default "etx_led"
  ---help---
    This is the name of the program that will be used when the NSH ELF
    program is installed.

config EXAMPLES_ETX_LED_PRIORITY
  int "etx_led task priority"
  default 100

config EXAMPLES_ETX_LED_STACKSIZE
  int "etx_led stack size"
  default DEFAULT_TASK_STACKSIZE

endif
If you want to see the changes regarding the application, you can look at this commit. You can also take the full code from GitHub.
Building the driver and app
All going well. Let’s build our app and the driver together. I have created the build.sh shell script to combine all the required steps into one file.
build.sh
This build.sh has been added into the nuttx/ directory. You can get the build.sh from GitHub.
|
|
|
# !/bin/bash

# A simple bash script to build the NuttX RTOS

#export ESP32 env
. $HOME/esp/esp-idf/export.sh


if [ $1 -eq 1 ]
then
  #distclean
  echo "Dist clean"
  make distclean

  #ESP32 configure
  echo "configuring ESP32 with NuttX RTOS"
  ./tools/configure.sh esp32-devkitc:nsh
fi

#menuconfig
make menuconfig

#make and flash
make download ESPTOOL_PORT=/dev/ttyUSB0
The above script has one argument. If you pass 1, then it does distclean and initializes the board configs. If you pass other than 1, then it does only the make menuconfig and make.
Let’s do distclean and build. Run the below command in NuttX/nuttx directory.
etx@etx-VirtualBox:~/NuttX/nuttx$. ./build.sh 1
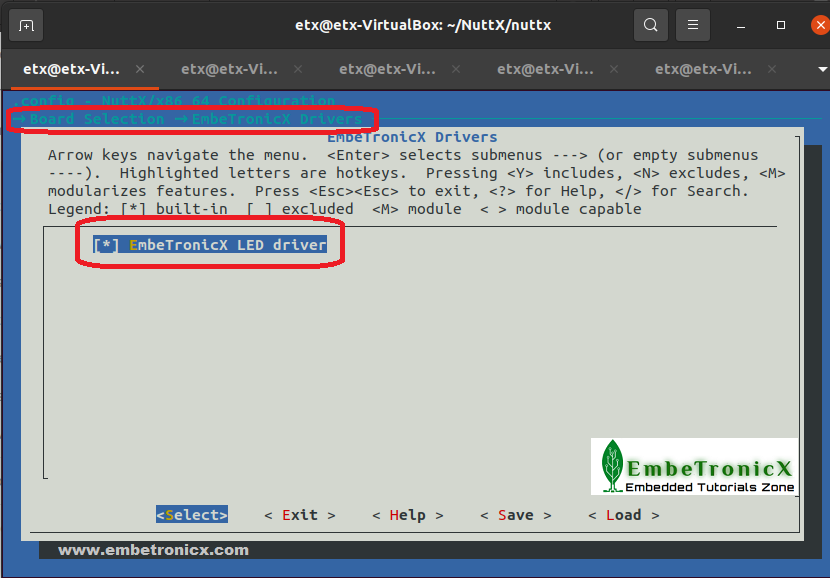
When you run the above command, you should get the menuconfig window. In that menuconfig, we have to enable the etx_led driver and the etx_led_app application.
Just navigate to Board Selection —> EmbeTronicX Drivers —> and check the EmbeTroincX LED driver like the below image.
|
|
|
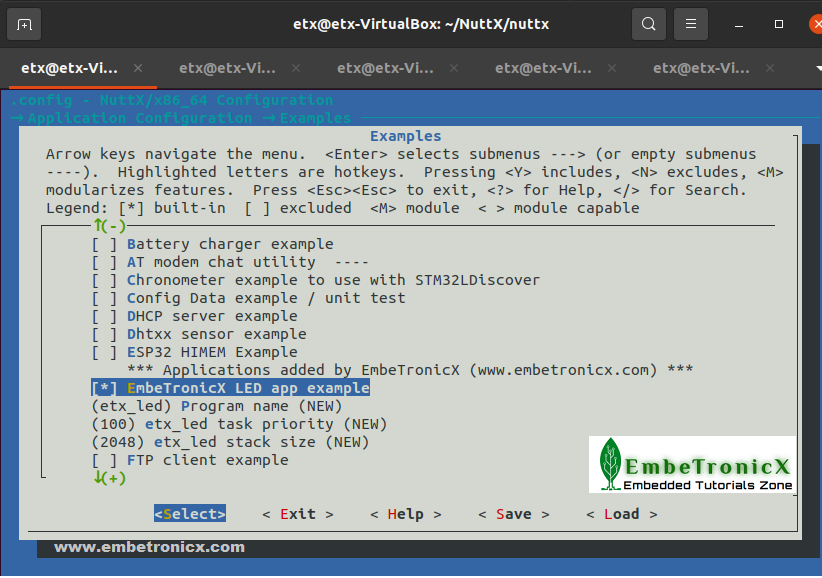
Once after enabled this, then press Exit and go to Home. Now it is time to enable the application. To do that, please navigate to the Home —> Application Configuration —> Examples —> and check the EmbeTronicX LED app example like the below image.
That’s all. Save and Exit the menuconfig and let it build. Once it is trying to connect, hold the BOOT button. Then it will start flashing.
Once you build and flashed it, you connect the device using the picocom using the picocom -b 115200 /dev/ttyUSB0 command.
Now you will get the NuttShell (nsh). Enter the ? or help command. You will get the output like the below image.
|
|
|
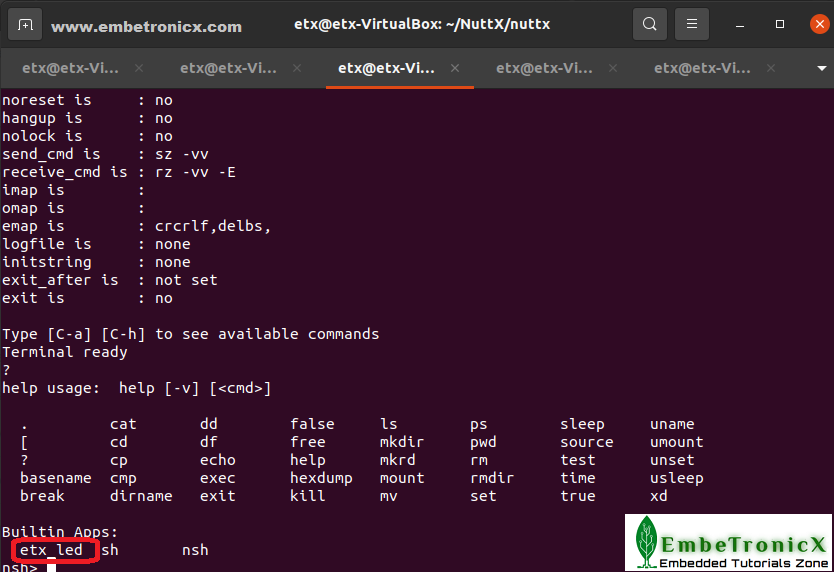
Our etx_led app has been added into the Builtin Apps. Let’s run the app.
ESP32 LED Blinky Example – Output
etx_led app has one argument that is the GPIO number. You can give any valid GPIO number. In this example, I am giving the onboard LED’s GPIO number 2. Run the below command.
etx_led 2
You will get an output like below.
|
|
|
If you don’t want to use the application, then you can use the below printf command. But make sure that you have enabled the printf command in the menuconfig as mentioned here.
To turn on the GPIO 2 LED try to enter the below command in nsh.
printf \x0201 > /dev/etx_led
Here, 02 is the GPIO number and 01 is the value to set.
To turn off the GPIO 2 LED try to enter the below command in nsh.
|
|
|
printf \x0200 > /dev/etx_led
Here, 02 is the GPIO number and 00 is the value to set.
Reset the ESP32 by pressing the DevKit EN button (RESET) to return to stop the etx_led application. If you do not have an onboard led, connect an LED to any GPIO (feed the proper GPIO number to the application) pin and associate a resistor in series (between 100 Ω to 1 k Ω).
In this ESP32 LED Blinky Example, we have controlled the output devices. In our next tutorial, we will see how to write a code to handle the button or any input devices.
You can also read the below tutorials.
|
|
|
Embedded Software | Firmware | Linux Devic Deriver | RTOS
Hi, I am a tech blogger and an Embedded Engineer. I am always eager to learn and explore tech-related concepts. And also, I wanted to share my knowledge with everyone in a more straightforward way with easy practical examples. I strongly believe that learning by doing is more powerful than just learning by reading. I love to do experiments. If you want to help or support me on my journey, consider sharing my articles, or Buy me a Coffee! Thank you for reading my blog! Happy learning!
