This article is a continuation of the series on NuttX RTOS tutorials using the ESP32 Dev board and carries the discussion on NuttX RTOS and their usage. The aim of this series is to provide easy and practical examples that anyone can understand. In our previous tutorial, we saw how to use the GPIO. This is the NuttX RTOS I2C Example using ESP32 ADXL345 Interfacing.
Table of Contents
NuttX RTOS I2C Example
ESP32 ADXL345 Interfacing
Prerequisites
To continue with this tutorial, you must have configured the ESP32 toolchain and compiled the NuttX RTOS. If you aren’t configured anything yet, we suggest you to set up the esp32 using the below-given tutorial.
Hardware Required
- ESP32 Dev board
- Laptop machine (Host System)
- ADXL345 Accelerometer sensor
ADXL345 Sensor
Before we begin with the Interfacing part, we just see the basics of the ADXL345 Accelerometer.
The ADXL345 is a small, thin, ultralow power, 3-axis accelerometer with high resolution (13-bit) measurement at up to ±16 g. Digital output data is formatted as a 16-bit twos complement and is accessible through either an SPI (3- or 4-wire) or I2C digital interface.
The ADXL345 is well suited for mobile device applications. It measures the static acceleration of gravity in tilt-sensing applications, as well as dynamic acceleration resulting from motion or shock. Its high resolution (3.9 mg/LSB) enables measurement of inclination changes less than 1.0°.
|
|
|
Several special sensing functions are provided. Activity and inactivity sensing detect the presence or lack of motion by comparing the acceleration on any axis with user-set thresholds. Tap sensing detects single and double taps in any direction. Freefall sensing detects if the device is falling. These functions can be mapped individually to either of two interrupt output pins.
An integrated memory management system with a 32-level first-in, first-out (FIFO) buffer can be used to store data to minimize host processor activity and lower overall system power consumption. Low power modes enable intelligent motion-based power management with threshold sensing and active acceleration measurement at extremely low power dissipation.

FEATURES
- Ultralow power: as low as 23 µA in measurement mode and 0.1 µA in standby mode at VS = 2.5 V (typical)
- Power consumption scales automatically with bandwidth
- User-selectable resolution
- Fixed 10-bit resolution
- Full resolution, where resolution increases with g range, up to 13-bit resolution at ±16 g (maintaining 4 mg/LSB scale factor in all g ranges)
- Embedded memory management system with FIFO technology minimizes host processor load
- Single tap/double-tap detection
- Activity/inactivity monitoring
- Free-fall detection
- Supply voltage range: 2.0 V to 3.6 V
- I/O voltage range: 1.7 V to VS
- SPI (3- and 4-wire) and I2C digital interfaces
- Flexible interrupt modes mappable to either interrupt pin
- Measurement ranges selectable via serial command
- Bandwidth selectable via serial command
- Wide temperature range (−40°C to +85°C)
- 10,000 g shock survival
- Pb free/RoHS compliant
- Small and thin: 3 mm × 5 mm × 1 mm LGA package
APPLICATIONS
- Handsets
- Medical instrumentation
- Gaming and pointing devices
- Industrial instrumentation
- Personal navigation devices
- Hard disk drive (HDD) protection
For more information, you can refer to its Data Sheet.
In this tutorial, we are going to connect this ADXL345 with the ESP32 using the I2C communication.
|
|
|
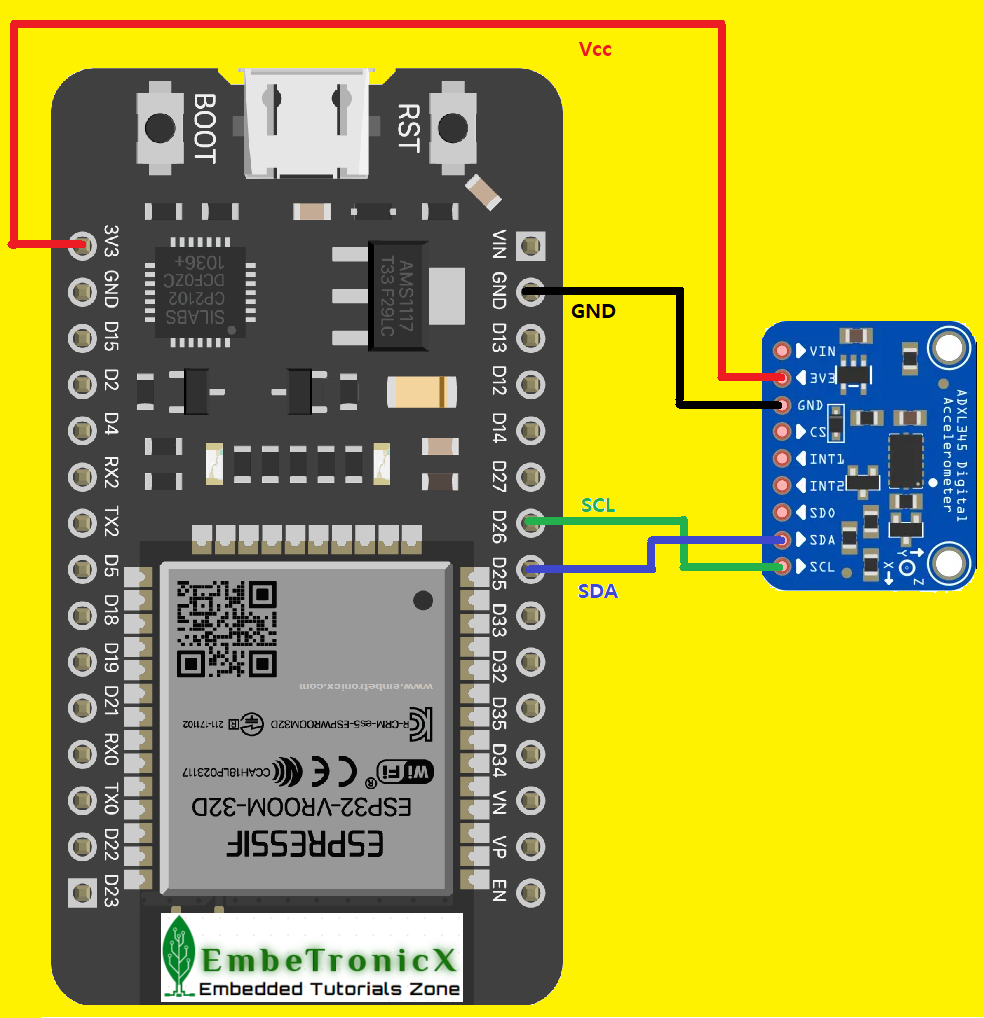
Connection Diagram – NuttX RTOS I2C Example (ESP32 ADXL345)
In this example, we have used the I2C1. You can also use the I2C0. But make sure you are connecting to the proper SCL and SDA. Refer to the below connection diagram.
- SDA – Pin 25
- SCL – Pin 26
- Vcc – 3.3V
- GND – Ground
Concept of the Driver and Application
In this tutorial, we are not going to write any I2C driver as we did for the GPIO driver. Instead, we are going to utilize the existing, well-written I2C driver. So, we are only going to write the I2C application.
The concept is very simple. We are just going to put the ADXL345 to measurement mode and just reading the X, Y, Z axis data continuously.
Writing I2C Application
In application, I am going to create a task called “etx_i2c_accel_task” using the task_create() function. Then in that task,
|
|
|
- Open the I2C driver (
/dev/i2c1). - Initialize the ADXL345 (Put the ADXL345 into measurement mode, then turn off the interrupts).
- Read the X, Y, Z, and print.
- Close the driver if any error.
I am creating a new directory called etx_i2c under apps/examples. Inside the directory, I am adding the below files.
- etx_i2c_accel_app.c
- etx_i2c_accel_app.h
- Kconfig
- Make.defs
- Makefile
You can check the application changes that I have added as part of this tutorial in the GitHub commit. And you can get the complete source code from GitHub.
etx_i2c_accel_app.c
[Get this code from GitHub]
/****************************************************************************
* examples/etx_i2c/etx_i2c_accel_app.c
*
* Licensed to the Apache Software Foundation (ASF) under one or more
* contributor license agreements. See the NOTICE file distributed with
* this work for additional information regarding copyright ownership. The
* ASF licenses this file to you under the Apache License, Version 2.0 (the
* "License"); you may not use this file except in compliance with the
* License. You may obtain a copy of the License at
*
* http://www.apache.org/licenses/LICENSE-2.0
*
* Unless required by applicable law or agreed to in writing, software
* distributed under the License is distributed on an "AS IS" BASIS, WITHOUT
* WARRANTIES OR CONDITIONS OF ANY KIND, either express or implied. See the
* License for the specific language governing permissions and limitations
* under the License.
*
****************************************************************************/
/****************************************************************************
* Included Files
****************************************************************************/
#include <nuttx/config.h>
#include <stdbool.h>
#include <stdlib.h>
#include <stdio.h>
#include <fcntl.h>
#include <sched.h>
#include <errno.h>
#include <sys/ioctl.h>
#include <nuttx/i2c/i2c_master.h>
#include "etx_i2c_accel_app.h"
#ifdef CONFIG_EXAMPLES_ETX_I2C_ACCEL
/****************************************************************************
* Private Data
****************************************************************************/
static int fd;
/****************************************************************************
* Private Functions
****************************************************************************/
/****************************************************************************
* Name: ETX_I2C_Write
*
* Details : This function writes the 1byte data to the slave device
****************************************************************************/
static int16_t ETX_I2C_Write( uint8_t reg, uint8_t value )
{
int16_t ex;
struct i2c_msg_s i2c_msg;
struct i2c_transfer_s i2c_transfer;
uint8_t txbuffer[2];
/* Setup to the data to be transferred. Two bytes: The ADXL345 register
* address followed by one byte of data.
*/
txbuffer[0] = reg;
txbuffer[1] = value;
/* Setup 8-bit ADXL345 address write message */
i2c_msg.addr = ADXL345_ADDRESS;
i2c_msg.flags = 0;
i2c_msg.buffer = txbuffer;
i2c_msg.length = 2;
i2c_msg.frequency = 400000; /* 400K bsp */
i2c_transfer.msgv = &i2c_msg;
i2c_transfer.msgc = 1;
ex = ioctl(fd, I2CIOC_TRANSFER, (unsigned long)(uintptr_t)&i2c_transfer);
if( ex < 0 )
{
printf("ETX_I2C:Write Error : %d\n", ex);
}
return( ex );
}
/****************************************************************************
* Name: ETX_I2C_Read
*
* Details : This function reads the data from the slave device
****************************************************************************/
static int16_t ETX_I2C_Read( uint8_t reg, uint8_t* value, int16_t len )
{
int16_t ex;
struct i2c_msg_s i2c_msg[2];
struct i2c_transfer_s i2c_transfer;
// Write the register address first
i2c_msg[0].addr = ADXL345_ADDRESS;
i2c_msg[0].flags = 0;
i2c_msg[0].buffer = ®
i2c_msg[0].length = 1;
i2c_msg[0].frequency = 400000; /* 400K bsp */
// Read the data
i2c_msg[1].addr = ADXL345_ADDRESS;
i2c_msg[1].flags = I2C_M_READ;
i2c_msg[1].buffer = value;
i2c_msg[1].length = len;
i2c_msg[1].frequency = 400000; /* 400K bsp */
i2c_transfer.msgv = i2c_msg;
i2c_transfer.msgc = 2;
ex = ioctl(fd, I2CIOC_TRANSFER, (unsigned long)(uintptr_t)&i2c_transfer);
if( ex < 0 )
{
printf("ETX_I2C:Read Error : %d\n", ex);
}
return( ex );
}
/****************************************************************************
* Name: ETX_ADXL345_Init
*
* Details : This function Initializes the ADXL345
****************************************************************************/
static int16_t ETX_ADXL345_Init( void )
{
int16_t ex = -1;
uint8_t dev_id;
// Reset all power settings
ETX_I2C_Write( ADXL345_RA_POWER_CTL, 0);
// Read the devId
ETX_I2C_Read( ADXL345_RA_DEVID, &dev_id, 1);
// Check the devId
if( dev_id == 0xE5 )
{
printf("Device ID : 0x%X (Success!!!)\r\n", dev_id);
//Set Output Rate to 100 Hz
ETX_I2C_Write( ADXL345_RA_BW_RATE, 0x0A);
// ADXL345 into measurement mode
ETX_I2C_Write( ADXL345_RA_POWER_CTL, 0x08);
// Disable Interrupts
ETX_I2C_Write( ADXL345_RA_INT_ENABLE, 0x00 );
ex = 0;
}
return( ex );
}
/****************************************************************************
* Name: etx_i2c_accel_task
****************************************************************************/
static int etx_i2c_accel_task(int argc, char *argv[])
{
int ret = 0;
int16_t X,Y,Z;
float Xg,Yg,Zg;
printf("ETX_I2C_ACCEL: Task Starting\n");
fd = open( ETX_I2C_DRIVER_PATH, O_WRONLY);
if( fd < 0 )
{
printf("ETX_I2C_ACCEL:ERROR - Failed to open %s: %d\n",
ETX_I2C_DRIVER_PATH, errno);
ret = -1;
}
ret = ETX_ADXL345_Init();
while( ret >= 0 )
{
// Read the X
ret = ETX_I2C_Read( ADXL345_RA_DATAX0, (uint8_t*)&X, 2);
// Read the Y
ret = ETX_I2C_Read( ADXL345_RA_DATAY0, (uint8_t*)&Y, 2);
// Read the Z
ret = ETX_I2C_Read( ADXL345_RA_DATAZ0, (uint8_t*)&Z, 2);
Xg = ( X * ADXL345_MG2G_MULTIPLIER * STANDARD_GRAVITY );
Yg = ( Y * ADXL345_MG2G_MULTIPLIER * STANDARD_GRAVITY );
Zg = ( Z * ADXL345_MG2G_MULTIPLIER * STANDARD_GRAVITY );
printf("Xg: %f, Yg: %f, Zg: %f\r\n", Xg, Yg, Zg);
}
close(fd);
printf("ETX_I2C_ACCEL: Task finishing\n");
return EXIT_FAILURE;
}
/****************************************************************************
* Public Functions
****************************************************************************/
/****************************************************************************
* main
****************************************************************************/
int main(int argc, FAR char *argv[])
{
int ret;
printf("ETX_I2C_ACCEL: Starting the Application\n");
ret = task_create( "ETX_I2C_ACCEL", // Task Name
CONFIG_EXAMPLES_ETX_I2C_ACCEL_PRIORITY, // Task priority
CONFIG_EXAMPLES_ETX_I2C_ACCEL_STACKSIZE, // Task Stack size
etx_i2c_accel_task, // Task function
NULL
);
if (ret < 0)
{
int errcode = errno;
printf("ETX_I2C_ACCEL: ERROR: Failed to start ETX I2C Accel task: %d\n",
errcode);
return EXIT_FAILURE;
}
return EXIT_SUCCESS;
}
#endif //#ifdef CONFIG_EXAMPLES_ETX_I2C_ACCEL
Makefile
############################################################################
# apps/examples/etx_i2c/Makefile
#
# Licensed to the Apache Software Foundation (ASF) under one or more
# contributor license agreements.  See the NOTICE file distributed with
# this work for additional information regarding copyright ownership.  The
# ASF licenses this file to you under the Apache License, Version 2.0 (the
# "License"); you may not use this file except in compliance with the
# License.  You may obtain a copy of the License at
#
#   http://www.apache.org/licenses/LICENSE-2.0
#
# Unless required by applicable law or agreed to in writing, software
# distributed under the License is distributed on an "AS IS" BASIS, WITHOUT
# WARRANTIES OR CONDITIONS OF ANY KIND, either express or implied.  See the
# License for the specific language governing permissions and limitations
# under the License.
#
############################################################################

include $(APPDIR)/Make.defs

# ETX I2C built-in application info

PROGNAME  = $(CONFIG_EXAMPLES_ETX_I2C_ACCEL_PROGNAME)
PRIORITY  = $(CONFIG_EXAMPLES_ETX_I2C_ACCEL_PRIORITY)
STACKSIZE = $(CONFIG_EXAMPLES_ETX_I2C_ACCEL_STACKSIZE)
MODULE    = $(CONFIG_EXAMPLES_ETX_I2C_ACCEL)

# ETX I2C ADXL345 Accelerometer Example

MAINSRC = etx_i2c_accel_app.c

include $(APPDIR)/Application.mk
Make.defs
############################################################################
# apps/examples/etx_i2c/Make.defs
#
# Licensed to the Apache Software Foundation (ASF) under one or more
# contributor license agreements.  See the NOTICE file distributed with
# this work for additional information regarding copyright ownership.  The
# ASF licenses this file to you under the Apache License, Version 2.0 (the
# "License"); you may not use this file except in compliance with the
# License.  You may obtain a copy of the License at
#
#   http://www.apache.org/licenses/LICENSE-2.0
#
# Unless required by applicable law or agreed to in writing, software
# distributed under the License is distributed on an "AS IS" BASIS, WITHOUT
# WARRANTIES OR CONDITIONS OF ANY KIND, either express or implied.  See the
# License for the specific language governing permissions and limitations
# under the License.
#
############################################################################

ifneq ($(CONFIG_EXAMPLES_ETX_I2C_ACCEL),)
CONFIGURED_APPS += $(APPDIR)/examples/etx_i2c
endif
Kconfig
#
# For a description of the syntax of this configuration file,
# see the file kconfig-language.txt in the NuttX tools repository.
#

config EXAMPLES_ETX_I2C_ACCEL
  tristate "EmbeTronicX I2C app example (ADXL345 Accelerometer)"
  default n
  depends on I2C && I2C_DRIVER
  ---help---
    Enable the EmbeTronicX I2C app example (ADXL345 Accelerometer)

if EXAMPLES_ETX_I2C_ACCEL

config EXAMPLES_ETX_I2C_ACCEL_PROGNAME
  string "Program name"
  default "etx_i2c_adxl345"
  ---help---
    This is the name of the program that will be used when the NSH ELF
    program is installed.

config EXAMPLES_ETX_I2C_ACCEL_PRIORITY
  int "etx_i2c_adxl345 task priority"
  default 100

config EXAMPLES_ETX_I2C_ACCEL_STACKSIZE
  int "etx_i2c_adx345 stack size"
  default DEFAULT_TASK_STACKSIZE

endif
Building the driver and app
Let’s build our app and the I2C driver together. I have created the build.sh shell script to combine all the required steps into one file.
build.sh
This build.sh has been added to the nuttx/ directory. You can get the build.sh from GitHub.
|
|
|
# !/bin/bash

# A simple bash script to build the NuttX RTOS

#export ESP32 env
. $HOME/esp/esp-idf/export.sh


if [ $1 -eq 1 ]
then
  #distclean
  echo "Dist clean"
  make distclean

  #ESP32 configure
  echo "configuring ESP32 with NuttX RTOS"
  ./tools/configure.sh esp32-devkitc:nsh
fi

#menuconfig
make menuconfig

#make and flash
make download ESPTOOL_PORT=/dev/ttyUSB0
The above script has one argument. If you pass 1, then it does distclean and initializes the board configs. If you pass other than 1, then it does only the make menuconfig and make.
I don’t want to do the distclean. So, just building the NuttX. Run the below command in NuttX/nuttx directory.
. ./build.sh 0
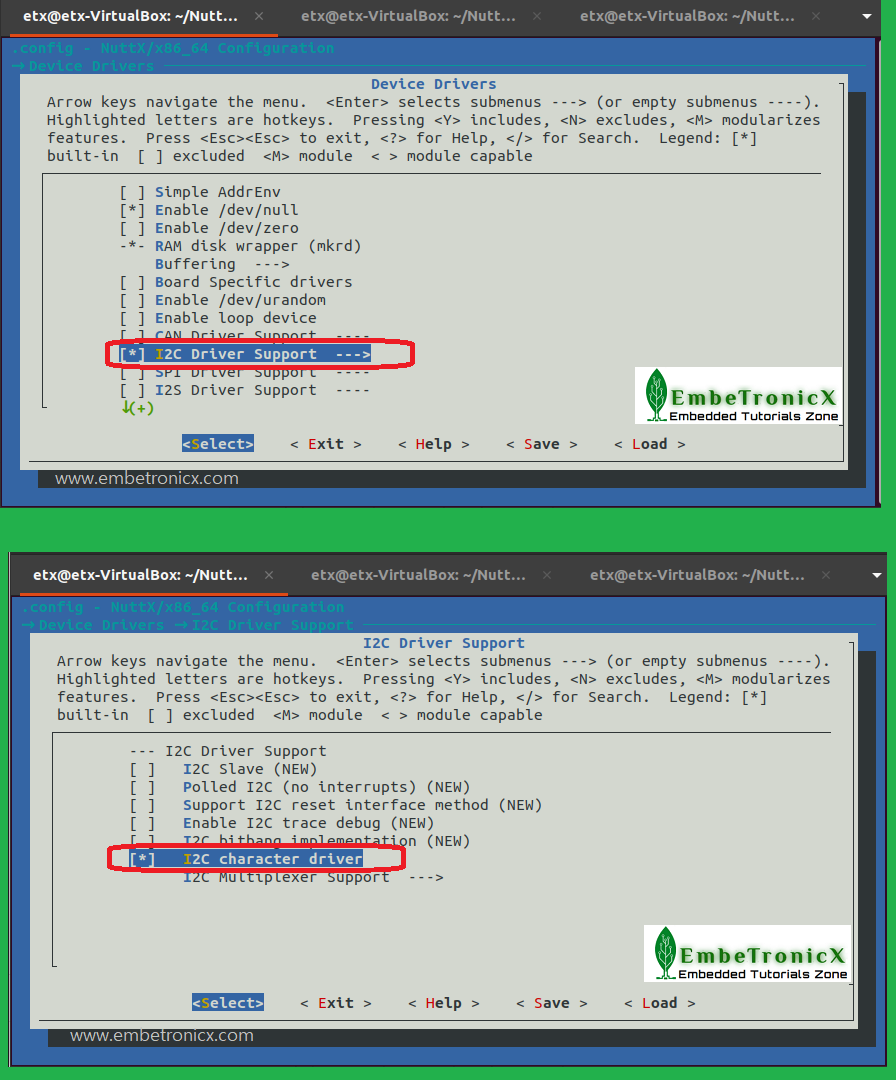
When you run the above command, you should get the menuconfig window. In that menuconfig, we have to enable the i2c driver and the etx_i2c_accel_app application. Let’s do that.
Just navigate to System Type —> ESP32 Peripheral Selection —> and check (enable) the I2C1 like the below image.

|
|
|
After that, let’s enable the I2C driver by navigating to Device drivers —>enable the I2C Driver Support. And go to that menu and enable the I2C Character Driver like the below image.
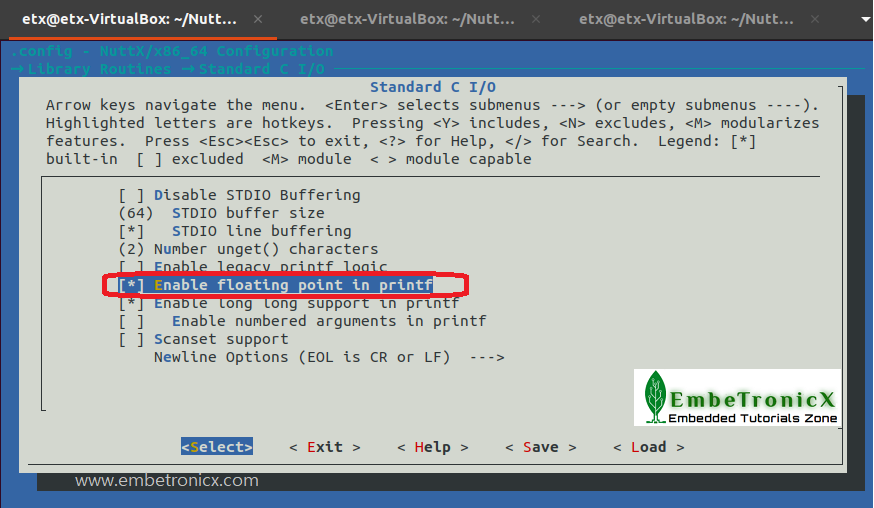
As we are going to use the floating numbers in our program, we have to enable the floating number also. To enable the floating-point number in NuttX RTOS, navigate to Library Routines —> Standard C I/O—> enable the Enable Floating point in printf like the below image.
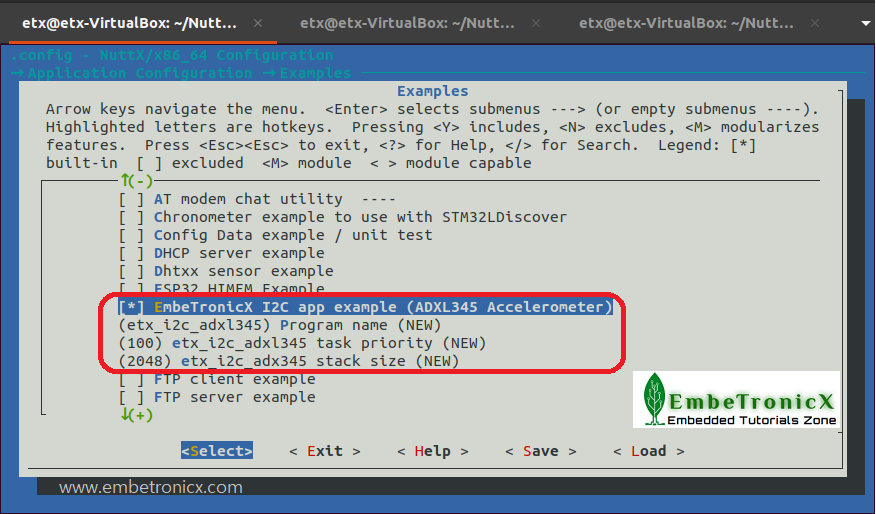
That’s from the driver. Let’s enable the Application that we have written earlier in this tutorial. Navigate to Application Configuration —> Examples —> and check (enable) the EmbeTronicX I2C app example (ADX345 Accelerometer) like the below image.
|
|
|
That’s all. Let’s build the NuttX now.
Save and Exit the menuconfig and let it build. Once it is trying to connect, hold the BOOT button. Then it will start flashing.
Once you build and flashed it, you connect the device using the picocom using the picocom -b 115200 /dev/ttyUSB0 command.
Now you will get the NuttShell (nsh). Enter the ? or help command. You will get the etx_i2c_adxl345 app. Now run the etx_i2c_adxl345 app.
|
|
|
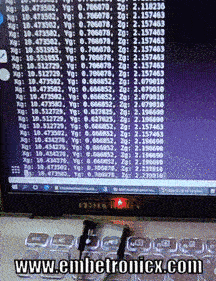
Output – ESP32 ADXL345 Interfacing using NuttX RTOS I2C
Once the system is booted, then run the etx_i2c_adxl345 application. You should get the X, Y, Z-axis like below continuously.
nsh> etx_i2c_adxl345
ETX_I2C_ACCEL: Starting the Application
ETX_I2C_ACCEL: Task Starting
nsh> Device ID : 0xE5 (Success!!!)
Xg: 3.373488, Yg: 1.686744, Zg: -8.786758
Xg: 3.373488, Yg: 1.686744, Zg: -8.786758
Xg: 3.373488, Yg: 1.686744, Zg: -8.786758
Xg: 3.373488, Yg: 1.686744, Zg: -8.786758
Xg: 3.373488, Yg: 1.686744, Zg: -8.786758
Xg: 3.373488, Yg: 1.686744, Zg: -8.786758
Xg: 3.373488, Yg: 1.686744, Zg: -8.786758
Xg: 3.373488, Yg: 1.686744, Zg: -8.786758
Refer to the below image.
This is a very basic example. In this example, we just read the data and print it. In our next tutorial, we will see how to generate events using the ADXL345 and NuttX.
You can also read the below tutorials.
|
|
|
Reference
- https://acassis.wordpress.com/2019/01/19/how-to-use-nuttx-i2c-scan-features/
- https://www.analog.com/media/en/technical-documentation/data-sheets/ADXL345.pdf
Embedded Software | Firmware | Linux Devic Deriver | RTOS
Hi, I am a tech blogger and an Embedded Engineer. I am always eager to learn and explore tech-related concepts. And also, I wanted to share my knowledge with everyone in a more straightforward way with easy practical examples. I strongly believe that learning by doing is more powerful than just learning by reading. I love to do experiments. If you want to help or support me on my journey, consider sharing my articles, or Buy me a Coffee! Thank you for reading my blog! Happy learning!
