This article is a continuation of the Series on Linux Device Drivers and carries the discussion on character drivers and their implementation. The aim of this series is to provide easy and practical examples that anyone can understand. This is the Setup Beaglebone Board – Linux Device Driver Tutorial – Part 1.2.
You can find a video explanation of this tutorial here. You can also find all the Linux device driver’s video playlists here.
Table of Contents
Setup Beaglebone Board
If we want to develop a Linux device driver in the Beaglebone board, we need to Setup Beaglebone Board first. In this demonstration, we have used Beaglebone Green (BBG). But you can use Beaglebone Black (BBB) also.
We are breaking this post into multiple segments.
- Bring up the Beaglebone using the pre-built images
- Boot from eMMC instead of SD card
- Setup Host
- Linux Kernel Cross-compilation (Beaglebone Linux kernel build)
- Update the latest Linux kernel
- Enable the ethernet via USB0
Note: These steps are tested with the Beaglebone Green (BBG) board, But should work for Beaglebone board black (BBB) as well.
|
|
|
Bring up the Beaglebone using the pre-built images
We are just following the guide from this website.
- First, download the latest Debian images from beagleboard.org. I have downloaded the AM3358 Debian 10.3 2020-04-06 4GB SD IoT.
- You will get a file with an extension of .img.xz. Just extract it using any extractor. You will get a bone-debian-10.3-iot-armhf-2020-04-06-4gb.img file.
- Then download the Win32 Disk Imager and install it.
- Now insert your SD card into the PC and format it.
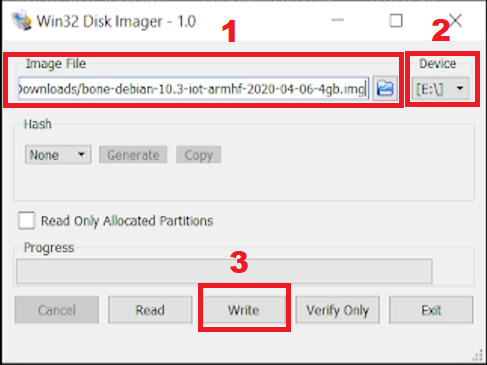
- Then open that Win32 Disk Imager. This is used to write the image to your SD card.
- Pick the image file that we have downloaded, and select your SD card drive. And write it. It will take few minutes.
- Close that application and eject your SD card.
- Now insert the SD card to the Beaglebone Green. Then insert the USB cable.
- Now the Beaglebone board will boot from the SD card. Just wait for some time.
- Once the Beaglebone board is detected from your machine like other USB devices, You can connect the SSH to the Beaglebone Green using Putty or Teraterm.
- Give the host address. By default, it will be 192.168.7.2, and the port is 22.
- Click Okay and Continue.
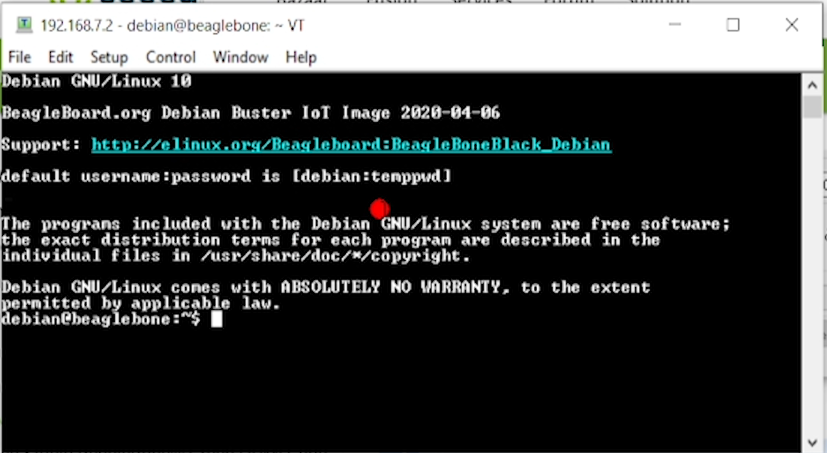
- Provide the username and password. The default username is “debian“, and the password is “temppwd“.
- Now, you can see the Linux boot prints like below.
- Let’s check the kernel version using
uname -ar. Now, the Linux kernel 4.19.94 is running.
Boot from eMMC instead of SD card
Now the Beaglebone has booted from the SD card. So, whenever you power it on, the Beaglebone will boot the complete system from the SD card. If you don’t want the Beaglebone to boot from the SD card, then there is another way. It has an internal eMMC flash memory. We can copy the images to that flash memory. So, in this case, we can save the SD card slot for some other purpose.
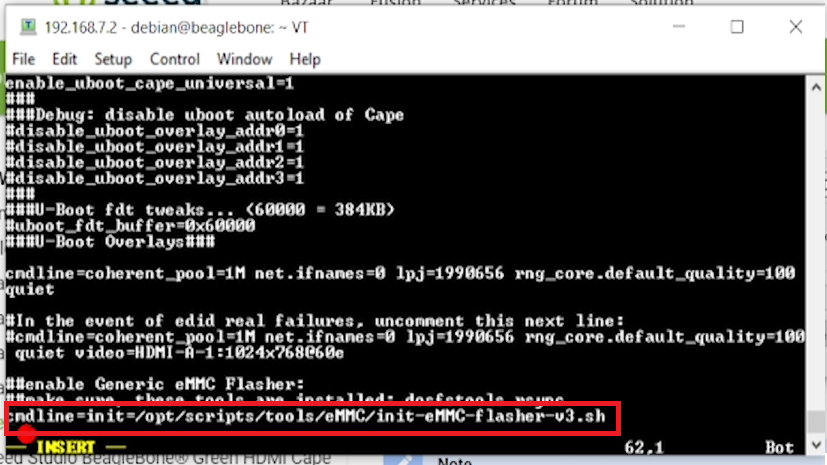
- In the target (Beaglebone), edit the uEnv.txt file using
sudo vi /boot/uEnv.txt. Here, I have used the VI editor. You can use any other editors. - Uncomment the last line (remove the # symbol at the starting of the last line).
|
|
|
- Then save and close this file.
- Now reset the Beaglebone and wait for few minutes as it has to copy the data from the SD card to Flash.
- You can see the LEDs are blinking like these during that process.
- When the process is finished, all the LEDs will go to the off state.
- Remove the power and take the SD card out from the Beaglebone board. Now, you don’t need the SD card to boot as we have copied the data to the flash memory.
- Power on the Beaglebone.
- Now connect to the Beaglebone Green using the SSH. The username is “debian” and the password is “temppwd“.
- This time, Beaglebone is boot from the eMMC flash memory.
It’s time to update the kernel to the new version. In the initial part of this video, we have connected the Beaglebone board with the host machine using the SSH connection. Now let’s use the UART connection so that we can see the u-boot prints as well. Connect the USB to the serial converter to the J1 pins like the below image.
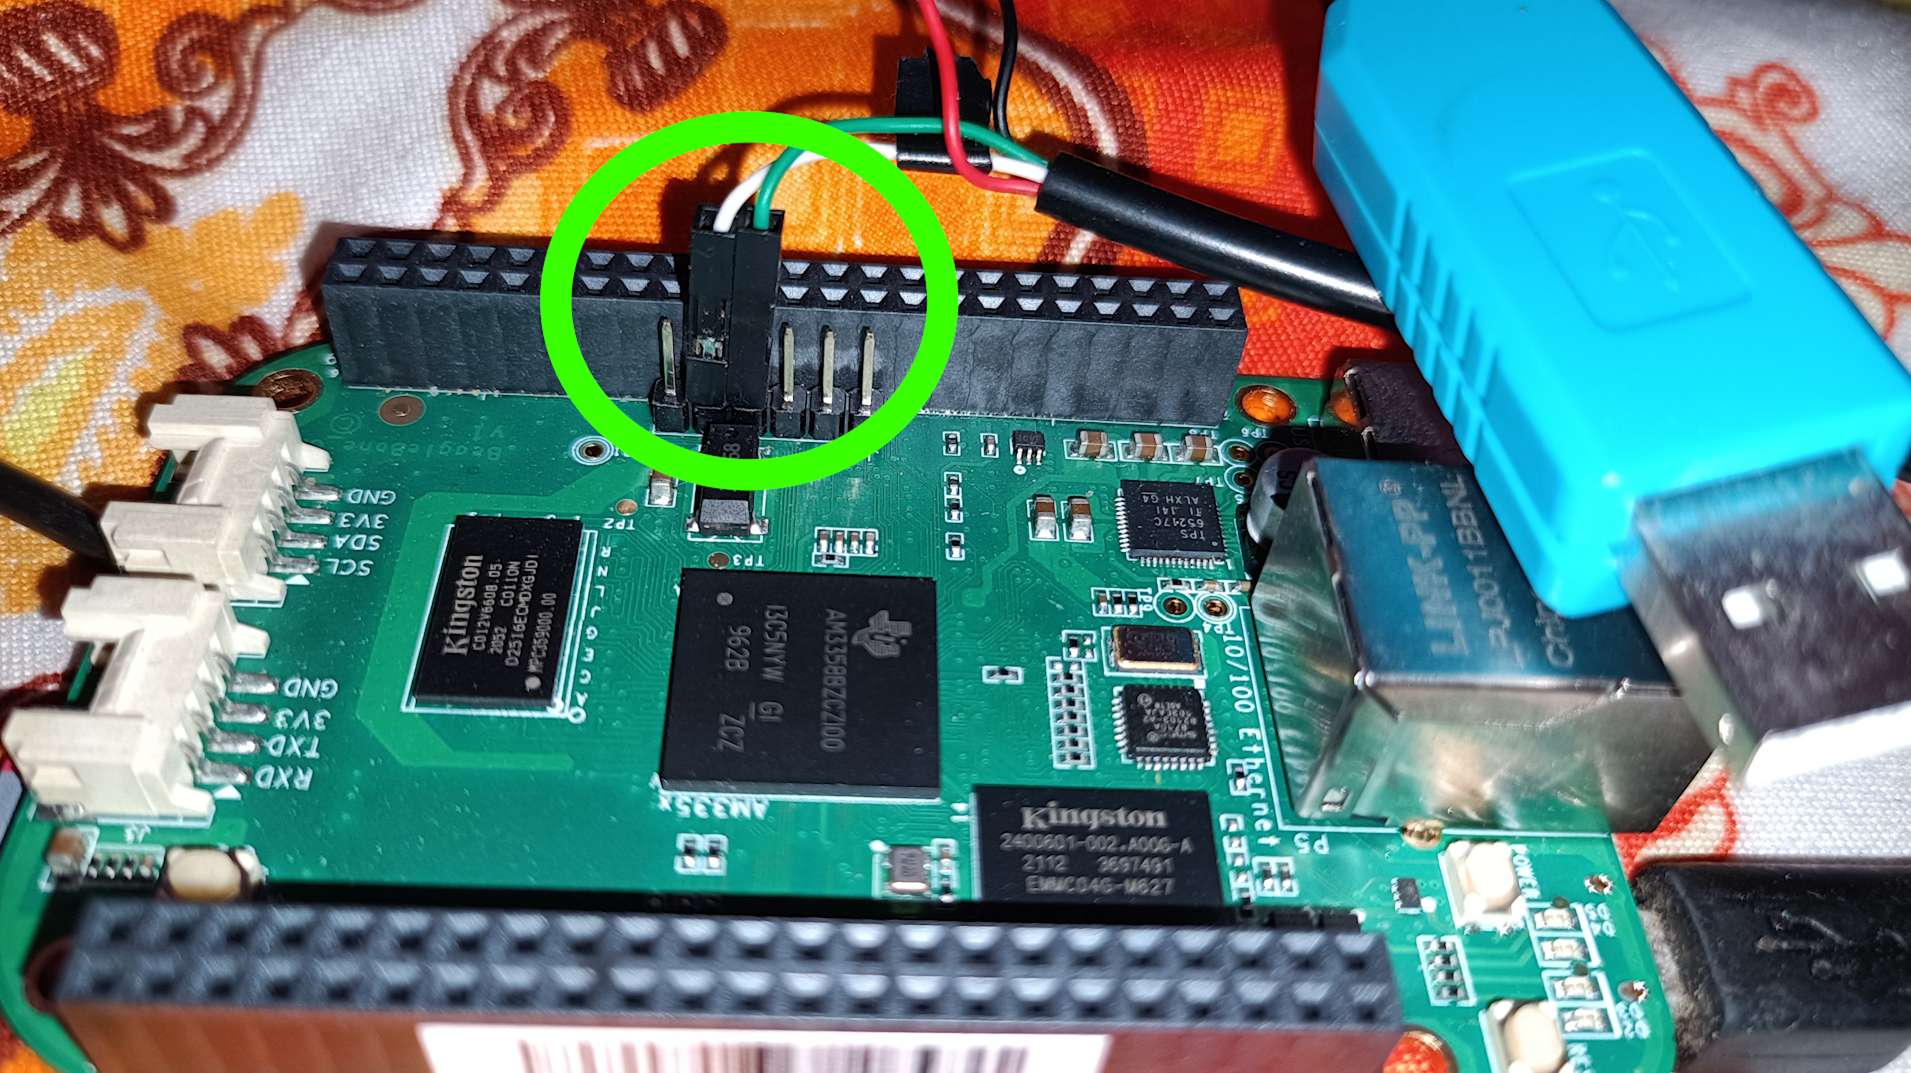
We can access the kernel, and u-boot from the UART itself. If you don’t want the UART, then you can use the SSH. But you will have to wait till the kernel boots. You cannot see the u-boot prints if you use an SSH connection.
Setup Host
Now we will set up the Host ubuntu.
- First, let’s install the packages that we need to build the Linux kernel.
sudo apt-get install build-essential gcc-arm-linux-gnueabi git lzop u-boot-tools bison flex libssl-dev libncurses-dev sshfs lzma gettext libmpc-dev libncurses5-dev:amd64
- Then create a new directory called BBG.
mkdir ~/BBG
cd ~/BBG
- Then clone the Linux kernel from Github and check out the newer kernel. In this post, I am going to build the Linux Kernel 5.10.65.
git clone git://github.com/beagleboard/linux.git
cd linux/
git checkout 5.10.65-ti-r23
Linux Kernel Cross-compilation
- Then use the default configurations.
make -j4 ARCH=arm CROSS_COMPILE=arm-linux-gnueabi- bb.org_defconfig
- Then run menuconfig. You can enable or disable any components using this menuconfig.
make -j4 ARCH=arm CROSS_COMPILE=arm-linux-gnueabi- menuconfig
- Now, let’s build the Linux kernel using this command. This will take time. It took 40mins for me. So, wait patiently.
make -j4 ARCH=arm CROSS_COMPILE=arm-linux-gnueabi- LOADADDR=0x80000000 uImage dtbs
- Let’s build the modules. This also took 40mins for me.
make -j4 ARCH=arm CROSS_COMPILE=arm-linux-gnueabi- modules
- Now, we will create a temporary directory that resides outside of the Linux kernel directory. And, We will install the modules into that temp directory.
mkdir ../tmp/
make -j4 ARCH=arm CROSS_COMPILE=arm-linux-gnueabi- INSTALL_MOD_STRIP=1 INSTALL_MOD_PATH=../tmp modules_install
Now we have everything.
|
|
|
Update the latest Linux kernel
We can copy these compiled kernel, modules, and device tree files to the Beaglebone board using the SSH connection.
- First, let’s attach the Beaglbone USB0 to the Virtualbox Ubuntu. In the VirtualBox, go to Devices -> USB -> and select Seeed Beaglebone Green.
- Now, the USB will be connected to the Ubuntu VirtualBox.
- We will ping the Beaglebone to check whether it is up or not. (
ping 192.168.7.2). - Okay, it is up. Now, we can copy those files.
sudo rsync -avz ../tmp/lib/modules/ [email protected]:/home/debian/
sudo rsync -avz arch/arm/boot/dts/*.dtb [email protected]:/home/debian/
sudo rsync -avz arch/arm/boot/zImage [email protected]:/home/debian
Now, we have all the files in the Beaglebone board under the /home/debian directory. We will have to move those files into the proper places.
- In the SSH terminal or UART terminal, run the below commands.
cd /home/debian
sudo mv zImage /boot/vmlinuz-5.10.65-ti-r23
sudo mv 5.10.65 /lib/modules/
sudo mkdir -p /boot/dtbs/5.10.65-ti-r23
sudo mv *.dtb /boot/dtbs/5.10.65-ti-r23/
- Now, all the files are in the proper places. Let’s edit the uEnv.txt file.
sudo vi /boot/uEnv.txt
- Go to the top of the file. Comment the uname_r which has an older kernel name. And update our new kernel name to the uname_r. It should be like the below.
#uname_r=4.19.94-ti-r42
uname_r=5.10.65-ti-r23
- Save and close this file.
Enable the ethernet via USB0
In the new kernel, Ethernet via USB0 will not be enabled by default. So, we have to load the module called g_ether at the boot time. Let’s edit the /etc/modules and add g_ether to that file. Then save and exit the file. Now we will reboot the Beaglebone board.
In the UART terminal, you can see the newer kernel has been loaded. You can verify that by running uname -ar. But sadly, you cannot access the SSH. Just check the ifconfig. You cannot find the usb0. But if you do ifconfig -a, You can see the usb0 without an IP address. So, we have set the IP address using the below command.
sudo ifconfig usb0 192.168.7.2 netmask 255.255.255.0
After that command, if you run ifconfig, you should be able to see the usb0 with the IP address 192.168.7.2. Now, we can use the SSH connection in the new kernel.
|
|
|
Note: If you want to use this SSH in a windows machine, then you have to install the RNDIS driver. But in Ubuntu, you don’t need to install anything.
Setup Beaglebone Board – Video Explanation
Please check our video explanation below.
In our next tutorial, we will write our first Linux device driver.
You can also read the below tutorials.
|
|
|
Embedded Software | Firmware | Linux Devic Deriver | RTOS
Hi, I am a tech blogger and an Embedded Engineer. I am always eager to learn and explore tech-related concepts. And also, I wanted to share my knowledge with everyone in a more straightforward way with easy practical examples. I strongly believe that learning by doing is more powerful than just learning by reading. I love to do experiments. If you want to help or support me on my journey, consider sharing my articles, or Buy me a Coffee! Thank you for reading my blog! Happy learning!
