
This article is a continuation of the series on Unit testing in C and carries the discussion on Unit Testing and its implementation. The aim of this series is to provide easy and practical examples that anyone can understand. This is the Code coverage in unit testing – Unit testing in C tutorial Part 2.
You can also read the unit testing introduction, ceedling installation, Unity, Cmock, stringizing, token pasting in C, and macro vs inline.
Table of Contents
Unit testing in C – Code Coverage
Introduction
Code coverage measures the number of lines of source code executed during a given test suite for a program. Tools that measure code coverage normally express this metric as a percentage.
![Code\;Coverage= \left[\frac{Number\;of\;lines\;of\;code\;exercised}{Total\;Number\;of\;lines\;of\;code}\right]\times100\%](https://s0.wp.com/latex.php?latex=Code%5C%3BCoverage%3D+%5Cleft%5B%5Cfrac%7BNumber%5C%3Bof%5C%3Blines%5C%3Bof%5C%3Bcode%5C%3Bexercised%7D%7BTotal%5C%3BNumber%5C%3Bof%5C%3Blines%5C%3Bof%5C%3Bcode%7D%5Cright%5D%5Ctimes100%5C%25&bg=ffffff&fg=000&s=2&c=20201002)
So, if you have 90% code coverage then it means, there is 10% of the code that is not covered under tests. Code coverage tools will use one or more criteria to determine how your code was exercised or not during the execution of your test suite. Code Coverage utilities hook into your source code and your test suite and return statistics on how much of your code is actually covered by your tests.
|
|
|
The common metrics that you might see mentioned in your coverage reports include:
- Statement coverage
- Decision or Branches coverage
- Condition coverage
- Modified condition/decision coverage (MCDC)
- Function coverage
- Function call coverage
- Line Coverage
- Loop Coverage
We will see one by one below.
Statement Coverage
This is a metric that ensures that each statement of the code is executed at least once. It measures the number of lines executed. It helps to check the do’s and don’t’s of a source code.
Example
void test_func( bool condition )
{
  if ( condition == true )
  {
    printf("Condition is true\n");
  }
  else
  {
    printf("Condition is false\n");
  }
}
Let’s take this source. Now will assume that I am going to write one test case and passing the argument true to that test_func. So that, code will execute like below.
void test_func( bool condition )
{
if ( condition == true )
{
printf(“Condition is true\n”);
}
else
{
printf(“Condition is false\n”);
}
}
So here, the green coloured lines will execute. That means, totally, 7 lines will be executed out of 11 lines. So, the else part is not at all covered. If we want to cover the else part, we cannot achieve that using another test case. Because of that branch (if-else), it will execute only one path. So we have to write another test to cover that else part.
I am writing the 2nd test case to test the else part. This time I have to pass false to the argument condition. In that case, it will execute the statements like below.
void test_func( bool condition )
{
if ( condition == true )
{
printf(“Condition is true\n”);
}
else
{
printf(“Condition is false\n”);
}
}
So, the 2nd test case will run through 8 statements out of 11 statements. In this case, it is not running if part. So, if we combine both the test cases, we will cover 100% statements of this code.
What is the use of statement coverage?
- We can find the dead codes
- We can find the unused branches
Decision or Branch Coverage
Branch coverage ensures each branch in the program (e.g., if statements, loops) has been executed. That means each branch has been executed at least once during testing. So, each branch condition must have been true at least once and false at least once during testing. Confused? Lol. Sorry for that bad explanation. Will clear that by the below example. We can use the same example which we have used above.
|
|
|
Example
void test_func( bool condition )
{
  if ( condition == true )
  {
    printf("Condition is true\n");
  }
  else
  {
    printf("Condition is false\n");
  }
}
Let’s take this source. Now we will assume that I am going to write one test case and passing the argument true to that test_func. So that, the code will execute if condition like below.
void test_func( bool condition )
{
if ( condition == true )
{
printf(“Condition is true\n”);
}
else
{
printf(“Condition is false\n”);
}
}
So here, the green coloured lines will execute (branch). We have covered one path of the branch. But still, another path is there to test which else part.
I am writing the 2nd test case to test the else part. This time I have to pass false to the argument condition. In that case, it will execute the statements like below.
void test_func( bool condition )
{
if ( condition == true )
{
printf(“Condition is true\n”);
}
else
{
printf(“Condition is false\n”);
}
}
So, the 2nd test case will run through the else part. In this case, it is not running if part. So, if we combine both the test cases, we will cover 100% branches of this code (We have covered both if and else part).
What? Just wait a minute. I have explained both the statement coverage and the branch coverage with the same example and the same test cases. So, Does that mean, if we cover all the statements it will cover all the branches as well? In the above example YES. But if you see another example it is not true.
Difference between statement coverage and branch coverage
Let’s discuss another example given below.
void test_func( bool condition )
{
 if ( condition == true )
 {
  printf("Condition is true\n");
 }
 printf("EmbeTronicX\n");
}
For the above example, I am writing one test case. In that test case, I am passing the argument as true (condition = true). In such a case, the statement coverage is like below.
void test_func( bool condition )
{
if ( condition == true )
{
printf(“Condition is true\n”);
}
printf(“EmbeTronicX\n”);
}
The green coloured lines will be executed when condition is true. That means, we have covered 100% statement with only one test case.
So now we will come to our question. Here, we have achieved 100% statement coverage. Does that mean, we have achieved branch coverage also? Obviously NO. Why and How? See the below image. I have put the path of the code execution.
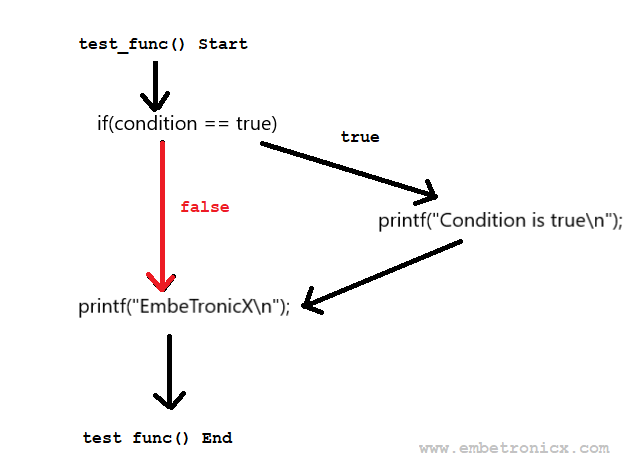
So by using the above picture, We have not covered the red line path which is a false case of if(). But we have covered 100% of the statement coverage and missed the one path of a branch. So branch coverage will differ from statement coverage when branches are “empty”. In the above example, else part is missing. So the branch is empty here.
If we achieve 100% of branch coverage, that means we have covered all the statements too. But if we achieve 100% of statement coverage, that doesn’t mean, we have covered all the branches as well.
|
|
|
Note:
100% branch coverage = 100% statement coverage
100% statement coverage != 100% branch coverage
Condition Coverage
Condition coverage only applies to logical operands like AND, OR, XOR. In order to ensure complete Condition coverage criteria, the logical operands should be evaluated at least once against “true” and “false“. This is closely related to decision coverage but has better sensitivity to the control flow. However, full condition coverage does not guarantee full decision coverage. Condition Coverage is also known as ‘Predicate Coverage’.
Let us take an example to explain Condition Coverage
|
|
|
if (X && Y)
In order to suffice valid condition coverage for this pseudo-code following tests will be sufficient.
TEST 1: X=TRUE, Y=FALSE
TEST 2: X=FALSE, Y=TRUE
Modified condition/decision coverage (MCDC)
The modified condition/decision coverage (MC/DC) coverage is like condition coverage, but every condition in a decision must be tested independently to reach full coverage. This means that each condition must be executed twice, with the results true and false, but with no difference in the truth values of all other conditions in the decision. In addition, it needs to be shown that each condition independently affects the decision.
If you want to understand clearly the MC/DC, please see this video. (credits: udacity)
|
|
|
Function Coverage
Function Coverage refers to the number of functions in your code that were tested.
Function call coverage
It is a very common scenario in programming that one function calls another and so on. There is a calling function and a called function. So this coverage technique ensures that there do not exist any faults in the function call.
Line Coverage
Line Coverage is straightforward. It’s the number of lines of code your tests evaluated.
Loop Coverage
This technique is used to ensure that all the loops have been executed, and the number of times they have been executed. The purpose of this coverage technique is to make sure that the loops adhere to the conditions as prescribed and don’t iterate infinitely or terminate abnormally. Loop testing aims at monitoring the beginning until the end of the loop.
Keep this in your mind
Just remember one thing, having “100% code-coverage” doesn’t mean that everything is tested completely and doesn’t mean that they are tested under every (common) situation, while it means every line of code is tested but not on the real situation. The coverage doesn’t reflect the code quality, it just tells you how many lines are covered by a test. A piece of code with a coverage of 100% could have as many bugs as code without the tests. I would use code coverage to highlight bits of code that I should probably write tests for. Basically, 100% code coverage doesn’t mean your code is perfect. Use it as a guide to writing more comprehensive unit tests.
|
|
|
How should I deal with the coverage?
Now you know what code coverage isn’t you probably think, so why should I use it then? Code coverage helps you and your development team, for example, it requires every developer to do minimal effort of testing.
It also helps you to be a better developer. When you write your own code and you know you have to test it you’ll notice that your code will be more clean and easy to understand to make it easier to test.
Final words
Code coverage is especially important with Test Driven Development, where the developer writes his tests before he writes his code. TDD is meant to inform the Agile development process and help developers write cleaner code with fewer lines of junk. In this case, Code Coverage helps developers write better tests, and helps keep their code on target by pointing out code that falls outside the expected development scope
In our next tutorial, we will see how to install the unit test framework.
You can also read the below tutorials.
|
|
|
Embedded Software | Firmware | Linux Devic Deriver | RTOS
Hi, I am a tech blogger and an Embedded Engineer. I am always eager to learn and explore tech-related concepts. And also, I wanted to share my knowledge with everyone in a more straightforward way with easy practical examples. I strongly believe that learning by doing is more powerful than just learning by reading. I love to do experiments. If you want to help or support me on my journey, consider sharing my articles, or Buy me a Coffee! Thank you for reading my blog! Happy learning!
