This is the Series of tutorials on the STM32 Microcontroller. The aim of this series is to provide easy and practical examples that anyone can understand. In this article, we are going to see the STM32 Ethernet Example program which runs a simple HTTP server.
Table of Contents
Hardware Required
We have our own EmbeTronicX Store called ChipTronicX. You can purchase the hardware from ChipTronicX.
- STM32F767Zi Nucleo Board
- Ethernet Cable
- Router
STM32 Ethernet Example
In this tutorial, we are going to create a simple HTTP web server in the STM32. Then we are going to access the web server through the ethernet port. Let’s get started.
Project Creation
Create the new project in STM32CubeIDE. Then in the .ioc file, Click “Connectivity” –> “ETH“. Set the Mode as RMII. Please refer to the below image.
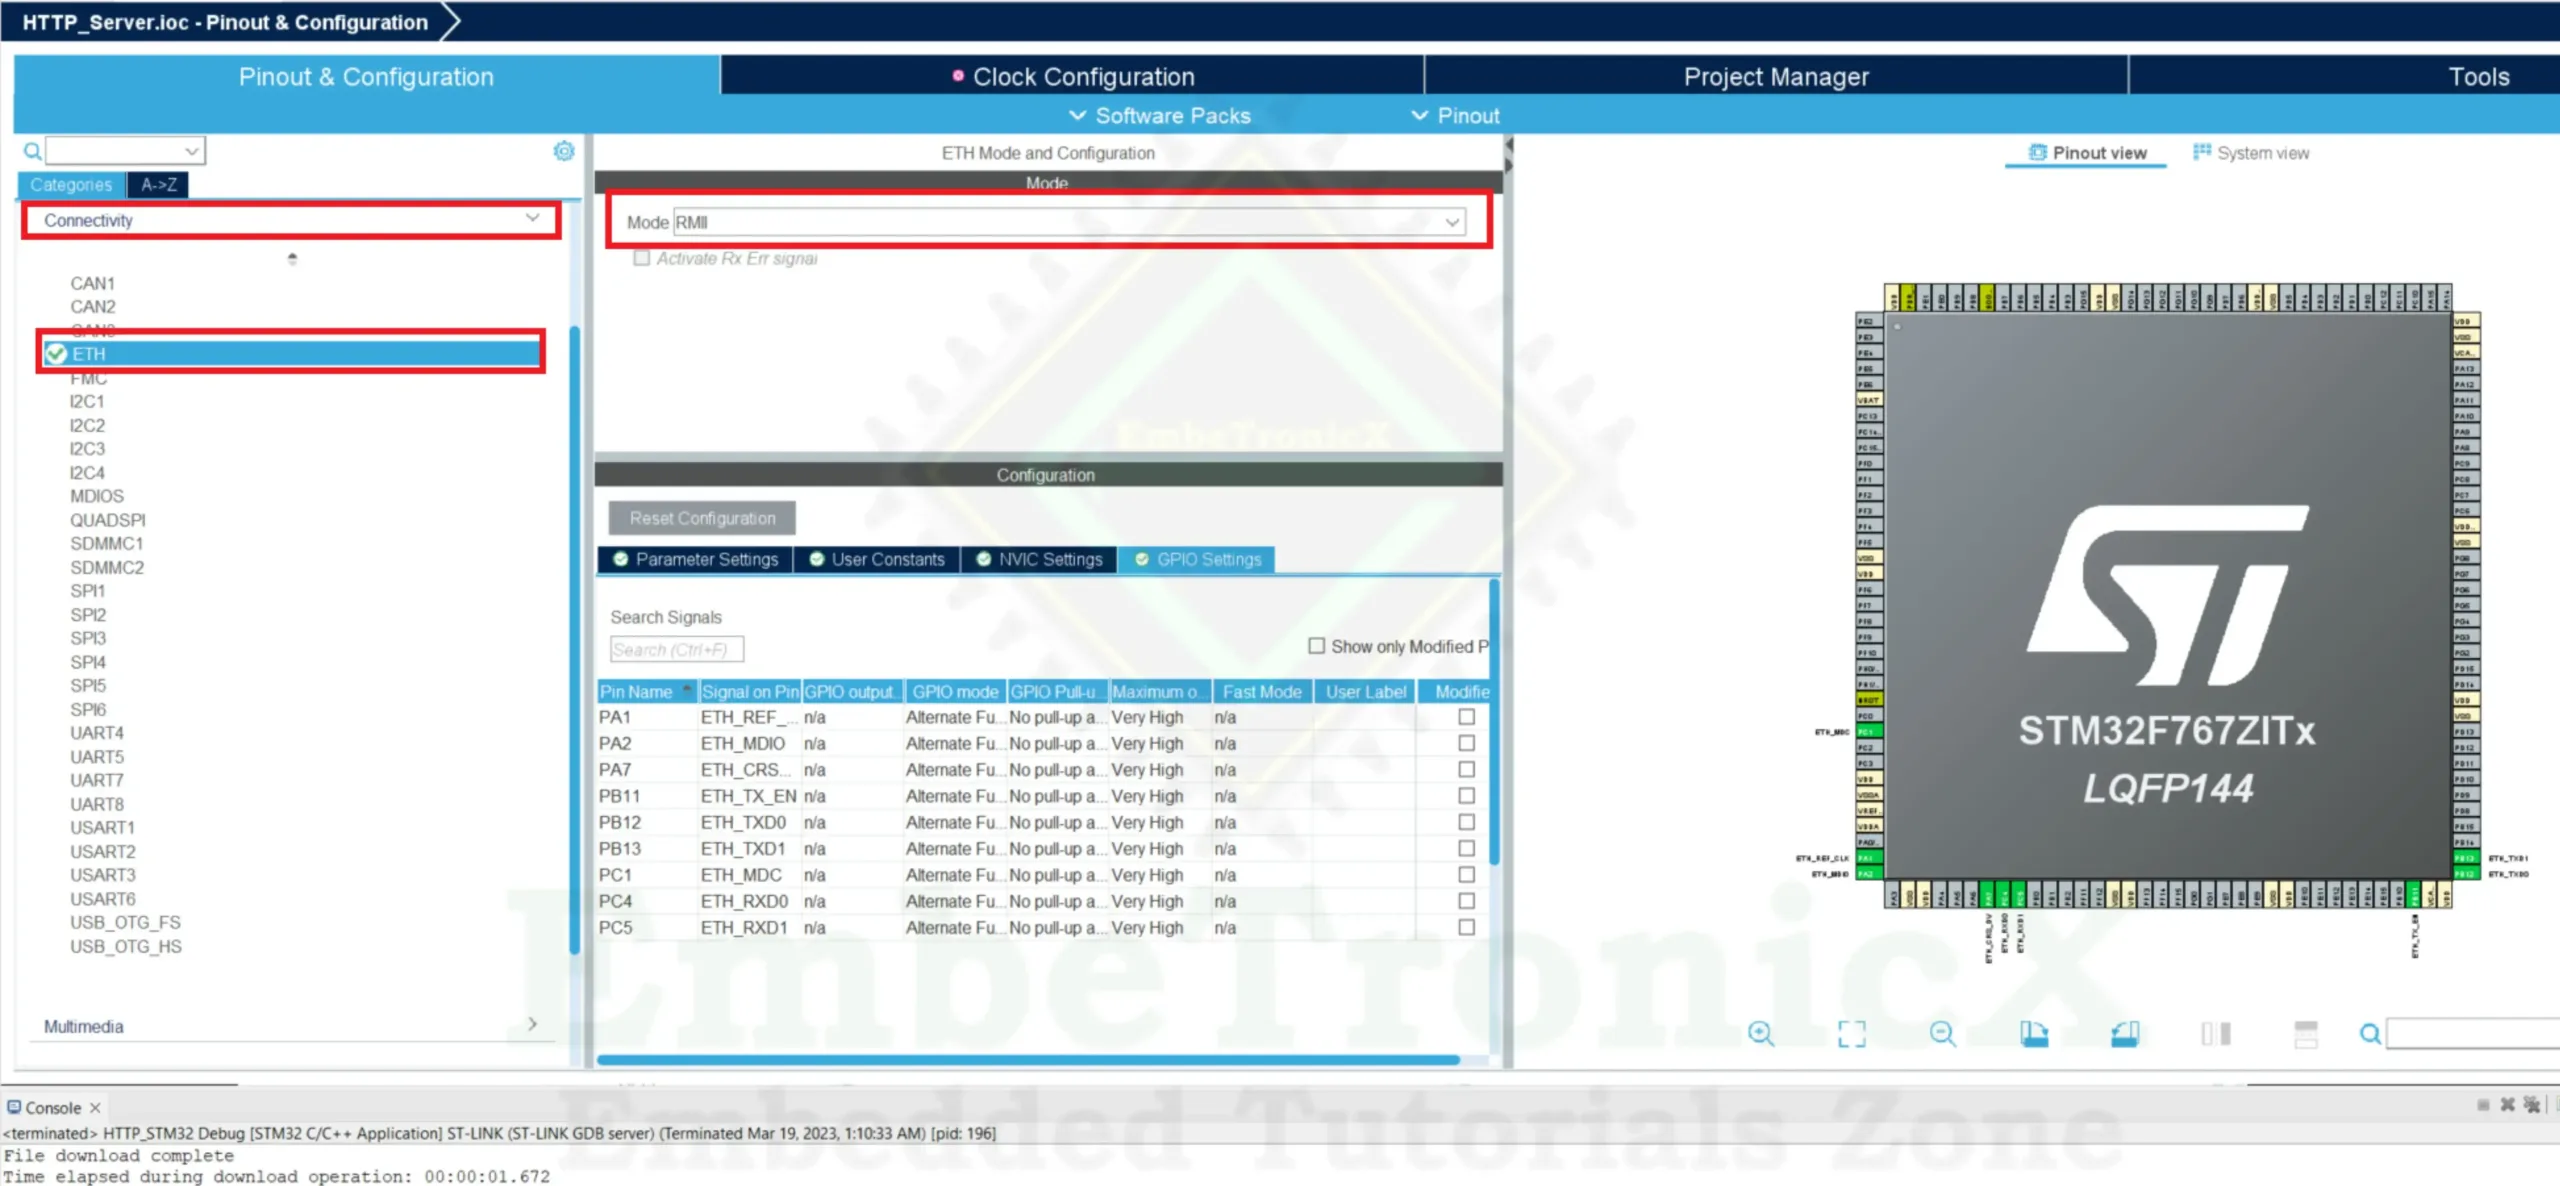
Now we need to modify the pins based on our Nucleo board. In our STM32F767Zi Nucleo board, the below pins are connected to the ethernet port.
|
|
|
| Pin Name | Pin Function |
| PA1 | RMII Reference Clock (ETH_REF_CLK) |
| PA2 | RMII MDIO (ETH_MDIO) |
| PC1 | RMII MDC (ETH_MDC) |
| PA7 | RMII RX Data Valid (ETH_CRS_DV) |
| PC4 | RMII RXD0 (ETH_RXD0) |
| PC5 | RMII RXD1 (ETH_RXD1) |
| PG11 | RMII TX Enable (ETH_TX_EN) |
| PG13 | RXII TXD0 (ETH_TXD0) |
| PB13 | RMII TXD1 (ETH_TXD1) |
But in the STM32CubeIDE, PG13, and PG11 are not enabled. Instead, other pins are used. Change the ETH_TXD0 pin to PG13 and ETH_TX_EN pin to PG11. The rest of the other pins are same as the STM32F767Zi board pins. Ensure you enabled all the pins like the below image.

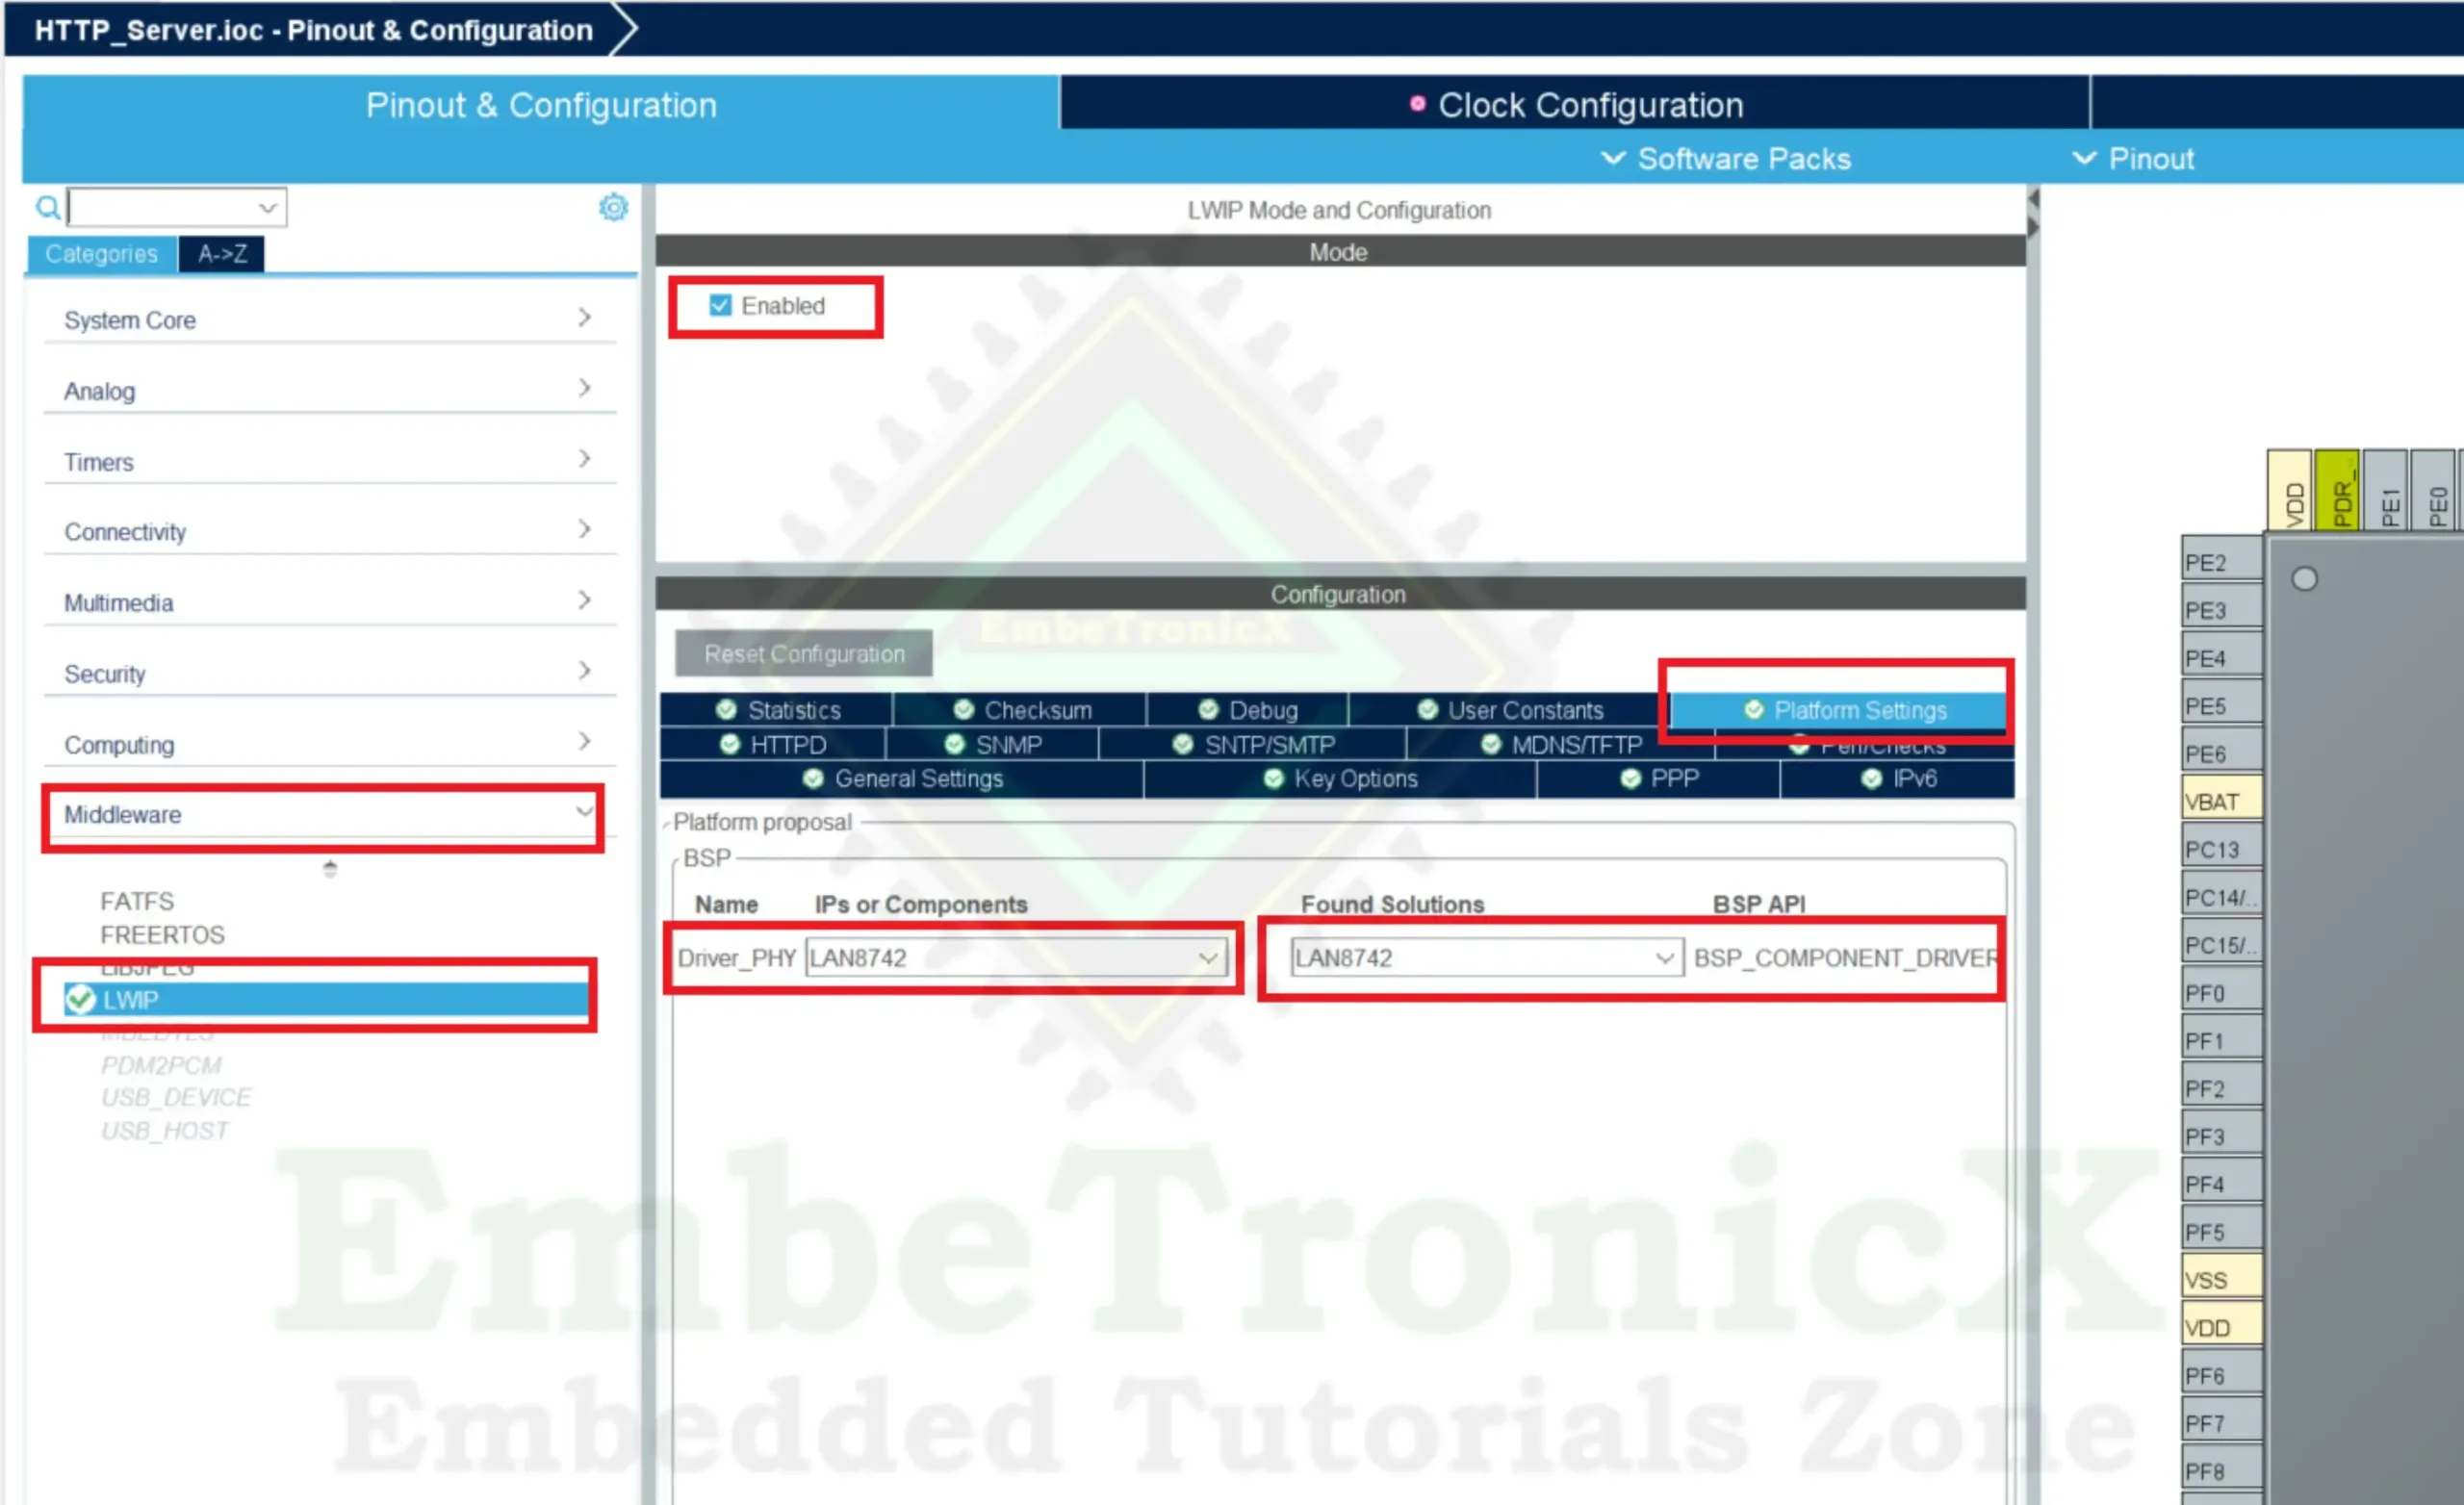
Then Click the “Middleware” –> “LWIP” and Enable that. Then, In the Platform Settings, Select the LAN8742 as a Driver_PHY. Refer to the below image.
Now, we will set the IP address. Click the General Settings, and Disable the LWIP_DHCP(DHCP Module). Then set the IP address, Netmask, and Gateway like the below image.
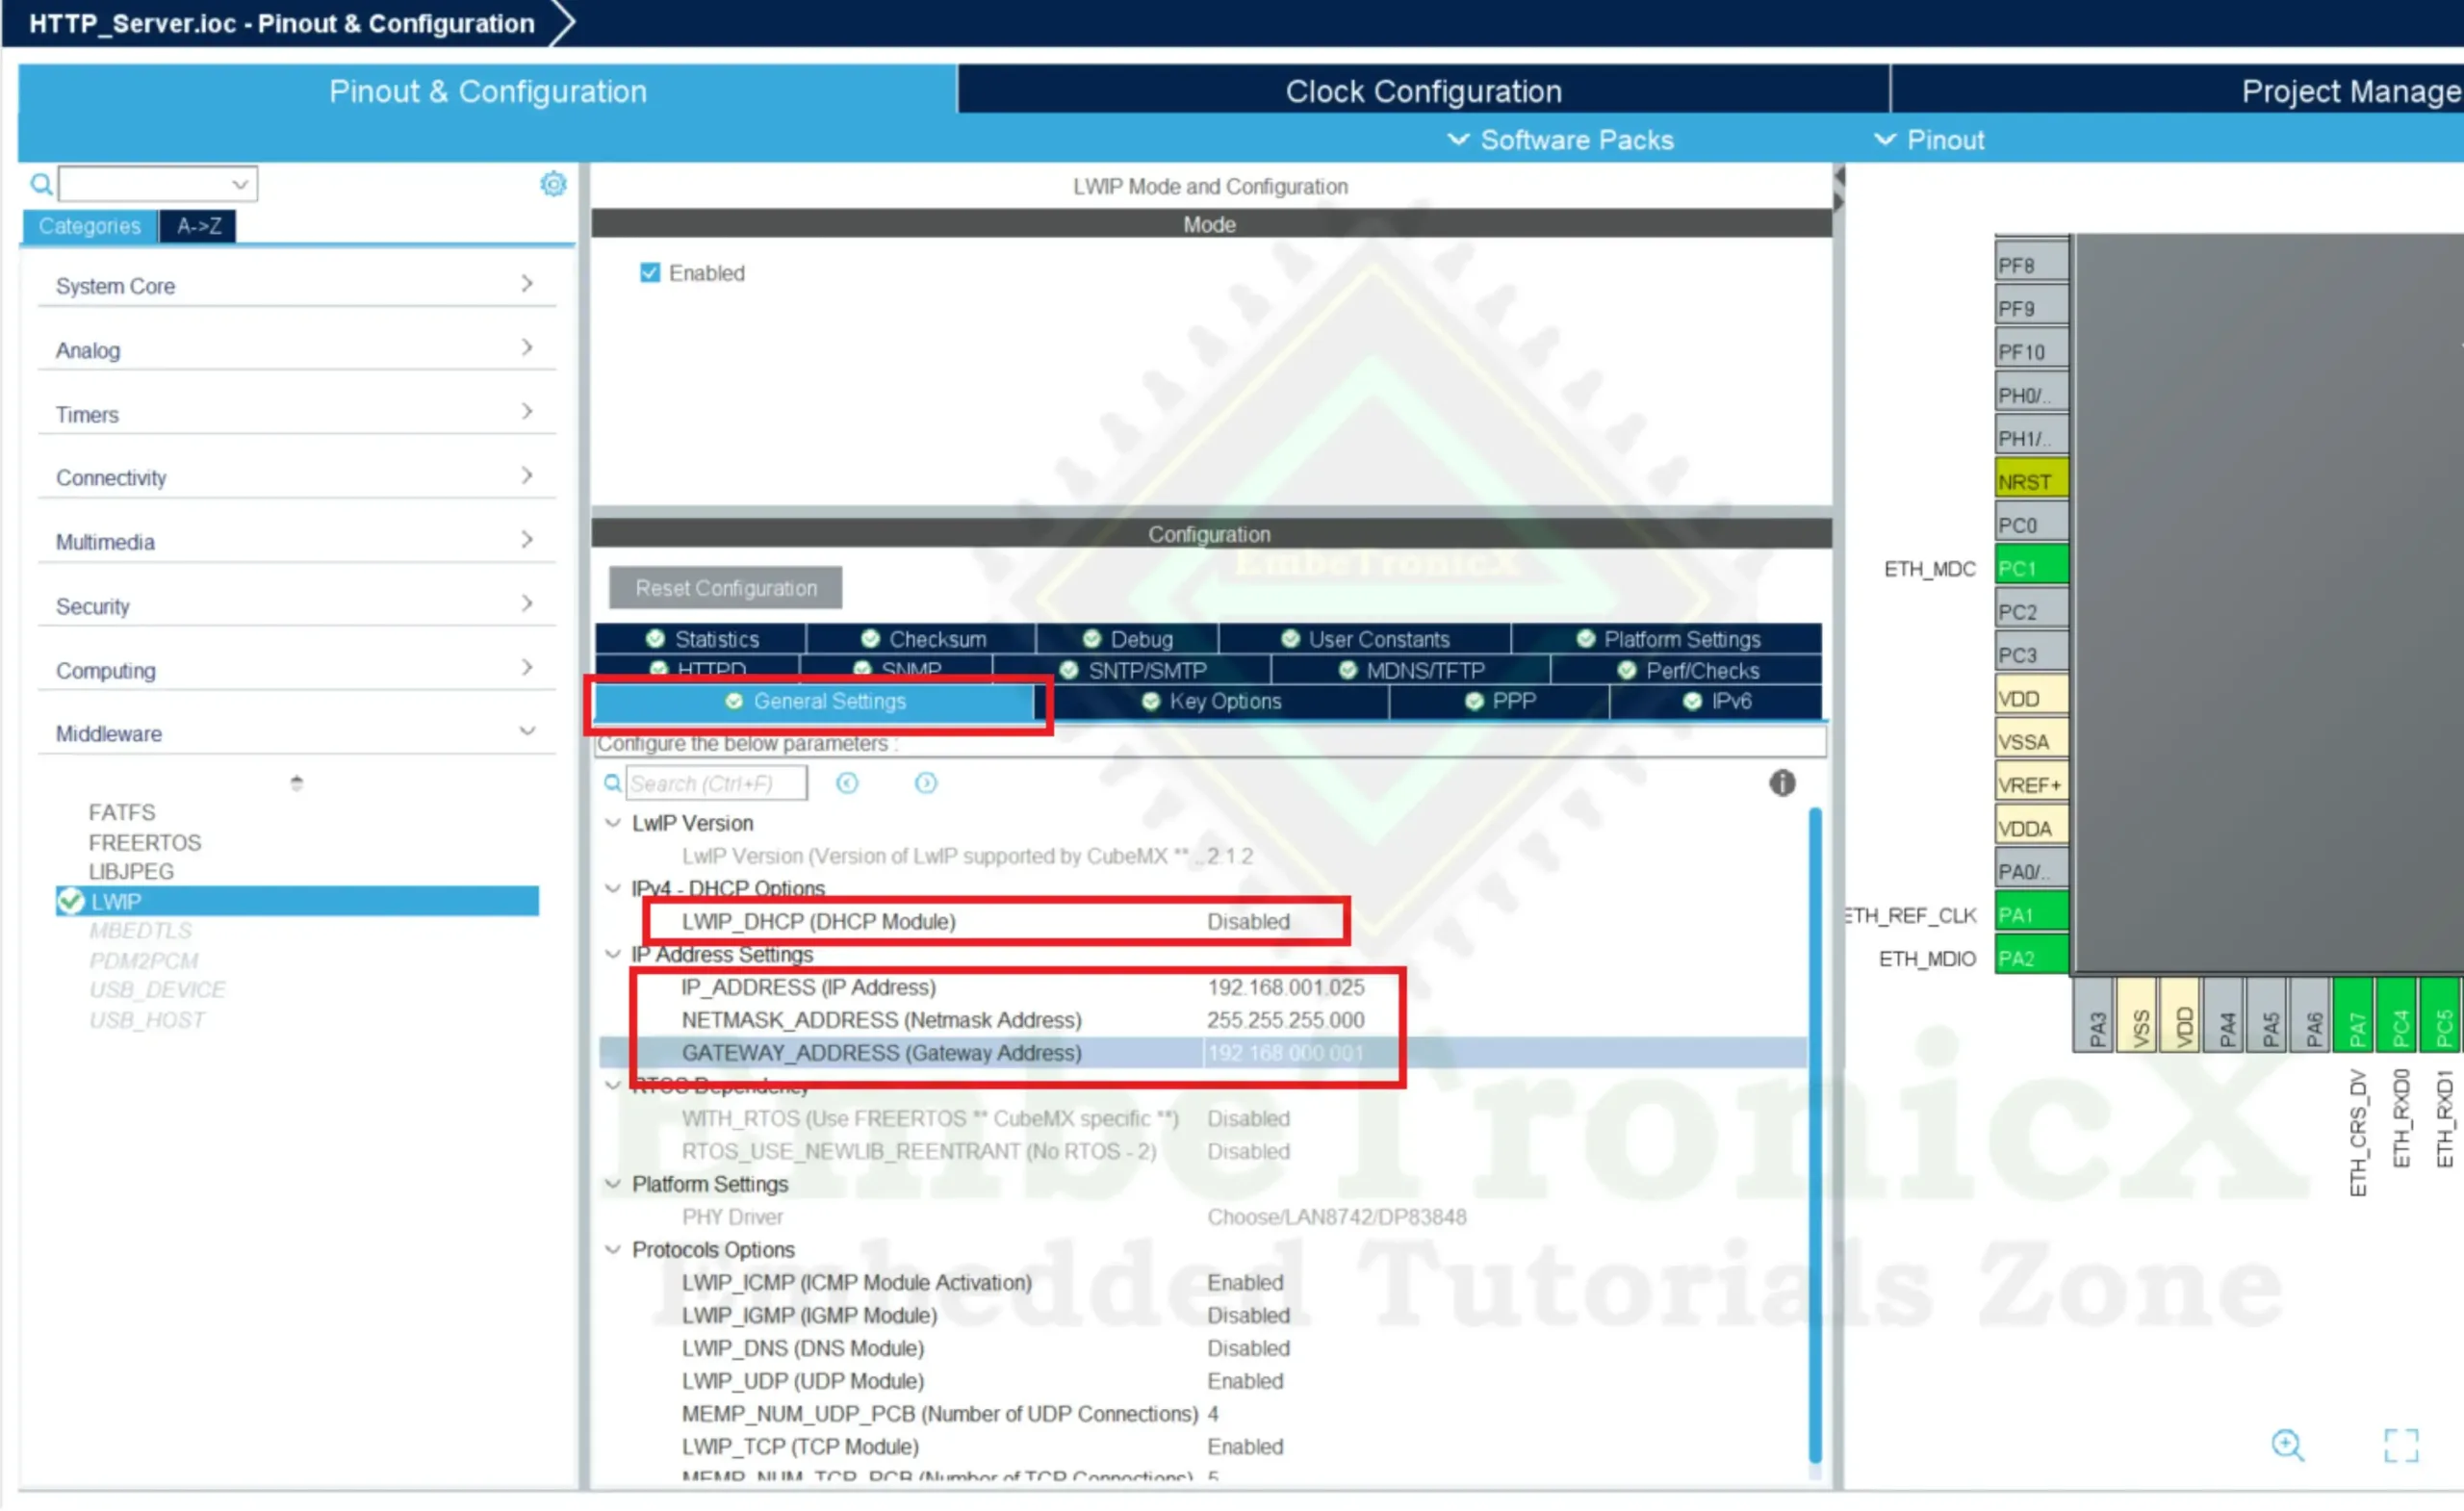
Now our IP address is 192.168.1.25. Then click the HTTPD and enable the LWIP_HTTPD. Refer to the below image.

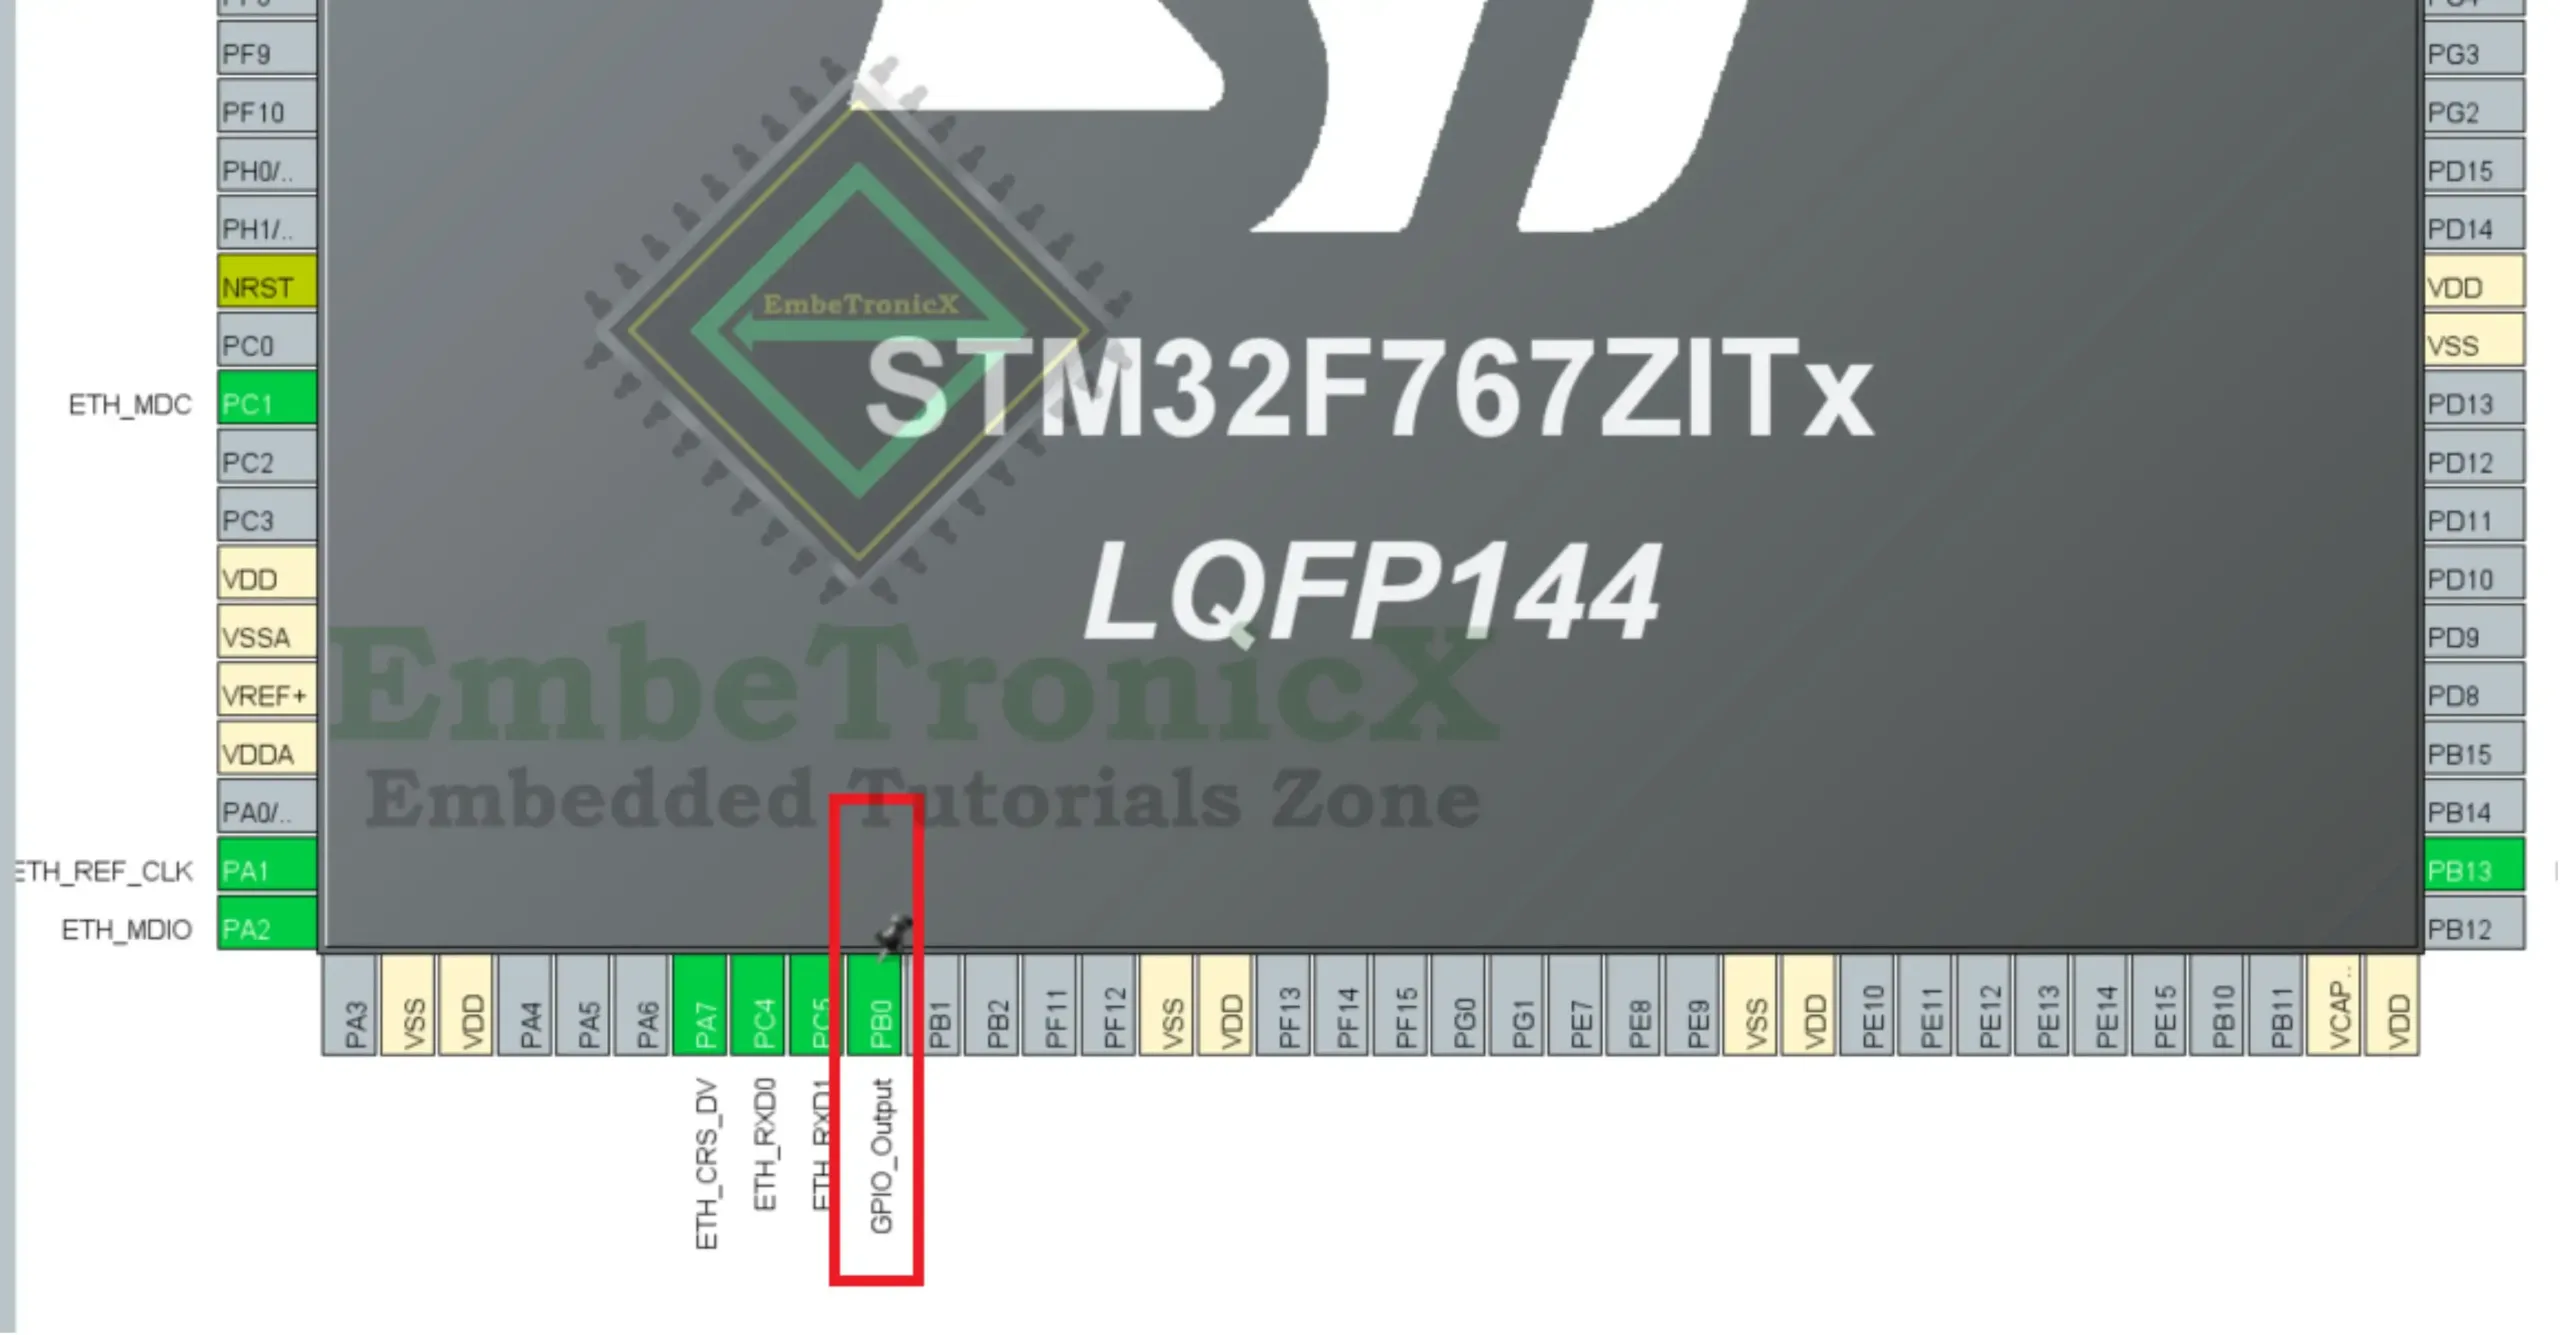
We are going to use the User LED for blinking. So, enable the PB0 pin as GPIO Output. Refer to the below image.
|
|
|
Now, click the Clock Configuration. The clock is not configured properly. It is asking me to run the automatic clock issue resolver. Click Yes (If you don’t want to set it manually). You can setup manually also based on your project. Refer to the below image.
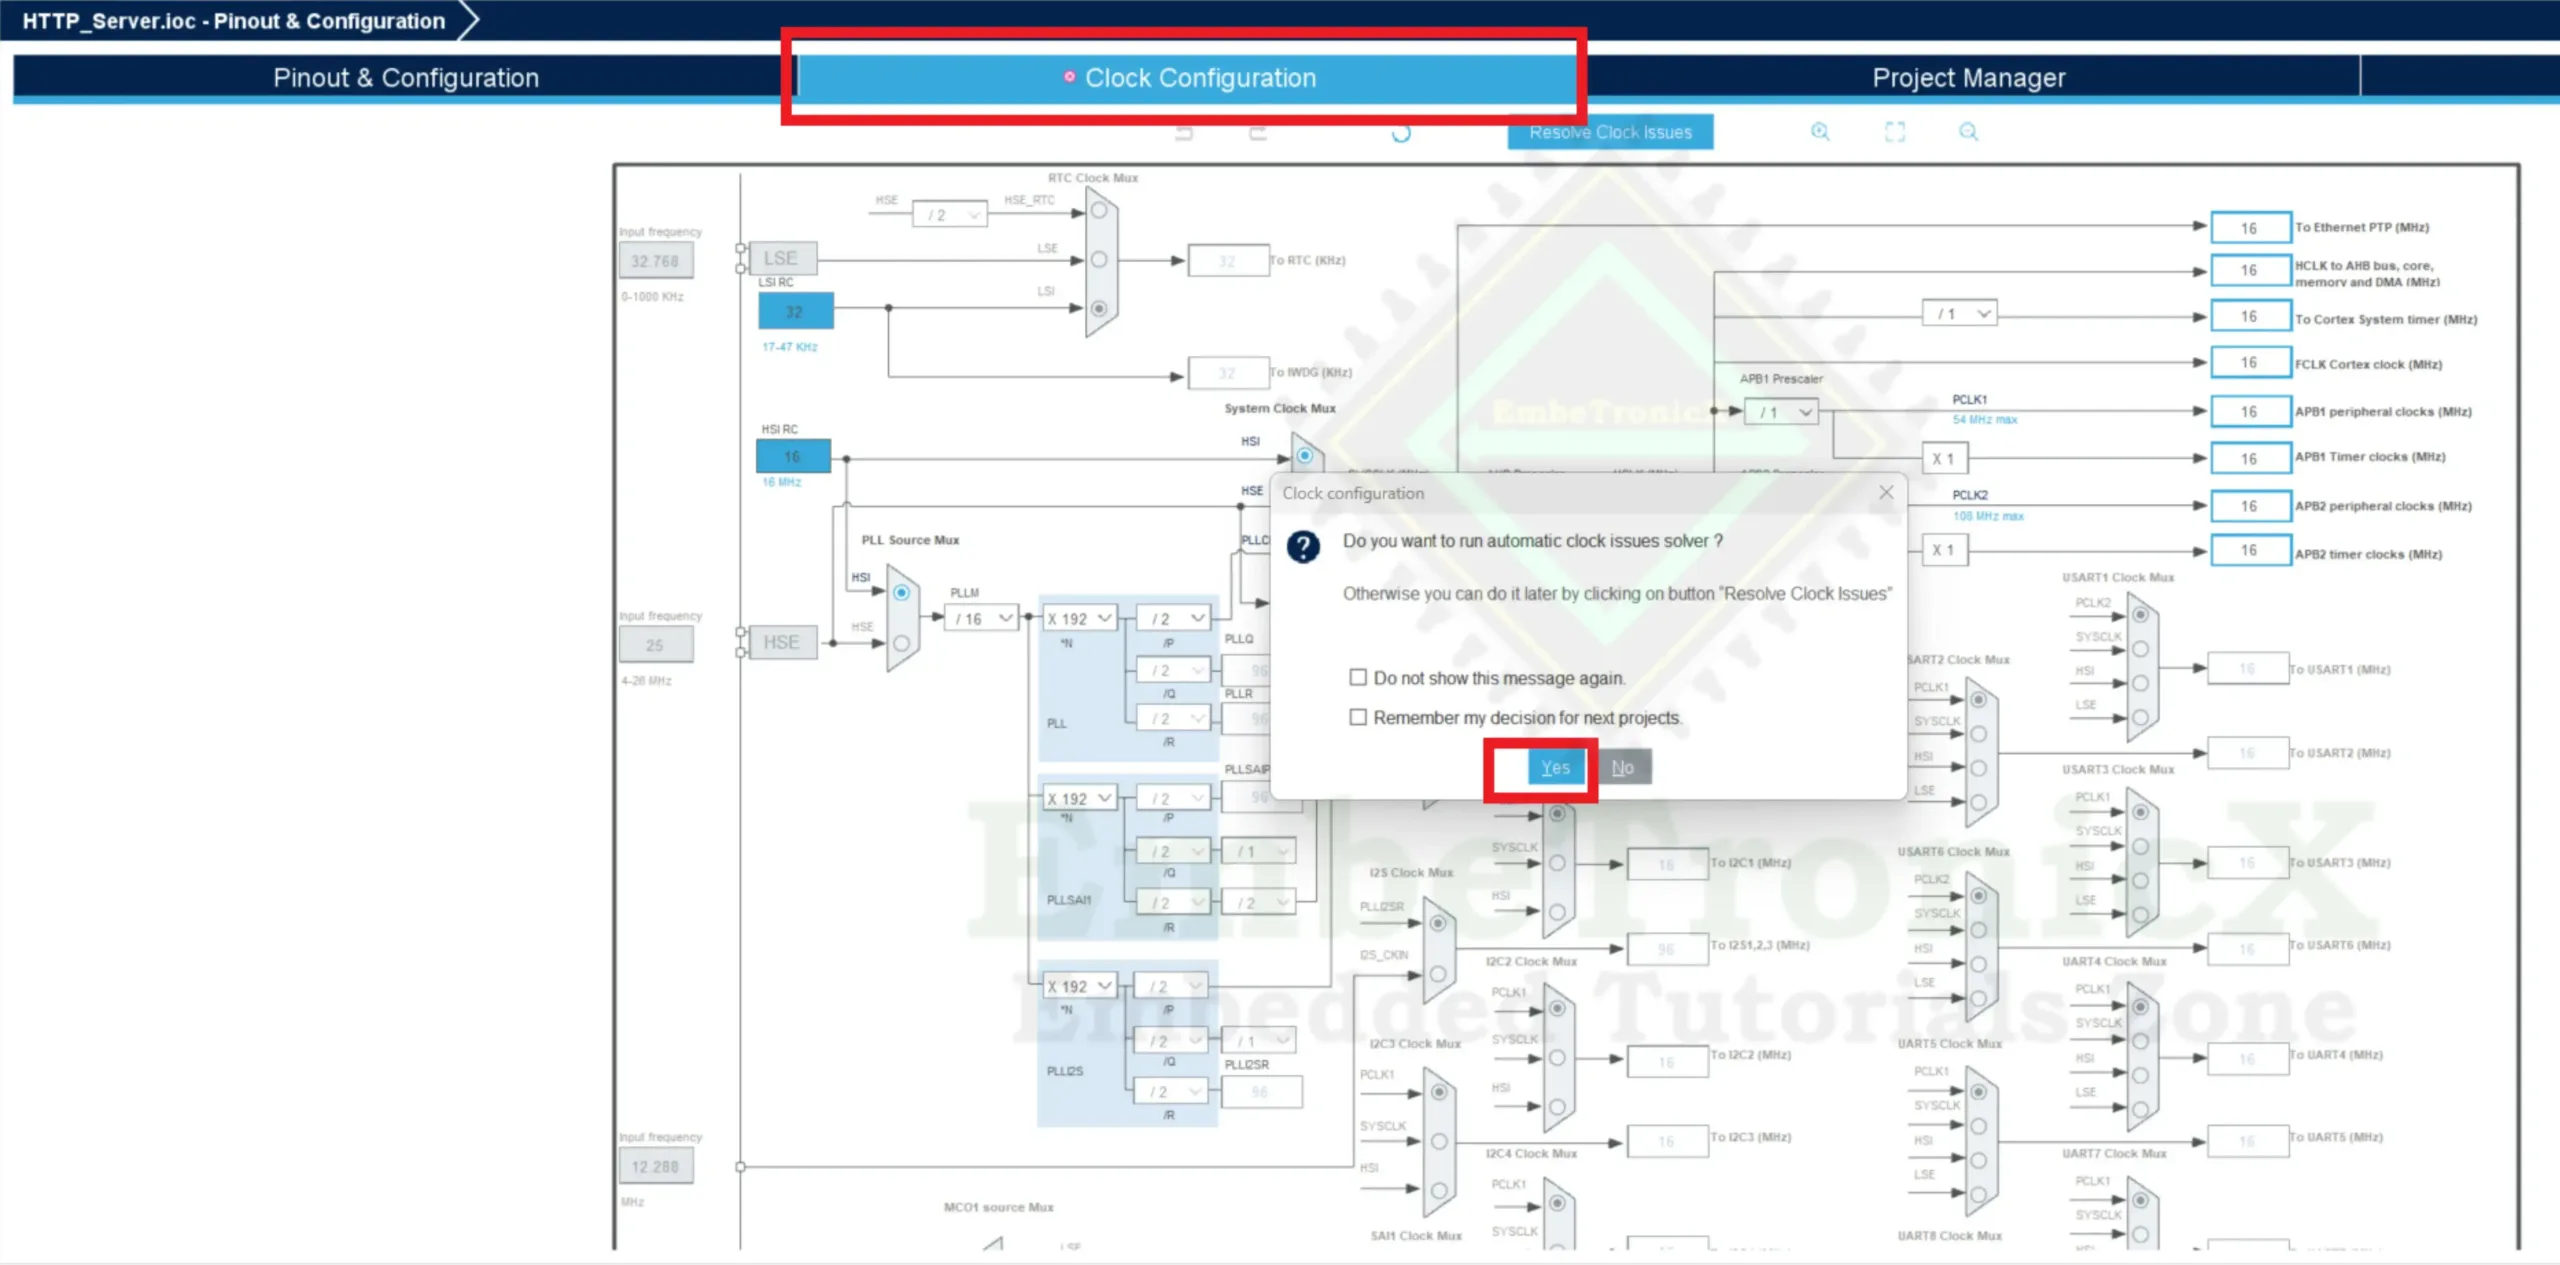
It has resolved the clock issues automatically. That’s it. We have configured it. Save this ioc file and it will auto-generate the code for us. You can see the video explanation here if you are confused.
Note: This project was setup with STM32CubeMx V6.6.1 using STM32Cube FW_F7 V1.17.0.
Source Code – STM32 Ethernet Example
Add the below code to the main.c file between USER CODE BEGIN Includes and USER CODE END Includes).
You can get the entire project code from GitHub.
|
|
|
/* USER CODE BEGIN Includes */
#include "lwip/apps/httpd.h"
/* USER CODE END Includes */
Add the below code between USER CODE BEGIN 2 and USER CODE END 2. This code will initialize the HTTP server.
  /* USER CODE BEGIN 2 */
  httpd_init();
  uint32_t count = 0;
  /* USER CODE END 2 */
Add the below code between the while (1) and USER CODE END WHILE. This MX_LWIP_Process() function process the HTTP server. And to know that process is running perfectly without any issues, we are toggling the PB0 LED every 10000 times.
  /* USER CODE BEGIN WHILE */
  while (1)
  {
    MX_LWIP_Process();
    count++;
    if( count >= 10000)
    {
      HAL_GPIO_TogglePin(GPIOB, GPIO_PIN_0 );    //Green LED Toggle
      count = 0;
    }
    /* USER CODE END WHILE */
Now build the source code.
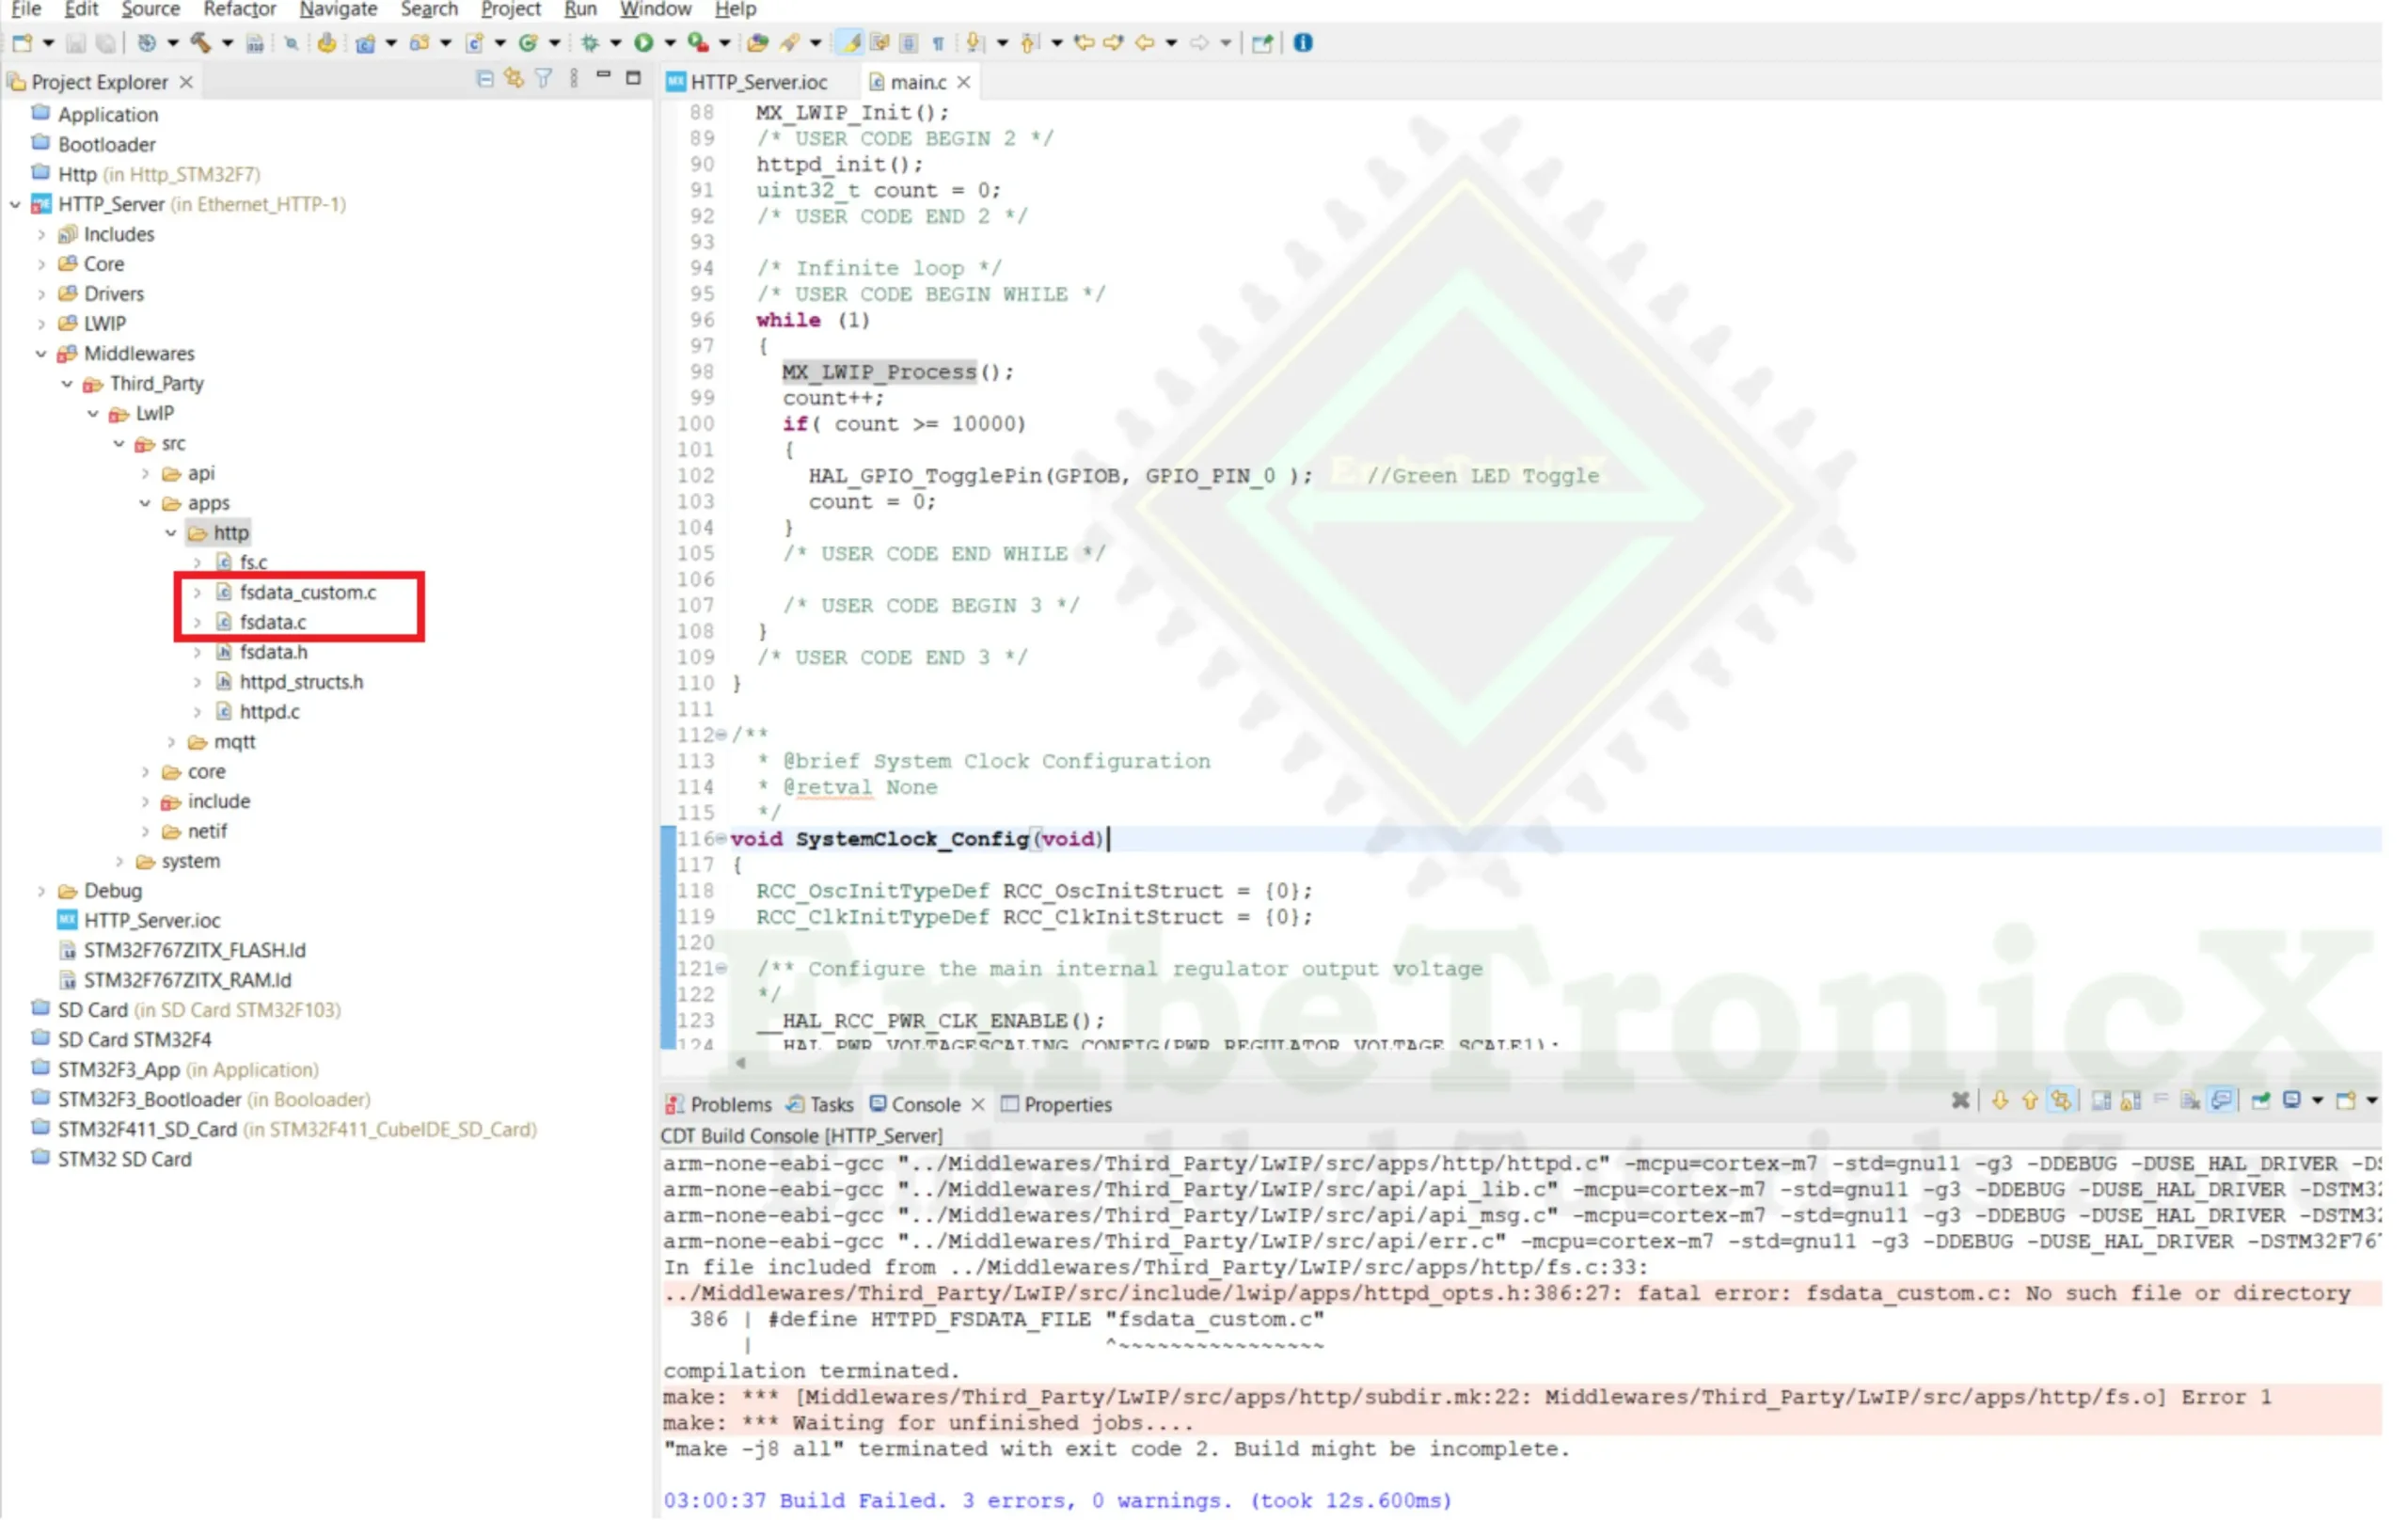
You will get the error called “/Middlewares/Third_Party/LwIP/src/include/lwip/apps/httpd_opts.h:386:27: fatal error: fsdata_custom.c: No such file or directory“. We will have to generate this file based on our webpage. Now we will do that.
MakeFsData
Download this zip file and extract it. To run this makefsdata.pl, we need to install Perl on our machine. Download and install Perl from the official website.
|
|
|
Then open the command terminal and run the following command under the extracted directory.
perl makefsdata.pl
You should get the output like below and it should generate the fsdata_custom.c and fsdata.c files.
perl makefsdata.pl
opening root directory, found the following files and all subdirectories to process:
  404.html index.html


Starting convert files to arrays process:
  Adding file: 404.html
  /404.html, Bytesread = 1745

  Adding file: index.html
  /index.html, Bytesread = 1413
Now we have fsdata_custom.c and fsdata.c files. Copy that and add those files to the Middlewares –> Third_Party –> LwIP –> Src –> apps –> HTTP. Refer to the below image.
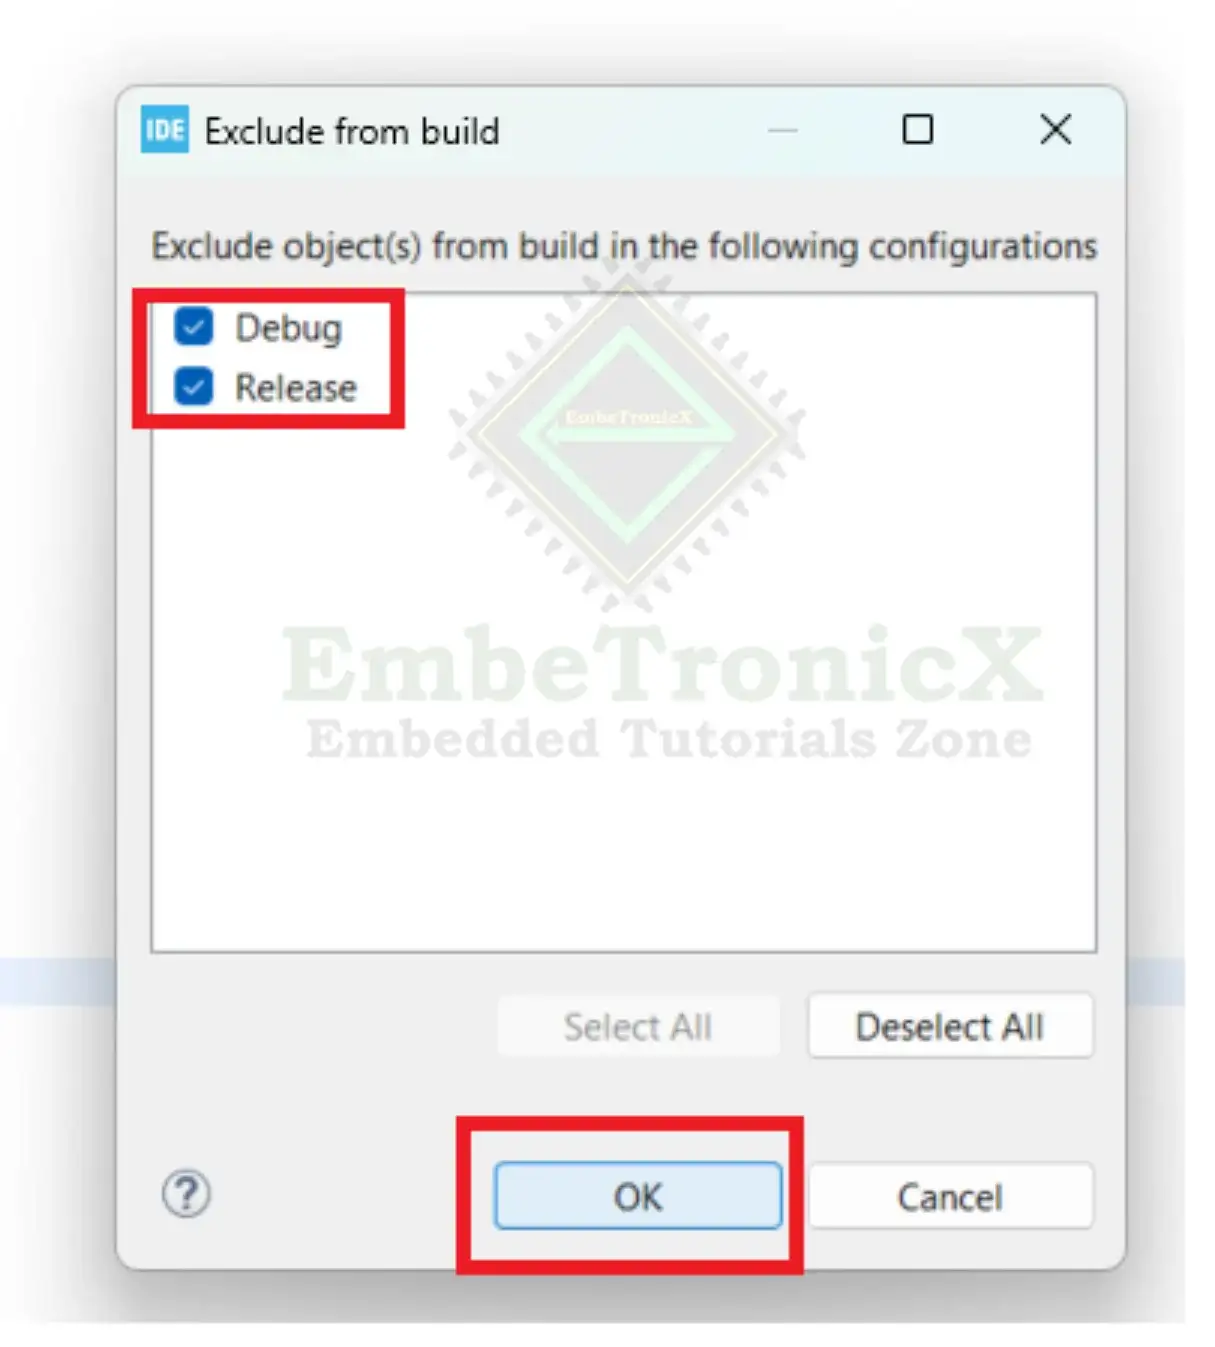
fsdata_custom.c and fsdata.cNow we will exclude those two files from the build. Select those two files and right-click. Then click Resource configurations –> Exclude from build. Refer to the below image.

Now select Debug and Release then click OK. Refer to the below image.
|
|
|
That’s it. Now build the project. There should not be any errors. Flash the bin file to the STM32F767Zi.
Connection
Connect the LAN cable (RJ45 cable) to the STM32F7 and Router. Now, ensure your machine or mobile is connected to the same router through wifi or ethernet cable. Refer to the below image.
Note: Ensure that the jumpers are connected in JP6 and JP7 in the STM32F767Zi Nucleo board.
STM32 Ethernet Demo
Now restart the STM32F7 Necleo. You should see the LED is blinking fastly. Then when you access this “192.168.1.25” from your browser, you should see the webpage. When you access the “192.168.1.25/test“, you should see the 404 error page. We have added only two HTML pages. You can add many pages to the fsdata_custom.c and fsdata.c files by using this process. Please check the below video demo.
Video Explanation
In our next tutorial, we are going to see how to control the LEDs in the STM32 Nucleo board using HTTP CGI.
|
|
|
Please read the other STM32 Tutorials.
You can also read the below tutorials.
Embedded Software | Firmware | Linux Devic Deriver | RTOS
Hi, I am a tech blogger and an Embedded Engineer. I am always eager to learn and explore tech-related concepts. And also, I wanted to share my knowledge with everyone in a more straightforward way with easy practical examples. I strongly believe that learning by doing is more powerful than just learning by reading. I love to do experiments. If you want to help or support me on my journey, consider sharing my articles, or Buy me a Coffee! Thank you for reading my blog! Happy learning!
