
We wanted to explore the Zephyr RTOS using the ESP32 Nucleo board. We will be providing the Zephyr RTOS tutorials using this Zephyr RTOS – ESP32 Tutorial Series. This post will help you to setup Zephyr RTOS for ESP32 (Getting Started Zephyr RTOS) and we will run the basic Helloworld program.
You can also read the FreeRTOS Tutorials, STM32 CMSIS RTOS Getting started, STM32 Bootloader tutorials, and NuttX RTOS Tutorials.
Table of Contents
Setup Zephyr RTOS for ESP32
Prerequisites
If you want to know about the RTOS and how it is working, then please read the below posts first.
Hardware Required
- ESP32 board
- Ubuntu machine or Windows machine with VirtualBox
Introduction
Whenever people talk about RTOS, mostly they used to talk about FreeRTOS, uCOS, Keil RTX, RT Linux, VxWorks, etc. In recent days, we have been hearing about the NuttX RTOS sand Zephyr RTOS here and there. We have posted the NuttX RTOS already. Now we will see the Zephyr RTOS.
What is Zephyr RTOS?
The Zephyr Project, is an open-source RTOS, by the Linux Foundation. It is a scalable real-time operating system (RTOS) supporting multiple hardware architectures, optimized for resource-constrained devices, and built with security in mind.
|
|
|
As a Linux Foundation-hosted collaborative effort, the Zephyr ProjectTM unites leaders from across the tech industry in pursuit of the improvement of IoT device performance and interoperability.
![]()
The Zephyr OS is based on a small-footprint kernel designed for use on resource-constrained systems: from simple embedded environmental sensors and LED wearables to sophisticated smart watches and IoT wireless gateways.
The Zephyr kernel supports multiple architectures, including ARM Cortex-M, Intel x86, ARC, Nios II, Tensilica Xtensa, and RISC-V, and a large number of supported boards.
We can expect common kernel features like threads, semaphores, etc. than other RTOSes provide. Zephyr RTOS might become the first open-source, safety-certified RTOS ever.
|
|
|
Key features of Zephyr RTOS
As more and more vendors bring new IoT systems to market, consumers will start finding it difficult to connect (and use) all different devices together. A scalable, open platform like Zephyr mitigates this problem by making it easier for developers to build interoperable IoT applications across a range of device types. This means that, for example, your thermostat will be able to communicate with your security camera, which will be able to communicate with your smart home hub, which will be able to communicate with your smartphone.
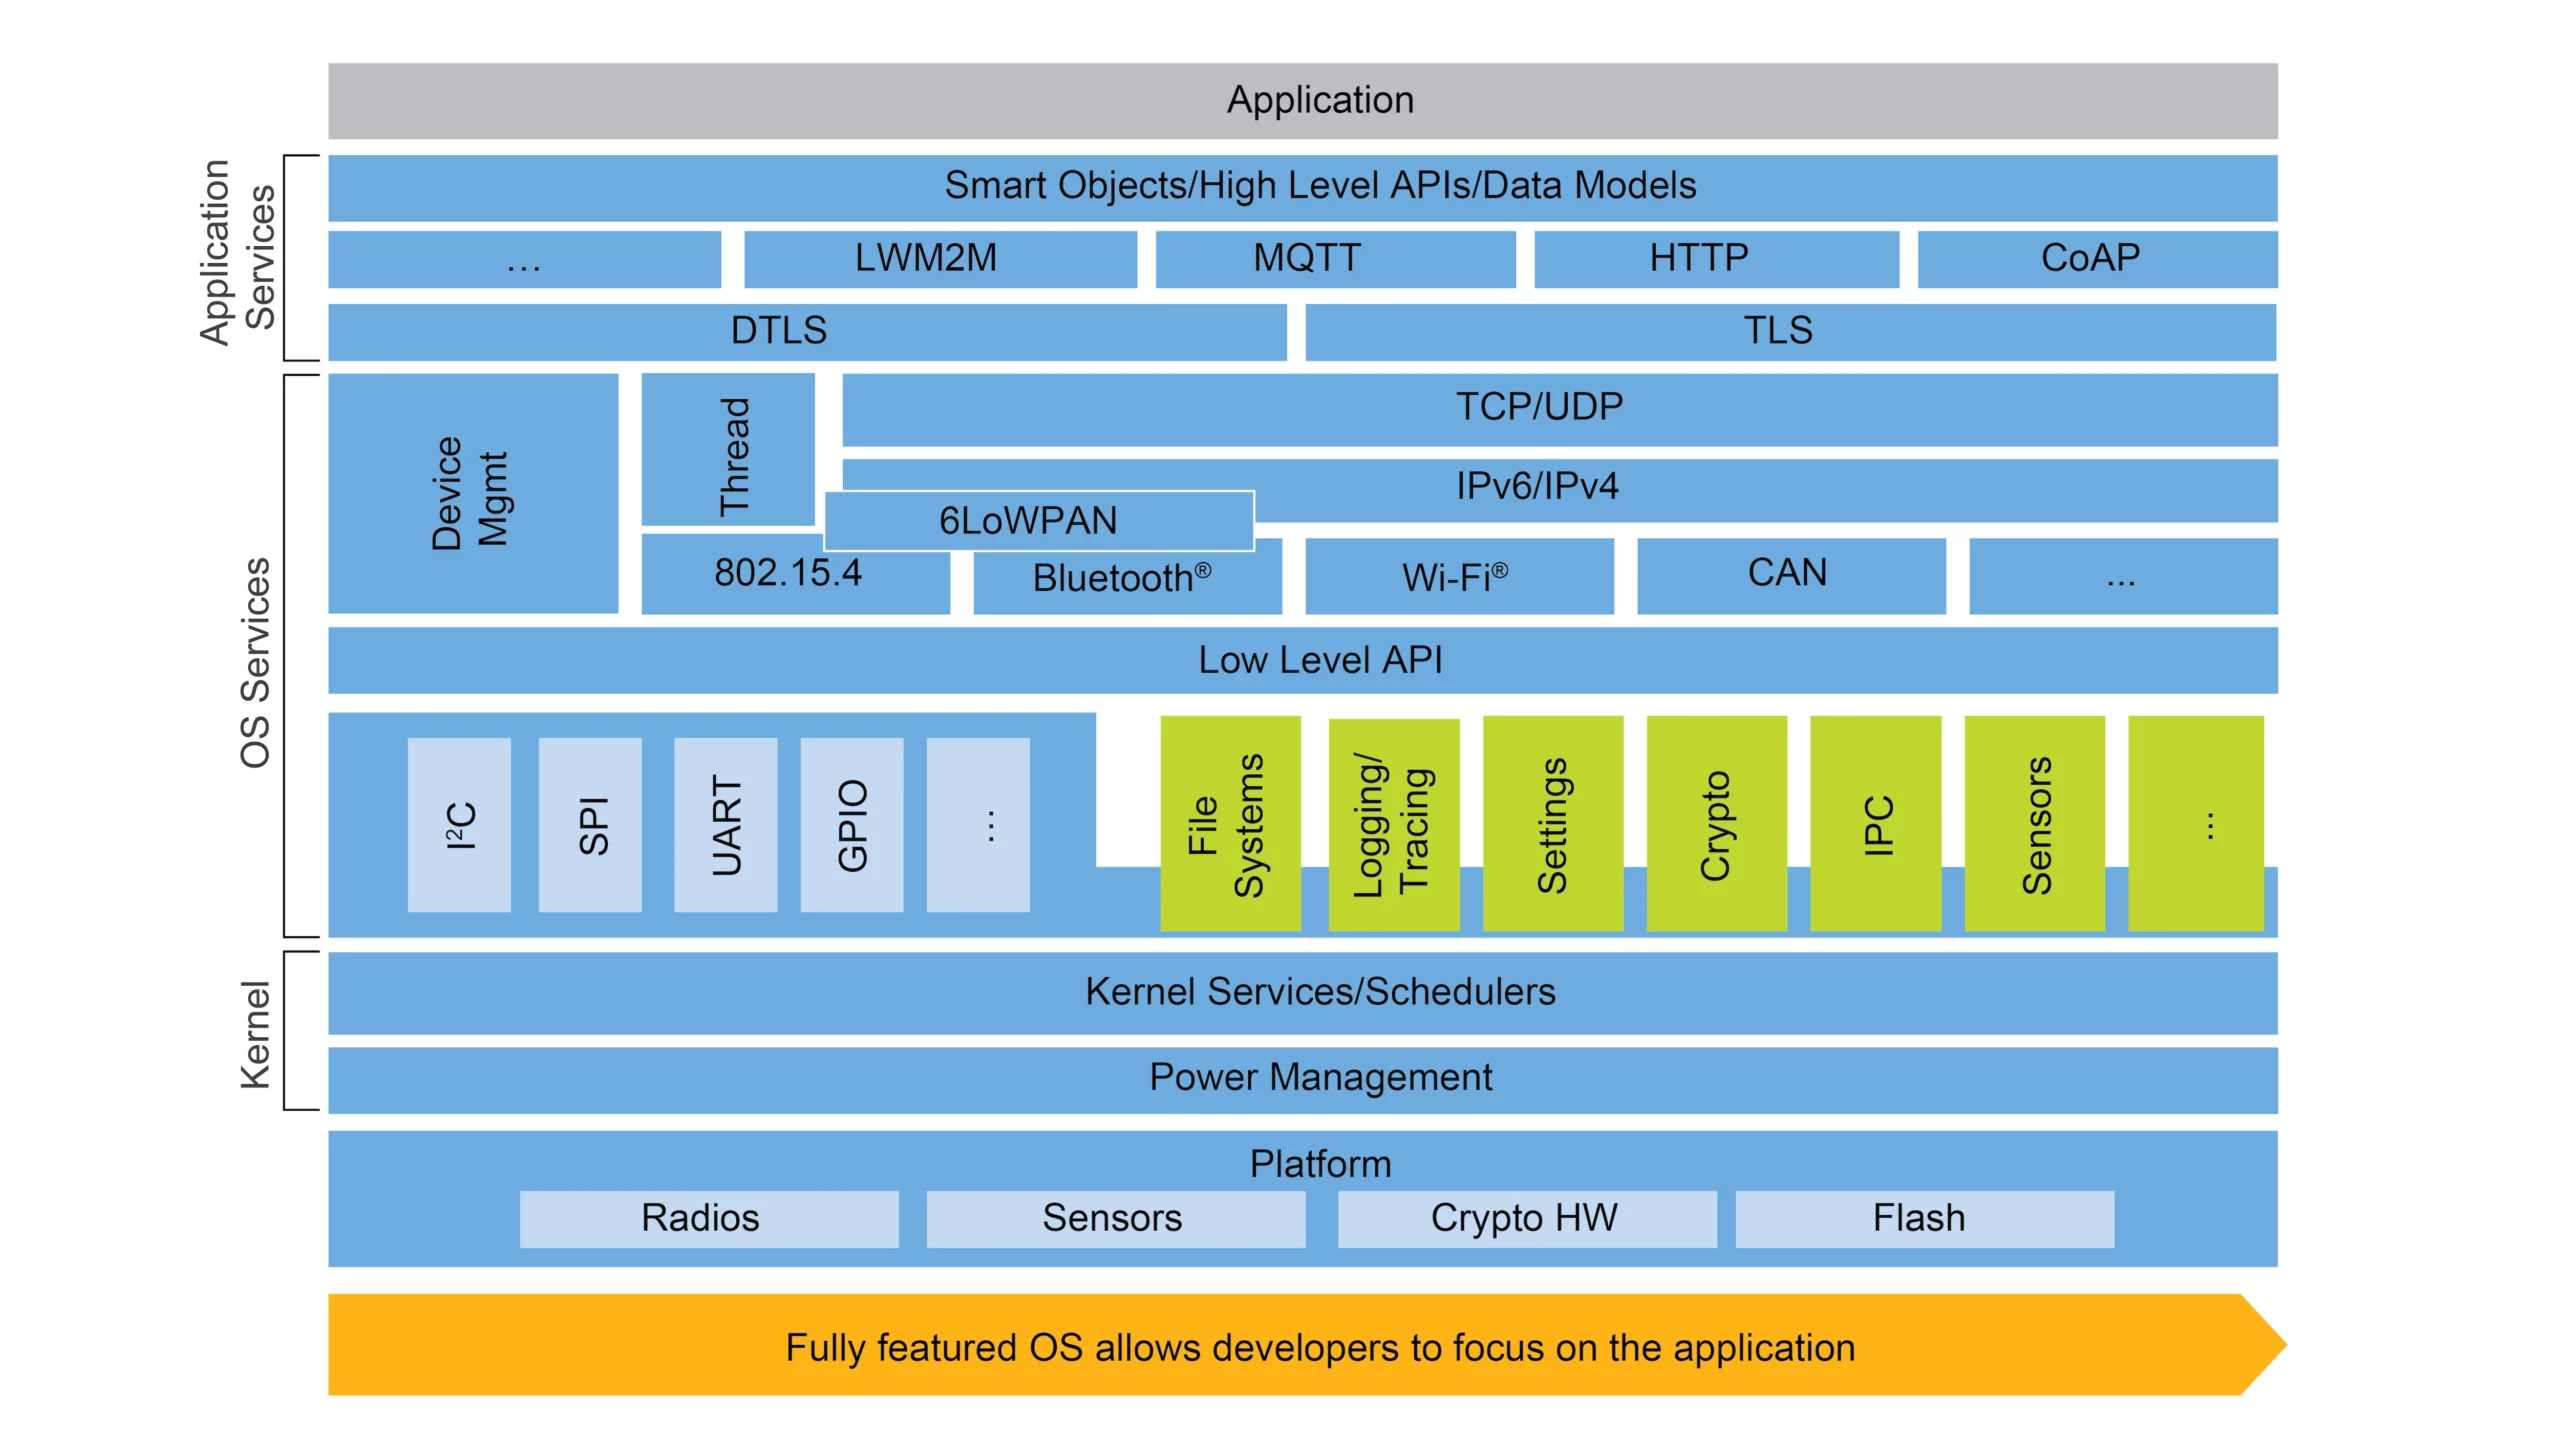
[Image source – NXP]
- Open-source real-time operating system
- Extensive suite of Kernel services
- Multiple Scheduling Algorithms
- Highly configurable / Modular for flexibility
- Cross Architecture
- Memory Protection
- Compile-time resource definition
- Optimized Device Driver Model
- Devicetree Support
- Bluetooth Low Energy 5.0 support
- Native Linux, macOS, and Windows Development
- Virtual File System Interface with LittleFS and FATFS Support
- Product development ready
- Includes security updates
You can read the complete details here.
If you want to contribute to the Zephyr RTOS, you can check this page.
|
|
|
Setup Zephyr RTOS for ESP32
Zephyr has excellent documentation and a complete System Development Kit (SDK). You can always refer to the official documentation page if you need any clarification.
You can also go through the video explanation.
In this tutorial series, we will be using the ubuntu machine as a host machine. If you don’t have the Ubuntu machine, then install the VirtualBox in your windows machine and install the Ubuntu OS. You can check out the official page for Windows setup if you don’t want to use Ubuntu. Let’s get started.
Update the system
Open up a terminal window and issue the below commands.
sudo apt update
sudo apt upgrade
Install dependencies
Download, inspect and execute the Kitware archive script to add the Kitware APT repository to your sources list.
|
|
|
wget https://apt.kitware.com/kitware-archive.sh
sudo bash kitware-archive.sh
Then install the required applications using the below command.
sudo apt install --no-install-recommends git cmake ninja-build gperf ccache dfu-util device-tree-compiler wget python3-dev python3-pip python3-setuptools python3-tk python3-wheel xz-utils file make gcc gcc-multilib g++-multilib libsdl2-dev picocom
Get Zephyr and install Python dependencies
As of now, we should have installed the CMake, python, and Devicetree compiler.
Now we will install the westand add that to the environment variable using the below commands.
pip3 install --user -U west
echo 'export PATH=~/.local/bin:"$PATH"' >> ~/.bashrc
source ~/.bashrc
Let’s get the Zephyr source code using the west. Run the below commands.
west init ~/zephyrproject
cd ~/zephyrproject
west update
west zephyr-export
Now, we will install Zephyr’s additional python requirements by running Zephyr’s scripts/requirements.txt.
|
|
|
pip3 install --user -r ~/zephyrproject/zephyr/scripts/requirements.txt
Install a Toolchain
Note: If you want to setup zephyr OS for STM32, then please follow these steps.
The ESP32 toolchain xtensa-esp32-elf is required to build the application. We will install the toolchain by using the below command.
west espressif install
This process will take some time based on your internet speed.
Once we install the toolchain, we need to set some environment variables. By default, the toolchain will be installed to the “${HOME}/.espressif/tools/zephyr/xtensa-esp32-elf“. So use the below commands to set the required environment variables.
export ZEPHYR_TOOLCHAIN_VARIANT="espressif"
export ESPRESSIF_TOOLCHAIN_PATH="${HOME}/.espressif/tools/zephyr/xtensa-esp32-elf"
export PATH=$PATH:$ESPRESSIF_TOOLCHAIN_PATH/bin
Note: you need to run the above three commands (Set the toolchain path) every time you newly open a terminal.
|
|
|
Finally, retrieve required submodules to build this port. This might take a while for the first time.
west espressif update
west update
We are all set. Let’s build the HelloWorld source code.
Build Sample Helloworld Program
Let’s go to the source code directory. Then we can build the source code by using the below command.
cd ~/zephyrproject/zephyr
west build -p auto -b <your-board-name> samples/hello_world/
In the above command, you can replace the <your-board-name> to your development board. For example, We are using the ESP32 board. So, we will replace the <your-board-name> to esp32. Refer to the below command.
west build -p auto -b esp32 samples/hello_world/
Flash the Helloworld
Before you flash the code, connect the ESP32 board to the machine. Then run the below command and press the reset button if required.
|
|
|
west flash
Run the Helloworld
We can check the output using the picocom. Run the below command and press the RESET button (EN Button).
picocom -b 115200 /dev/ttyUSB0
You should get the output like the below image.

Video Explanation and Output
[Will be added soon]
You can also read the below tutorials.
|
|
|
Reference(s):
- https://docs.zephyrproject.org/latest/getting_started/index.html
- https://docs.zephyrproject.org/2.6.0/boards/xtensa/esp32/doc/index.html
Embedded Software | Firmware | Linux Devic Deriver | RTOS
Hi, I am a tech blogger and an Embedded Engineer. I am always eager to learn and explore tech-related concepts. And also, I wanted to share my knowledge with everyone in a more straightforward way with easy practical examples. I strongly believe that learning by doing is more powerful than just learning by reading. I love to do experiments. If you want to help or support me on my journey, consider sharing my articles, or Buy me a Coffee! Thank you for reading my blog! Happy learning!
